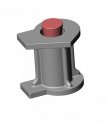
I pulled the speedo apart to make the "paperclip" mod to my button. When I got it apart, the previous owner must have tried to fix it and the "push rod" that breaks was missing. Scrap that mod, come up with new mod I had been contemplating. Works like a champ. May try and draw it up for a 3d printer, or if somebody else with better drawing skills want to, here is the idea. 2 peices, drop in, no glue or fabrication. These are very crude prototypes Here is the fitment. This is held in place by the white plastic it fits into and the outside of the speedo housing once assembled. The pin is just made out of a golf tee, and the plastic part used to have copper wire wound around it. I am looking for other items that would work, but I think a 3d printed part would be more precision and look better. I originally was going to glue it, but it seems to stay in place just nice. The T is light, and the switch button is plenty strong to operate it. More food for thought for those tempted to fix the selector button.
Thanks to danketchpel's mad cad/3d modeling skills, it's almost done. Going to see if I can print up the first ones and see how they fit.
What are you going to do with the pushrod? It was previous discussed that a solution which rests on the button on the circuit board might cause premature failure of the actual button. I was thinking maybe a couple of mm of foam to keep the pushrod from always sitting on the pin, or a small spring that would hold the pushrod 1mm off the button until it was pressed ?
The concern is good, and was addressed and examined the very first time I tried it. The micro switch has a very stout spring in it. The pin weighs nearly nothing. If a person wanted to, the pusher rod could be made with a shoulder for a small plastic spring. Metal might cause issue, but a plastic laminate/layer/washer on the switch (cut hole for button) could be a solution. Finding the right diameter "Click Pen" spring would be fun. I think depressing the button is going to cause more wear than the pin floating on the switch. The switch itself is not a switch per se, but rather a contact that pulses the dash through function. https://www.sparkfun.com/products/97 http://tymkrs.tumblr.com/post/19734219441/the-four-pin-switch-hooking-it-up The rubber button that you push preloads the pin, so rattling does not happen. If you add another spring or cushion it is redundant as it is all built right into the switch. Even with the preload, the button has distinct click that will not activate with bouncing. The original design preloads the switch worse than the "floating" pin. Lifting the pin will interfere with the "travel" of the pin, which is already limited some by the rubber button on top. In my first try, I can toggle using gloves. I haven't buttoned this one up yet, getting more accurate dimensions for the finished product. Adding more pressure could cause issue with the circuit board the switch is mounted on. I would not recommend any other parts to this solution, it is being designed to just drop in and work. Trying to keep parts as light as possible (and non conductive), using ABS so that the heat won't warp or melt it.
Any chance I could get one of those from you or have you possibly share the file you used to print it?
Man, I totally forgot about this project. The button works perfectly on both my bikes and my friends. I had a few made up, so yeah, I'll PM ya. Do you need the small torx for speedo disassembly?
Would love to have the file as well. Any chance of an STL or other 3D format file? I'd like to print a few on my own printer as well.
Hello TR650 friends, hope this solution work for the most. This is a thread where we found a couple of solutions, just for cross reference. Please feel free to ask about my repair.