• Husqvarna Motorcycles Made In Sweden - About 1988 and older

  • Hi everyone,

    As you all know, Coffee (Dean) passed away a couple of years ago. I am Dean's ex-wife's husband and happen to have spent my career in tech. Over the years, I occasionally helped Dean with various tech issues.

    When he passed, I worked with his kids to gather the necessary credentials to keep this site running. Since then (and for however long they worked with Coffee), Woodschick and Dirtdame have been maintaining the site and covering the costs. Without their hard work and financial support, CafeHusky would have been lost.

    Over the past couple of weeks, I’ve been working to migrate the site to a free cloud compute instance so that Woodschick and Dirtdame no longer have to fund it. At the same time, I’ve updated the site to a current version of XenForo (the discussion software it runs on). The previous version was outdated and no longer supported.

    Unfortunately, the new software version doesn’t support importing the old site’s styles, so for now, you’ll see the XenForo default style. This may change over time.

    Coffee didn’t document the work he did on the site, so I’ve been digging through the old setup to understand how everything was running. There may still be things I’ve missed. One known issue is that email functionality is not yet working on the new site, but I hope to resolve this over time.

    Thanks for your patience and support!

1983 500 CR Project

Paint or Powder Coat??


  • Total voters
    9
  • Poll closed .

Sutphin

Husqvarna
B Class
I have been hauling this beast around for the last 15 years. And for the last 15 years I have been telling people what a find it was and how lucky I was to have it. Decided to start the project about
3 weeks ago. Motor in a crate next to the bike. The good thing (if there is a good thing...)
paid $100 bucks for it 15 years ago. Maybe I over paid, not sure yet..going to need lots of TLC
and all...all... and then some of my beer money. Oh well..

Got it all tore down..ready to take some parts for paint, frame & swing arm to start.

Question: Paint or Powder Coat??? Have always painted. Hear powder is pretty nice .IMG_0265.JPGIMG_0271.JPGIMG_0276.JPG
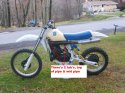
View attachment 22811 I am going to ride her.

I am looking for a left case cover (clutch side) Could use a hand finding one. Thanks. Scott
 
Scott,
Is it a late 83 or an 84? , i see a plastic tank, cause finding a 83 tank maybe as hard a finding a decent side case :eek:.
Good thing is either tank work on that frame. I won't worry about either at the moment, get it cleaned up & look into
what shape the motors in.
As far as powder coating, it's great, just make sure you tell the power coater you need the motor mount holes
& coil mounting location masked or you'll never get a decent electrical ground.

Husky John
 
Hey John,
Thanks..I don't know if its a late or early 83 (DUH...) How can I tell? So.. you would
Powder Coat VS Paint?? I have Forest Stahl doing the moter work for me, The Crank
bearing was gone.....needs a clutch other than that trans is good. What do you think about
a new stator? Andy down in Kentucky told me that a new after market kit works much
better and makes it better for starting and reliability? pricey though..about 5 or 6 hundy.
what do you think??
 
Scott,
What's the frame serial number should CO-1001, motor # 2094, i'd do paint cause i restore mine to race , not for show..
I'd hold off on the stator, til your sure the old one is shot...

John
 
Be sure to check out the following before you paint or powder coat:

1. Look closely at the chain tensioner bracket and make sure it is not too worn.
2. Do the same with the side stand bracket and the chain tension lugs on the back of the swing arm.
3. Make sure the right side - side panel bracket is lined up with the side panel ok.
4. Check out the other side panel fixing points and re-thread / repair if required.
5. Check the subframe is perfectly straight.
6. Remove the swing arm and headstock bearings completely.
7. Get the finisher to mask the frame number off so it is unpainted (if powder coating)
8. Mask the coil mounting, and other parts that will take a lot of effort to clean if you don't!

Apologies if I am mentioning what you already know, but some of the above may be helpful...

Andy
 
Scott,
What's the frame serial number should CO-1001, motor # 2094, i'd do paint cause i restore mine to race , not for show..
I'd hold off on the stator, til your sure the old one is shot...

John
Thanks for all help. My frame and motor number read as you suggest so I'm pretty sure it's an '83.
That was my thought on the stator, could use the money now for other much needed things anyway.
Again, any...tips are appreciated! Thanks.
Scott
 
Be sure to check out the following before you paint or powder coat:

1. Look closely at the chain tensioner bracket and make sure it is not too worn.
2. Do the same with the side stand bracket and the chain tension lugs on the back of the swing arm.
3. Make sure the right side - side panel bracket is lined up with the side panel ok.
4. Check out the other side panel fixing points and re-thread / repair if required.
5. Check the subframe is perfectly straight.
6. Remove the swing arm and headstock bearings completely.
7. Get the finisher to mask the frame number off so it is unpainted (if powder coating)
8. Mask the coil mounting, and other parts that will take a lot of effort to clean if you don't!

Apologies if I am mentioning what you already know, but some of the above may be helpful...

Andy
Thanks Andy,
1.) I was concerned about the chain tensioner bracket, looks like there is a bushing, it's pretty worn. Is this available or will I need to make one?
5.) A little worried about frame. How can I tell?
Again, no sweat on the suggestions. I really do appreciate any and all comments.View attachment 22906IMG_0511.JPGView attachment 22906IMG_0513.JPG
 
Everything is available for these!!!

All parts are in stock, but you can make some parts yourself if you are able. The tube in the chain tensioner is made from Aluminium, with an 'o'ring groove near each end to try and keep some grease between this and the bracket. Look out for the spring wearing the outside of the bracket too. This bracket was designed as a replacement part, and just this week I have welded 3 on for customers! Be sure to position the new lug corrrectly, as even some of the bikes from the factory are placed wrongly. You need to be able to get a 6 m/m socket cap screw past the swing arm leg when bolting it up.
Incedentally, the 'kink' in the front downtube is correct. All the 83/84 frames have this on the 2 strokes only though!
Post up a picture of the swing arm taken from the left side and underneath, and we will give an opinion! Also a view from the very rear of the frame looking forward at where the airbox mounts...
Best of luck.
Andy Elliott.
 
Powder coat traps.
1. Grease runs when you heat it... powdercoating heats it up and it can run so clean it down carefully, degrease the drain holes above the footpegs and in the headstock as well as pushing out the swing arm bearings and cleaning down.

2. Put dummy bolt in all threads. i had to sand back the top shock mounts after coating to fit the shockers on. it puts a solid hard coating on which is great for wear and tear but if its on the wrong spot, it can be a nuisance. I like to powder coat as i take it to the place and a $100+ bucks later im reassembling it.

great project, enjoy doing it.

Thanks Mate.
 
Scott,
What's the frame serial number should CO-1001, motor # 2094, i'd do paint cause i restore mine to race , not for show..
I'd hold off on the stator, til your sure the old one is shot...

John
IMG_0534.JPG

John,
Frame # CO06262 Motor # 2094
 
Everything is available for these!!!

All parts are in stock, but you can make some parts yourself if you are able. The tube in the chain tensioner is made from Aluminium, with an 'o'ring groove near each end to try and keep some grease between this and the bracket. Look out for the spring wearing the outside of the bracket too. This bracket was designed as a replacement part, and just this week I have welded 3 on for customers! Be sure to position the new lug corrrectly, as even some of the bikes from the factory are placed wrongly. You need to be able to get a 6 m/m socket cap screw past the swing arm leg when bolting it up.
Incedentally, the 'kink' in the front downtube is correct. All the 83/84 frames have this on the 2 strokes only though!
Post up a picture of the swing arm taken from the left side and underneath, and we will give an opinion! Also a view from the very rear of the frame looking forward at where the airbox mounts...
Best of luck.
Andy Elliott.

IMG_0563.JPGIMG_0562.JPGIMG_0563.JPGIMG_0562.JPGIMG_0554.JPGIMG_0537.JPG IMG_0563.JPGIMG_0562.JPGIMG_0554.JPGIMG_0537.JPG
 
All looks very good. If you are going to ride it a lot, I would weld on a new tensioner lug, as it is showing signs of wearing thin. If you do, rotate it up towards the camera a little, so you can put the cap screw in from the side.... By the way, I think the swing arm is 84, if it has the lug to push back the tensioner on the right hand side. That is a good thing!
Knock - or drill if it wont come out the alloy bush in the tensioner hole. It is just a 14mm hole right through. http://www.hva-factory.com/frame-fixings/husqvarna-chain-tensioner-assembly Shows all the parts
Subframe looks straight to me, but put a straight edge across the top of the ends of the tubes at the back of the seat - just to be sure before you paint. Good luck with the restoration.

Andy Elliott
 
Hey any posts of a 83 pipe would be helpful....the dude that had mine before me obviously
couldn't weld.....I have a nice gaping hole in my pipe...not sure IMG_0570.JPG what kind of tab was
supposed to be there...
 
Scott,
There's only 2 tabs on the pipe, one near the top of expansion chamber , under the tank & and second that 's rubber mounted
to a frame tab.

Husky John
 

Attachments

  • 84_husky_500CR_pipe mounts.JPG
    84_husky_500CR_pipe mounts.JPG
    167.8 KB · Views: 18
i just used the stock white the pc had, i did my swingarm and forks black for a radical look...not sure it achieved anything!!
 
Back
Top