• Husqvarna Motorcycles Made In Sweden - About 1988 and older

  • Hi everyone,

    As you all know, Coffee (Dean) passed away a couple of years ago. I am Dean's ex-wife's husband and happen to have spent my career in tech. Over the years, I occasionally helped Dean with various tech issues.

    When he passed, I worked with his kids to gather the necessary credentials to keep this site running. Since then (and for however long they worked with Coffee), Woodschick and Dirtdame have been maintaining the site and covering the costs. Without their hard work and financial support, CafeHusky would have been lost.

    Over the past couple of weeks, I’ve been working to migrate the site to a free cloud compute instance so that Woodschick and Dirtdame no longer have to fund it. At the same time, I’ve updated the site to a current version of XenForo (the discussion software it runs on). The previous version was outdated and no longer supported.

    Unfortunately, the new software version doesn’t support importing the old site’s styles, so for now, you’ll see the XenForo default style. This may change over time.

    Coffee didn’t document the work he did on the site, so I’ve been digging through the old setup to understand how everything was running. There may still be things I’ve missed. One known issue is that email functionality is not yet working on the new site, but I hope to resolve this over time.

    Thanks for your patience and support!

Before & After - Rear Fender

schimmelaw

Husqvarna
AA Class
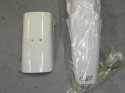
Photo 1: Left - take-off stocker. Right - UFO rear fender for 96' Yamaha YZ250.
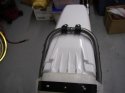
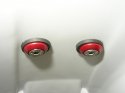
Photo 2: View from the rear.
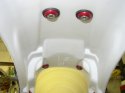
Photo 3: View from the front looking back.
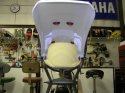
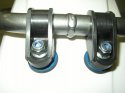
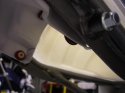
Photo 4: Underside mounting. Seat base and plastic shield will be painted white to match fender. Paint designed for plastic will be used.
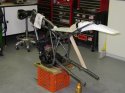
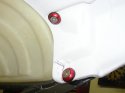
Photo 5: Mounted side view. The "lines" are good (not angled up too high or too low) - and the fender is about 2" longer than stock. An aftermarket under the fender tail light/brake light assembly will be mounted up later.
 

Attachments

  • rear fender 004.jpg
    rear fender 004.jpg
    88.1 KB · Views: 73
  • rear fender 001.jpg
    rear fender 001.jpg
    92.7 KB · Views: 71
  • rear fender 005.jpg
    rear fender 005.jpg
    84.5 KB · Views: 66
  • rear fender 006.jpg
    rear fender 006.jpg
    90 KB · Views: 70
  • rear fender 007.jpg
    rear fender 007.jpg
    89.1 KB · Views: 120
Ya that comes out at a very nice angle with good lines as you said. Did you trim the end of the fender? In shots 2 & 4 it looks like the end's cut shorter, but not in the other views.
 
New Seat pan and seat frame loop? Close up of the seat mount bolts please inside and outside if you don't mind?

Bolt sizes and where did you get the ano washers again?

T
 
Picklito,
No triming on the tip of the fender, as of yet. Waiting on tail light and its location under the fender before any of that. Hope I don't have to trim anything, I want a longer tapered fender.

HuskyT,
Stock seat base, tirelessly cleaned up. Scotch brite, bleach toile ..... bathroom cleaner a go round w/ me in the shower a couple of times. Still stained. Will be painted off in the future along with the plastic filler peice. Powdered original stock loop. I'll get some mounting hardware pics posted up this wkend. Still in ruff mock up. I'll get bolt lengths up then too. Ano washers from Comet Karts Sales.

"Oaklins" - rep promised no more bottoming out and I bought into it.

Motard conversion progressing.

Rick
 
HuskyT,

Photo1: Top side of back fender mount. Rubber fender washer sandwiched by fender and blue ano spacer. Spacer is a Honda xr650r fender part which recently got plated. 6x1 nylock flange nut. New rubber from Phillip in AZ.

Photo 2: Right side seat attachment bolt and upper inner mount. Seat bolt is ssteel 6x50 flat head allen. All of the other mounting bolts are 6x30, also ssteel flat head allens. Ano conical washer, rubber washer. Still so trimming to do - blk marks.

Photo 3: Business end. There will be a tailight back up in here eventually. Note stained seat base - uggggggggly! No way to get that white again. Too old. Too neglected. There is a plan for that. It will all be white post seat rebuild. Just used the two upper mounting holes to mount the fender not all four.

Photo 4: Just a good look.

Photo 5: Right side seat nut - 6x1 nylock flange bolt. Left hand side seat mount bolt. Note triming marks on that side - needed for looks and silencer mounting clearance.

I'm shooting for a completely rubber mounted rear fender setup. There are still a few issues to deal w/ but it is mounted, its sturdy/solid, cheaper than the $35.00-$40.00 I have seen the repos go for, a good platform for the rear light assembly and finally, I had fun w/ it.

Rick
 

Attachments

  • rear fender hardware 006.jpg
    rear fender hardware 006.jpg
    90.1 KB · Views: 32
  • rear fender hardware 004.jpg
    rear fender hardware 004.jpg
    77.8 KB · Views: 33
  • rear fender hardware 002.jpg
    rear fender hardware 002.jpg
    82.7 KB · Views: 36
  • rear fender hardware 001.jpg
    rear fender hardware 001.jpg
    91.4 KB · Views: 31
  • rear fender hardware 007.jpg
    rear fender hardware 007.jpg
    88.6 KB · Views: 39
Back
Top