• Husqvarna Motorcycles Made In Sweden - About 1988 and older

  • Hi everyone,

    As you all know, Coffee (Dean) passed away a couple of years ago. I am Dean's ex-wife's husband and happen to have spent my career in tech. Over the years, I occasionally helped Dean with various tech issues.

    When he passed, I worked with his kids to gather the necessary credentials to keep this site running. Since then (and for however long they worked with Coffee), Woodschick and Dirtdame have been maintaining the site and covering the costs. Without their hard work and financial support, CafeHusky would have been lost.

    Over the past couple of weeks, I’ve been working to migrate the site to a free cloud compute instance so that Woodschick and Dirtdame no longer have to fund it. At the same time, I’ve updated the site to a current version of XenForo (the discussion software it runs on). The previous version was outdated and no longer supported.

    Unfortunately, the new software version doesn’t support importing the old site’s styles, so for now, you’ll see the XenForo default style. This may change over time.

    Coffee didn’t document the work he did on the site, so I’ve been digging through the old setup to understand how everything was running. There may still be things I’ve missed. One known issue is that email functionality is not yet working on the new site, but I hope to resolve this over time.

    Thanks for your patience and support!

Before and After - Rear Chain Guide/Roller

schimmelaw

Husqvarna
AA Class
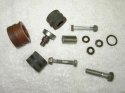
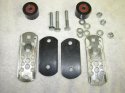
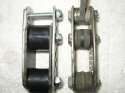
1st photo: Components of a stock 81' 430XC rear chain guide. Lower roller bushings came out with a hammer and in peices. See washers. Roller bearings from one side hit the floor and will never been seen again. Junk. The upper roller and metal bushing are beyond use. Rubber has hardened, is chunking and out right nasty. The metal bushing has worn down to be useless. And to think that this was trick set-up back then. Mounting hardware has been neglected. Not shown - mounting holes for the 6mm bolts on metal framing wallowed out. Extra roller is what it should have looked like. Alot of slop in those 28 year old stock components.

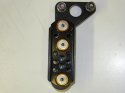
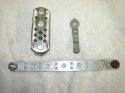
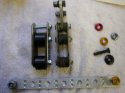
2nd photo: Metal framing - the mount holes for the rollers have been welded up and filed back down to original thickness. Lower mounting roller hole was raised about 3/16" and redrilled to a fat 8mm. Upper roller hole was lowered about 3/16" and also drilled to a fat 8mm. While I had the drill press going I punched and chamfered a few other holes. Why not. Rollers are Moose Racing Chain Roller at 34mm. Double sealed polyurethane roller, including mounting hardware, at $14.99 each. The black inner sheilds were cut from a kart nylon chain guard. $5.00 for about 2'.

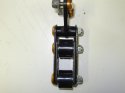
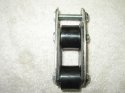
3rd and 4th photos: Outside view of chain guard assembly. Side view. Notice black guards protecting inside of chain guide. Entire assembly is now a fat 1.5" wide compared to the stock 1". A little heavier than stock but a much more solid component with chain rollers which actually have some tolerance and work. No slop in the component now. Oversize upper mounting bushing will be cut Monday. Mounting hardware will be adressed post finishing.

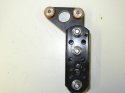
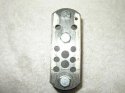
5th photo: Drilled brake stay, rear brake acutator arm and chain guide. Metal is ready for black powder. Aluminum is ready for anodizing. Street legal sm conversion in progress.
 

Attachments

  • chain guide 001.jpg
    chain guide 001.jpg
    94.7 KB · Views: 111
  • chain guide 003.jpg
    chain guide 003.jpg
    94.5 KB · Views: 123
  • chain guide 005.jpg
    chain guide 005.jpg
    94 KB · Views: 108
  • chain guide 004.jpg
    chain guide 004.jpg
    93.5 KB · Views: 114
  • chain guide 006.jpg
    chain guide 006.jpg
    94.4 KB · Views: 116
i'm your Huckleberry....but.....

Why lower the top roller and raise the bottom roller? due to the new 34mm O.D. size of the moose rollers?

Are the two steel brackets old or are they new? How is it that the width is now 1.5" from the original 1' .... you lost me there somewhere....nevermind .... I get it now.... the width of the roller + the kart nylon makes for an overall wider spaced set of rollers....

Kart nylon is to protect the side of the steel guide from being worn by the chain.......

Pn# for the Moose racing rollers? X2

Brake actuator arm.... any conern with strength of the arm now???

Cool stuff!:thumbsup::cheers:
T
 
Just a suggestion but if you were to use photobucket or Smug Mug and post an IMG link for each image, you could have full size pictures for viewing and comments with each individual picture in order........

Again, Just a suggestion.....this is cool stuff you are doing!

T
 
Me again,

What is the red allen head in the end of the aluminum brake stay arm...

More detail please!

T
 
Tim,
Thanks for the compliments.
1st photo: The new top roller (Moose part #1231-0036 times two) using the stock mounting holes would have not have fit. The stock top roller mounting holes are too high on the metal framing and the new roller would have contacted the stock aluminum bushing and aluminum mounting bracket. (See 2nd photo - the part that attaches to the swingarm.) The photos don't show the clearance issue because both sets have been welded and redrilled - you just have to take my word for it. The new rollers are significantly larger in both diameter and width. Additionally, the supplied mounting hardware is 8mm and not the 6mm stock size. Bigger is better. Got to like that. The lower mounting holes could have been used in the stock location but my holes were wallowed out which necessitated a rebuild anyway. Hence they got welded up. Once welded and filed back down I could put the holes anywhere I wanted. Just decided to raise them a little from stock to close up the chain area in the guide and give the frames a little more metal on the lower mounting area. Metal frames are the stockers.

Anodized aluminum concial washer - another kart part - www.cometkartsales - in both 6 and 8mm - for flat allen head bolts. Very cool parts. About $2.00 apiece. Comet also has plastic conical washers for body panels and the nylon/plastic chain guide material I used.

2nd photo: Shows the upper mount/bushing issue which required lowering top roller mounting holes for clearance.

3rd photo: 1 1/8" for stock and fat 1 1/2" for rebuild. A much more capable component.

For intended purpose of components drilled, I have no concens what-so-ever in terms of their strength and reliability. If I thought one of these mods would jepardize the parts intended use or my SAFETY, I wouldn't do it. The drilled compoments are still very capable of preforming their task. Plus its something to do! House full of girls - let me out!!!
Thanks again, Rick
 

Attachments

  • chain guide - supplement 021.jpg
    chain guide - supplement 021.jpg
    94.2 KB · Views: 96
  • chain guide - supplement 022.jpg
    chain guide - supplement 022.jpg
    94.1 KB · Views: 88
  • chain guide - supplement 024.jpg
    chain guide - supplement 024.jpg
    85.3 KB · Views: 82
How is the motard project coming, I'm interested in the wheel build heck I'm interested in the hole project keep us posted.
 
mattskn,
Street-legal motard conversion is progressing. Front suspension, hub/rotor/rim/tire and front brake system are all progressing. Always waiting on parts or the $ to buy them. Current state of economy has me a little leery of dropping $600.00-$700.00 dollars for a large parts purchase. Tire, excell rim, rotor, spoke/nipple combo, fork seals/oil, steering bearings and quality bolt/nut hardware -- Boom -- 8 BILLS! Easy. And that just for the front. If my beautiful caught me doing that - OUCH! A little at a time. Progress is slow, BUT moving forward.
I'll continue to post up what I might be working on at the time.
Rick
 
schimmelaw;19036 said:
mattskn,
Street-legal motard conversion is progressing. Front suspension, hub/rotor/rim/tire and front brake system are all progressing. Always waiting on parts or the $ to buy them. Current state of economy has me a little leery of dropping $600.00-$700.00 dollars for a large parts purchase. Tire, excell rim, rotor, spoke/nipple combo, fork seals/oil, steering bearings and quality bolt/nut hardware -- Boom -- 8 BILLS! Easy. And that just for the front. If my beautiful caught me doing that - OUCH! A little at a time. Progress is slow, BUT moving forward.
I'll continue to post up what I might be working on at the time.
Rick

Sound good I hear that.. Parts are made evory day no rush..
 
Update post powder, anodizing, nickle plating & ssteel mounting hardware:

Photo 1: Front side of chain roller. Black powder, anodized conical washers & ssteel flat allens. Anodized mounting assembly.

Photo 2: Business side. New rollers and protected inners.

Photo 3: Backside. Nylock flange nuts. Backside of swingarm mounting assembly w/ anodized washers and ssteel mounting hardware.

HOT D:censored:N! - ready for re-installation post frame/swingarm powder.
 

Attachments

  • chain guide 007.jpg
    chain guide 007.jpg
    91.1 KB · Views: 84
  • chain guide 008.jpg
    chain guide 008.jpg
    91.2 KB · Views: 94
  • chain guide 009.jpg
    chain guide 009.jpg
    90 KB · Views: 88
Hey Schim,
What is the O.D. of those Moose rollers?

You are making my creative juices flow, and i`m not talking happy hour here.

Nice work Mate :cheers:
 
flame,
The bush sticks out from the mount a fat 1/2" w/ a fat 8mm ID.

hidez,
You running rich tonight? Having mine as we speak. Rollers are 7/8" from side to side and 1 1/4" top to bottom. They are huge compared to the stockers w/ sealed roller bearings to boot. Gone is that metal bush rotating/wearing around the mounting bolt.
 
Just a note to you guys following Schimmelaw's project. I'm the former owner of this bike and he allows me occasional visiiting privileges. The project looks even better in person than in the pictures. To say he does good work is a gross understatement. His attention to detail tells me he may be seriously twisted!

LHill
 
Ya but it`s a good twisted :thumbsup:

Hey Scimm,
Is three parts lemonade to one part Ketel one considered rich?:cheers:
Running good race gas insures clean combustion and reduced exh. spooge.
 
Back
Top