schimmelaw
Husqvarna
AA Class
Similar to Matskn, I too was going to be working on a wheel build this past weekend. Front hub powdered. Wheel bearings bought and installed. Dust seals cleaned and installed. Aluminum wheel spacers anodized. Axle, axle nut, brake rotor bolts nickle plated. Excel 17" rim sitting on the shelf for the last couple of months (waiting for completion other wheel components). Finally, the spokes from Buchanan's show up at the office on Friday. H L Yea**************************************** I've got a good project this weekend.
Wake up early Saturday knowing that today is the day. House chores done. A couple of lil Husky issues dealt w/. My beautiful gives a "shop pass" for the rest of the afternoon/night. Sweeeeeeeeet.
Its late afternoon and I'm "jonesing" to get going. Lets build a wheel. Workbench gets cleaned up. Got to have clean place to work for this project. Parts get organized and photographed (got to have that "before" photo). Smoke that cig. Pull the trigger. Here we go. Spoke 1. Skip 3, spoke 2. Skip 3, spoke 3. Skip 3, spoke 4 and so on and so on. 5, 6, 7, 8 ---- WHOA****************************************!! ---- BIG PAUSE ----- where is hole 9? Got a 32 hole rim. F-Bomb F-Bomb F-bomb F-bomb. Throw in a few GDs for good measure. Never even looked at the parts label - just assumed.
Night ruined!!
Its early, I got a shop pass - what the H am I going to do now. Smoke another cig. Another ------ BIG PAUSE ------ something has/is leaking on the clutch cover. Hey, lets tear that apart and see what going on.
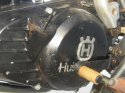
Photo 1: The obligatory before photo. It is just like everyone elses. Chipping, scratched and clouding paint. Multiple layers of paint. Misc. deep garr marks. Grimmey. Leaking oil. Useless kickstart bracket/holder thingy. Rusted kickstarter hardware. Cap wrong part - there is a center hole which has been siliconed up. Kickstarter rubber cushion is wore out. Dated mounting hardware. Something has to be done about this. Can't anodize - part will look horible - almost dusty. Don't want to powder. The cover would look great - BUT - the center cases would then look dated. Maybe paint? Whatever I do, this current finish has to be removed.
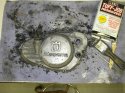
Photo 2: The abortion beigns. I've said it before and I'll say it again ... "I love products that do what they say they will do..." Cudos to the BIX paint remover. An arduous and nasty process, but
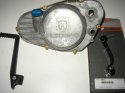
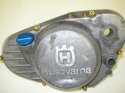
Photos 3 and 4: The after. No paint, ano or powder for me - I'm keeping it just like it is. It is sooooooo ugggggggly! Cobby is cool!
L Yea**************************************** I've got a good project this weekend. Wake up early Saturday knowing that today is the day. House chores done. A couple of lil Husky issues dealt w/. My beautiful gives a "shop pass" for the rest of the afternoon/night. Sweeeeeeeeet.
Its late afternoon and I'm "jonesing" to get going. Lets build a wheel. Workbench gets cleaned up. Got to have clean place to work for this project. Parts get organized and photographed (got to have that "before" photo). Smoke that cig. Pull the trigger. Here we go. Spoke 1. Skip 3, spoke 2. Skip 3, spoke 3. Skip 3, spoke 4 and so on and so on. 5, 6, 7, 8 ---- WHOA****************************************!! ---- BIG PAUSE ----- where is hole 9? Got a 32 hole rim. F-Bomb F-Bomb F-bomb F-bomb. Throw in a few GDs for good measure. Never even looked at the parts label - just assumed.
Night ruined!!
Its early, I got a shop pass - what the H am I going to do now. Smoke another cig. Another ------ BIG PAUSE ------ something has/is leaking on the clutch cover. Hey, lets tear that apart and see what going on.
Photo 1: The obligatory before photo. It is just like everyone elses. Chipping, scratched and clouding paint. Multiple layers of paint. Misc. deep garr marks. Grimmey. Leaking oil. Useless kickstart bracket/holder thingy. Rusted kickstarter hardware. Cap wrong part - there is a center hole which has been siliconed up. Kickstarter rubber cushion is wore out. Dated mounting hardware. Something has to be done about this. Can't anodize - part will look horible - almost dusty. Don't want to powder. The cover would look great - BUT - the center cases would then look dated. Maybe paint? Whatever I do, this current finish has to be removed.
Photo 2: The abortion beigns. I've said it before and I'll say it again ... "I love products that do what they say they will do..." Cudos to the BIX paint remover. An arduous and nasty process, but
Photos 3 and 4: The after. No paint, ano or powder for me - I'm keeping it just like it is. It is sooooooo ugggggggly! Cobby is cool!