• Husqvarna Motorcycles Made In Sweden - About 1988 and older

  • Hi everyone,

    As you all know, Coffee (Dean) passed away a couple of years ago. I am Dean's ex-wife's husband and happen to have spent my career in tech. Over the years, I occasionally helped Dean with various tech issues.

    When he passed, I worked with his kids to gather the necessary credentials to keep this site running. Since then (and for however long they worked with Coffee), Woodschick and Dirtdame have been maintaining the site and covering the costs. Without their hard work and financial support, CafeHusky would have been lost.

    Over the past couple of weeks, I’ve been working to migrate the site to a free cloud compute instance so that Woodschick and Dirtdame no longer have to fund it. At the same time, I’ve updated the site to a current version of XenForo (the discussion software it runs on). The previous version was outdated and no longer supported.

    Unfortunately, the new software version doesn’t support importing the old site’s styles, so for now, you’ll see the XenForo default style. This may change over time.

    Coffee didn’t document the work he did on the site, so I’ve been digging through the old setup to understand how everything was running. There may still be things I’ve missed. One known issue is that email functionality is not yet working on the new site, but I hope to resolve this over time.

    Thanks for your patience and support!

Front Fork Assembly

Larsa

Husqvarna
A Class
Chaps,

I assembled my fork yesterday and would like to confirm something I found a little strange.

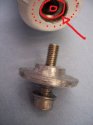
When assembling the fork tubes, my fork had two coutersunk 'washers' at the bottom end. When mounting the washers there is a quite signifficant gap between the washer and fork tube, both diametrically and vertical. Is this as it is supposed to be or do I have the wrong washers ? Also, no sealing parts here, but I suppose that is the way it should be.

I made a sketch in paint trying to explain the issue a little better than I was able to in words.
Als, the parts I refere to would be item #10 in the fork section of http://www.yourhusky.com/files/82-husky-parts.pdf

Thanks gentlemen
BR LarsFork.jpg


http://www.yourhusky.com/files/82-husky-parts.pdf
 
Just lost the whole post trying to upload drawing as a word document so PM for a copy.
One piece replaces the two,
100_3631.JPG
Nice sug fit to centre the damper rod, used silicon to seal, M8x35 gives full take up of thread in the damper,
100_3634.JPG
And cleaned up, looks good to me. Could be St/St or ally. I used ally(unsprung wieght and all that !)
100_3637.JPG
 
Are you sure you have putten the washer ( with a rounded face) under the damping spindle in the fork leg ???
 

Attachments

  • 100_3634.JPG
    100_3634.JPG
    46.2 KB · Views: 22
Tell you what, I think my forks were assembled wrong when I got them. I did think about Husky making things like that. I am just re-assembling as things came apart. Should the 2nd piece(ie small washer) be dropped in the fork? Both were on the outside?
It's still not a good fit but makes more sense. Living and learning (I hope)..
 
A pic to explain ! OK.
And the washer in the fork leg is the base for the spring.
 

Attachments

  • Numériser0004.jpg
    Numériser0004.jpg
    35.2 KB · Views: 37
OK so these are the new bits I had made.
100_3554.JPG
And this is the way they came off. So the big ally washer actually goes inside (fla side up to centre) then the (now st/st) washer on the outside?
 
Thanks very much all. I will recycle the new bits, I will m/c the new bit off them and put them on the bits for sale(free to good home) forum, but I will remake the bottom washers to fit a little better. Should have known that my forks were shagged not due to poor design but poor assembly.
 
You have to push the fork tubes [ chrome bits] all the way to the bottom and give them a twist before you tighten the allen screw . this lines it all up.
You may not get it right the first time so work the tubes up and down and feel for any stiffness.
Should be free.

Cheers Mike
 
For a visual, if the taped side is "not faced down", you will see about a 1/4" gap between the washer and the inside bottom of the fork tube. That gap is just waiting for you to crack the bottom of the fork tube when you tighten the bolt.
 
So then I got thinking and realised that the new bits I had mistakenly made to bolt on the bottom would fit anyway and replace the stainless bits. So a trip to the anodisers and hey presto, not a complete waste of time after all. All nicely centered with the other ally bit in the right place.

100_3851.JPG

100_3853.JPG
 
Back
Top