chris1261
Husqvarna
AA Class
Picked up my Strada yesterday. After reading this forum for a few weeks, I was ready to install my GPS today. I wanted switched power, and I knew there was a connector just above the cylinder head on the right side of the bike.
Here it is with the cap taken off.

I'd read that people had looked in vain for a connector, so I didn't even fire up google. Instead, I took a piece of single-core copper wire, and bent it a little..

The bend is important as you'll see in a minute.
I inserted the wire into the connector. the side that has the green/white wire going to it

and then I drilled a 5/64" hole in the cap

Now, when the cap is on, the kink in the wire will hold it into the connector.

turn on the key, and we have power:

Now, it's just a matter of running the other side to ground, and mounting the GPS.
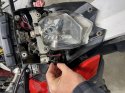
While I was at it, I also found a place to hide my EZPass. not sure if it'll register through the 2 layers of plastic, I guess i'll just have to take a ride down the parkway and find out.
Here it is, nestled behind the headlight.

Well, time to take it out for a ride.
--Chris
Here it is with the cap taken off.
I'd read that people had looked in vain for a connector, so I didn't even fire up google. Instead, I took a piece of single-core copper wire, and bent it a little..
The bend is important as you'll see in a minute.
I inserted the wire into the connector. the side that has the green/white wire going to it
and then I drilled a 5/64" hole in the cap
Now, when the cap is on, the kink in the wire will hold it into the connector.
turn on the key, and we have power:
Now, it's just a matter of running the other side to ground, and mounting the GPS.
While I was at it, I also found a place to hide my EZPass. not sure if it'll register through the 2 layers of plastic, I guess i'll just have to take a ride down the parkway and find out.
Here it is, nestled behind the headlight.
Well, time to take it out for a ride.
--Chris

")