MPerry
Husqvarna
AA Class


I added a second radiator fan (spal 4") and decided I wanted the option to turn it on manually or set it to auto with the original fan. The setup is simple. Most effort is in running the wires and removing components.
1) conduct cannisterectomy (see cannisterectomy in index)
2) add second fan (see second radiator fan in index)
3) select a switch. I went with an on-off-on with 4th connection for ground (ground is for lighted switches only). 3 prongs (1-2-3) allow the switch between 1/2-off-2/3. In this case 2 is the auxiliary fan and you rotate between 1=battery power and 3=master fan.
4) run power from batt with in line fuse. I went with 7.5A for the batt line.
5) run power from master fan. I tapped in up stream from the master fan quick disconnect.
6) run line from auxiliary fan (second fan). You can ground the auxiliary fan anywhere on the bike as it will share the ground of master and batt this way. I grounded where my crash bars connect in the center of frame.
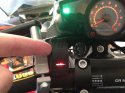
7) decide how you want to route the line and where you want to place the switch. You can see where I placed mine. Simply zip tied there with foam tape to help it sit snug.
You can now toggle the fan on if you want or toggle to auto. Master fan will come on regardless of on or auto, you are just deciding where and when the auxiliary fan receives power from. It's a nice capability on slow hot rides or in traffic. You can also leave it on after shutdown to keep the bike cooling.
The only issue I ran into is the switch itself. The bike power light is on all the time so I had to add a quick disconnect for the switches ground to keep the light off when not in use. I may add a tiny switch for the ground or just do it manually when I want to see the lights. with this setup, I can see when the master fan kicks on as indicated in the top light in the pic (not illuminated). You can go with a non illuminated switch too.
There it is.