-
Hi everyone,
As you all know, Coffee (Dean) passed away a couple of years ago. I am Dean's ex-wife's husband and happen to have spent my career in tech. Over the years, I occasionally helped Dean with various tech issues.
When he passed, I worked with his kids to gather the necessary credentials to keep this site running. Since then (and for however long they worked with Coffee), Woodschick and Dirtdame have been maintaining the site and covering the costs. Without their hard work and financial support, CafeHusky would have been lost.
Over the past couple of weeks, I’ve been working to migrate the site to a free cloud compute instance so that Woodschick and Dirtdame no longer have to fund it. At the same time, I’ve updated the site to a current version of XenForo (the discussion software it runs on). The previous version was outdated and no longer supported.
Unfortunately, the new software version doesn’t support importing the old site’s styles, so for now, you’ll see the XenForo default style. This may change over time.
Coffee didn’t document the work he did on the site, so I’ve been digging through the old setup to understand how everything was running. There may still be things I’ve missed. One known issue is that email functionality is not yet working on the new site, but I hope to resolve this over time.
Thanks for your patience and support!
- Husqvarna Motorcycles
- Husqvarna Motorcycles - Sweden
- Vintage/Left Kickers
- Vintage Restoration Projects
You should upgrade or use an alternative browser.
1972 WR250 the beginning
- Thread starter motorick
- Start date

DeathFromAbove
My Cat Says AREAR!
DeathFromAbove
My Cat Says AREAR!
Crashaholic
Husqvarna
Pro Class
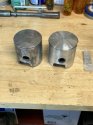
Another important area to get sealed is at the intake manifold. Intake leaks screw with the idle and a crisp response off of the idle position. This also goes for the fit between the Bing carb and intake. The years of engine vibration will loosen the fit between these two. Theres nothing I know of that can effectively create a long term seal in this area without making a mess out of it. With one project, I had to search for an intake manifold replacement due to to much play between it and the Bing.
DeathFromAbove
My Cat Says AREAR!
As for the intake surface I do the same but less on a home built Pipe with a piece of SS machined flat stock welded to it to put the abrasive belt on. But the real culprit usually is the manifold surface, so I dress it as well on the surface plate.
And for the seal between the Bing and Intake I install a Oring a little bigger than the intake diameter. I'll get you a size when I get to the shop. It's not elegant or perfect but helps seal that surface between the two parts. I push the carb as hard as I can onto the intake and tighten it down. I haven't sucked one in yet but also don't ride roughshod on these bikes either. I can Send you a 24" section of the sanding belt if you want. Great Luck Chris
What are folks using to replace the ignition wire cover / sheath ? Carefully removed my old cracked one. Shrink tubes or ????
Here is a source for the gray sheath similar to an OEM Husky. They have various diameters - 6mm, 8mm and others.
https://www.ebay.com/itm/293416760003?itmmeta=01JDPX5WZPNEG3HJN836BR650V
Since it houses only two wires, 6mm is the closest to mine - but mine have been so abused over the years that its just a guess.
Crashaholic
Husqvarna
Pro Class
Crashaholic
Husqvarna
Pro Class
Heck yeah, belts and emery cloth are the best. Wish I had access to a surface plate, nice.I got too cheap and use some 280? grit belts
Amen to that brother.Gotta be on a surface plate or similar or you might FUBAR the surfaces!
I think the o-ring will stay put. I've tried that with a worn intake spigot and was a little leery when I rocked the carb back and forth even after tightening the carb. Once installed, the air cleaner may have held it tight enough but I still didn't feel comfortable with it. It was to close to Disneyland, I try and avoid mickey mouse around my stuff.And for the seal between the Bing and Intake I install a Oring a little bigger than the intake diameter.

DeathFromAbove
My Cat Says AREAR!
Thats close to a Mikuni upgrade!
motorick
Husqvarna
AA Class
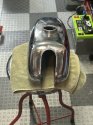
1. got the forks cleaned up & resealed
2. inspected clutch and repainted cover
3. got the tank cleaned inside & out. Recommendations on a tank painter?
Thanks Vinskord for the grey sheath recommendation! Installed and looks great, but had to cut the connectors off to fit : ( Any sources for the motoplat spade connectors to the coil?
Sorry, I couldn't get my fork & clutch cover pics to fit...
Attachments
DeathFromAbove
My Cat Says AREAR!
Let me dig up my 500xc thread to find that connector.
http://www.cafehusky.com/threads/1983-xc500.87850/page-11
Crashaholic
Husqvarna
Pro Class
Unless you forget to add the the hardener.Paint it yourself, It will make you happy!

Crashaholic
Husqvarna
Pro Class
Let me dig up my 500xc thread to find that connector.
Heres that connector link Chris.
http://www.cafehusky.com/threads/1983-xc500.87850/page-11#post-652765
DeathFromAbove
My Cat Says AREAR!
do not forget the hardener!!!
Let me dig up my 500xc thread to find that connector.
http://www.cafehusky.com/threads/1983-xc500.87850/page-11
Those links I posted are about 5 years old. Here are updated links (good as of Dec. 6, 2024):
https://www.ebay.com/itm/256339372683
https://www.ebay.com/itm/253909680777
Couple of things to keep in mind:
1) This terminal originally had two wires crimped in it - one from the Motoplat and the other to the 'kill switch'. So the spec needs to be larger than for 18ga wire.
2) Be sure not to get one with the locking tab on it. This is for placement in a connector - similar to an auto headlight connector.
There are multiple sources for the terminal - ebay, Amazon, AliExpress, Newark, etc. Just search for 9.5 spade terminal.
Crashaholic
Husqvarna
Pro Class
I used these bullet connectors on my RT project. Don't have a pic of a new female spade to show.

DeathFromAbove
My Cat Says AREAR!
But I think the original guy sold, but the new guy is still getting them and selling.
I bought a crimper too.
https://www.vintageconnections.com/
Looks like there's a little solder there Daryn!!
")
And thanks for the Update Vinskord!!!
