• Husqvarna Motorcycles Made In Sweden - About 1988 and older

  • Hi everyone,

    As you all know, Coffee (Dean) passed away a couple of years ago. I am Dean's ex-wife's husband and happen to have spent my career in tech. Over the years, I occasionally helped Dean with various tech issues.

    When he passed, I worked with his kids to gather the necessary credentials to keep this site running. Since then (and for however long they worked with Coffee), Woodschick and Dirtdame have been maintaining the site and covering the costs. Without their hard work and financial support, CafeHusky would have been lost.

    Over the past couple of weeks, I’ve been working to migrate the site to a free cloud compute instance so that Woodschick and Dirtdame no longer have to fund it. At the same time, I’ve updated the site to a current version of XenForo (the discussion software it runs on). The previous version was outdated and no longer supported.

    Unfortunately, the new software version doesn’t support importing the old site’s styles, so for now, you’ll see the XenForo default style. This may change over time.

    Coffee didn’t document the work he did on the site, so I’ve been digging through the old setup to understand how everything was running. There may still be things I’ve missed. One known issue is that email functionality is not yet working on the new site, but I hope to resolve this over time.

    Thanks for your patience and support!

1980 390CR Rebuild by Moody390

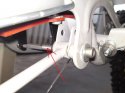
The Old lines are a 1/8" BSPT thread. The new ones were NPT, so I reverted back to the originals.

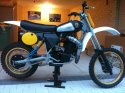
Brakes are all sorted. Last thing I'm struggling with is the tuning side of things, Its all jetted up and fires 1st kick every time now, THO only when the plug is dry. After I kill it and check the plug, it's saturated. It also struggles a bit to idle.

Any Suggestions? Ive dropped the needle to the bottom position and wound out the Air screw to lean it out. I'm guessing a smaller pilot? maybe down to 17.5 from 20?
 
Are you using the 38mm round slide Mikuni that you show in the pic earlier in this thread? If so, something is 'seriously wrong somewhere' if you are running a 20 pilot and the motor is saturating the plug. Could be ignition, could be wrong jets, could be right jets that are worn out... As a start, can you please post ALL your jets? That would be pilot, slide number, needle jet, needle, clip position, main. Everything. And where did you set the timing?
 
I was using the UFO Carb piece from Thunder products, It creates a greater venturi effect in the carby and helps with the low end response. To use this, because of the greater suction of fuel, it requires halving the size of your pilot, hence the reason it was so small.

I found the problem with the over fueling, the UFO wasn't seating in the bottom of the carb, leaving about 8mm of gap between the bottom of the slide and the carb. I pulled it out and went back to a 50 pilot, no more saturated plug.

Now my spark has disappeared, it was intermittent in periods, but now its gone all together. Ill try a new plug cap first then ill toss the motosplat.

Carb specs are:

Mikuni 38mm Round slide Venturi
480 Main Jet
50 Pilot Jet
3.0 Slide
6F15 Needle
Q8 Needle Jet
Needle clip is 2nd from the top
All the jets and associated parts are brand new.
B8EGV Plug aswel
 
So that jetting looks much better. Should be "on the map" so the bike will run and you can fine tune it from there.

Motoplat is a good ignition, but it does require a good frame ground. You might have to go through the entire path and clean the paint from the motor mounts, from where the coil mounts, and where the stator mounts to the engine cases. And snip a half inch off the plug wire when you put the new cap on so that it screws into clean fresh copper wire. Gap .024" and RUN IT!!
 
Good Point about the earths. Makes sense why the spark was intermittent. Cases are internally bare so that should be a good earth. I'll pull the engine mounts and check the coil mounts. I did clean the earth mount for the kill switch, but not the motor.
Thanks Mate!
 
Thank You Very Very Very Very much Picklito hahaha.

I pulled the coil, noticing I had it mounted on the left side of the bracket, and it was showing rub marks from the tank pressing against it. I was only earthing it through the bolts and bolt holes which I had removed the powder coat. I grabbed a file and cleaned the bracket on the right side (the correct side) to bare metal. Gave it a crank, and spark! I fitted the tank, seat, and gave it fuel. Kick, Kick and Fire! Ran it for a bit. I killed it, checked the plug, ran it again. First kick fire, twice more the same outcome.

Really happy now. Thanks mate. Without a doubt, It doesn't start like any Husky I've experienced.
 
Will do. I have to fly out to work in a couple of days so will be hitting the bush when im back in about 3 weeks! pics to follow.
 
Moody390,
Make sure you check the length of bolt on your rear brake pivot arm mounts to the frame (rear brake pedal pivot too). Looks
from your picture like it will hit the chain. Test fit your chain before you go ripping around & break something. On my 82 430,
the chain "c" clip would pop off sometimes when i'd roll it off the truck, couldn't figure out what was going on until i saw my
bolt/nut would some times contact the chain. I reverse my bolt so the nut is on the brake pedal side & used a low profile
socket head bolt on inside of the swingarm, problem solved :thumbsup:

Husky John
 

Attachments

  • Platestayandpedal.jpg
    Platestayandpedal.jpg
    93.7 KB · Views: 77
Those pictures are from assembly when everything was getting mounted, all the bolts were cut to the correct length when it was completed. Thanks for the heads up tho.
 
All finished now. Some Husky Products foot pegs on the way. Heading out for a weekend of riding coming. will see how the shocks go. Got a feeling ill be replacing them for a set setup for me.
 

Attachments

  • 562522_10150968933998729_2128632524_n.jpg
    562522_10150968933998729_2128632524_n.jpg
    133.7 KB · Views: 146
Well the bike went well. Ended up with a Vintage Iron Pipe. Thanks to Rick for a 5 day make time and having it on my doorstep a week after. installed a folding tip shifter, new front plate, new air filter, husky produgs foot pegs and all the last bits. It goes a hell of alot better than i remember. And crazy loud. Even with only 80psi in the shocks, they actually went well.

Tuning is pretty close, a clip up on the needle should do it.

Next up is hunting down a set of upside downs, front disc and tripple to tie into it. Drums just don't do such a nice bike justice. Will keep updated.
 
Sweet**************************************** Good Job Moody****************************************

T
 
I've been bush a couple of times now. bike is just about spot on with the tuning now. Here's a shot with my mate 85 Yz250. 03 brakes and rims, dg pipe etc.
I've got a couple of short vids on my face book. When i figure out to to upload them here i will.
 

Attachments

  • 296806_441139585929067_845231621_n.jpg
    296806_441139585929067_845231621_n.jpg
    221.5 KB · Views: 103
Noooooo ..... not upside downers ! That'll spoil a superb rebuild (IMO).
Husky forks can work well. Mine are stock and are superb. The faster you go, the better they work. My front drum is excellent. I find using a set of EBC grooved shoes, and a bit of time arcing them works very well. It will lock the front on tarmac easily.
Superb job on the resto. What's your next project ?
 
I'll dig this old thread out instead of posting new ones.

The yellow oval side panel decals to suit the 81 side panels. Anyone have a source? the home cut ones are a bit average. If there are none out there, i'll head to a sign makers shop and get some hopefully made.

Also, Bike now runs black fenders and have a billet works style brake pedal on its way from husqvarna parts.... my number 1 stop shop haha.

Not much else has changed yet except the hours on it.

Thx
 
I fit the UFO to the sleeve then conture the arc for better flow. They work great. My pilot size was 35. Yours may vary. It's worth it using the UFO.
 
Back
Top