• Husqvarna Motorcycles Made In Sweden - About 1988 and older

  • Hi everyone,

    As you all know, Coffee (Dean) passed away a couple of years ago. I am Dean's ex-wife's husband and happen to have spent my career in tech. Over the years, I occasionally helped Dean with various tech issues.

    When he passed, I worked with his kids to gather the necessary credentials to keep this site running. Since then (and for however long they worked with Coffee), Woodschick and Dirtdame have been maintaining the site and covering the costs. Without their hard work and financial support, CafeHusky would have been lost.

    Over the past couple of weeks, I’ve been working to migrate the site to a free cloud compute instance so that Woodschick and Dirtdame no longer have to fund it. At the same time, I’ve updated the site to a current version of XenForo (the discussion software it runs on). The previous version was outdated and no longer supported.

    Unfortunately, the new software version doesn’t support importing the old site’s styles, so for now, you’ll see the XenForo default style. This may change over time.

    Coffee didn’t document the work he did on the site, so I’ve been digging through the old setup to understand how everything was running. There may still be things I’ve missed. One known issue is that email functionality is not yet working on the new site, but I hope to resolve this over time.

    Thanks for your patience and support!

1981 430 CR Restoration Thread

steve1970

Husqvarna
A Class
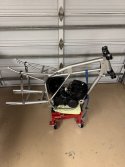
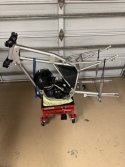
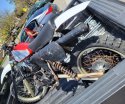
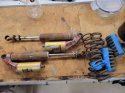
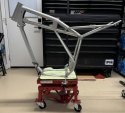
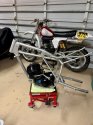
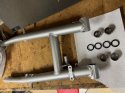
I brought home a mostly complete, non running '81 430 CR (see my other intro thread). I've got it taken apart/organized. The plan is a full restoration as time permits. I'll update and ask questions in this thread. I'm starting on the Ohlins piggyback shocks. They're pretty rough and like the rest of the bike, will need a full going through. I sourced the Ohlins maintenance procedure as well as the archived magazine article from links here on this forum (thanks!).

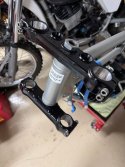
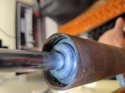
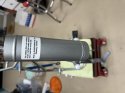
Any tips on prying these circlips out of the shock body without scuffing up the inside of the shock body? I pretty quickly got to this point and then stopped. I tried a few sizes of screwdriver but I can't get much leverage and I don't want to slip and gouge the body up. Tips?
 

Attachments

  • 1981 430 CR Project .jpg
    1981 430 CR Project .jpg
    201.5 KB · Views: 60
  • 20230523_101804.jpg
    20230523_101804.jpg
    160 KB · Views: 59
  • 20230523_104053.jpg
    20230523_104053.jpg
    87.2 KB · Views: 59
You will need to press that seal head down to give you room to get that c-clip out. There is a special tool used to hold the shock and lever arm to press that seal head down. But sometimes you cand press the seal head down without the tool. I just use a sharp scribe to get in behind the clip and then use another scribe or very small and very sharp screwdriver at the same time to lever the C-clip up and out. Did you find a manual for rebuilding the shocks?

Marty

Thanks for the reply Marty. I ended up fashioning some tools out of small cheap screwdrivers similar to what you describe using my MAP torch and bench grinder. Much appreciated. I got the clips out and the bearing below them without damaging anything. Ran out of time after that. Next up is the washers and the piston, which I will have to fashion another tool for based on what I've read in the manual and the old cycle world article on rebuilding. A threaded rod with a t handle, or maybe I'll get away with just using a long machine screw.
 
So life intervened and I stalled on this project a few times due to other projects. I need to stop bringing home so many stray bikes. I had big plans to do a lot more of this work at the nuts and bolts level myself but in the interest of time and also coming to terms with my own skill and space limitations, I paid for some help.

Current update is as follows -

Engine is rebuilt and ready to go - Vintage Husky in San Marcos CA
Shocks have been rebuilt - Vintage Husky, still need springs painted though (me)
Frame stripped and painted - Vintage Husky

I'm going to try to handle most/all of the rest of the parts level restoration and work on the reassembly as things get completed. The frame is on a stand now and I'm cleaning stuff up and getting things organized. I had to move most of my bike stuff to offsite storage so half the battle is just gathering everything together right now.
 

Attachments

  • Husky Frame.jpeg
    Husky Frame.jpeg
    110.7 KB · Views: 16
Glad your back at it Steve. There are a Dizzying amount of things that Stall these Projects!! My builds usually take 2 yrs. Unless I get sidetracked!! Looking good, but Naked!!
 
Thanks guys! I need to give myself more time than I had planned early on as I have kind of leaned in to making this bike "pretty" since I have an 82 430 CR that I ride and get dirty regularly. This bike might end up more of a garage queen, at least for a while.
 
Finally made some progress over the holidays. Engine and swingarm are in. A few details like new frame plugs and a repro sticker on the head tube. Spent time getting the paint off of the points of the frame for grounding (where the ignition bolts up and the engine mount points). I have to get a bunch of parts vapor blasted soon and then I can start painting. Work is going to be busy in 2025 though so progress will come whenever I can steal time. Hope everyone is having a great holidays season!
 

Attachments

  • IMG_6657.jpeg
    IMG_6657.jpeg
    102 KB · Views: 22
  • IMG_6437.jpg
    IMG_6437.jpg
    181.1 KB · Views: 22
  • IMG_6439.jpg
    IMG_6439.jpg
    78.4 KB · Views: 22
Work is going to be busy in 2025 though so progress will come whenever I can steal time.
Its looking like a beauty :thumbsup:but we'll patiently wait for completion. Without work first, money for hobbies can be scarce.

Love those early 80 430's, one Husky model I wish I had owned and ridden. :(
 
Work has gotten in the way of my hobbies my whole life, but also paid for them. Always a dilemma. :rolleyes:

I really like the 80s Huskys too. I have wanted an early 80s 430 since I was a teenager but they were too expensive for me. Now as an old guy I finally got the 82 430 CR in the back of the pic above and I've had a lot of fun riding it and done a couple of casual races. Figured I'd try bringing one back from the dead now and found the 81.
 
Looking Good! I'm a working behind you on my '82 250WR....Same starting condition as yours....pic in my short thread.
I'm getting ready for a rear "WR hoop" repair (or what ever its called). After smooting out the new welds, will likely go powder coating. Sent out rear shocks, will do forks myself, and considering respoking the wheels. Engine/tranny seems ok.
Regards,
Joe M
Santa Clara, CA
 
Thanks Joe, I'm still plugging away but nothing new worth posting yet. Trying to do something most days even if its just 20 minutes or so. 250 WR is a very cool bike!
 
Another minor update...

Triple clamps stripped and repainted. No pics of the process but it took multiple applications of stripper, lots of scrubbing and picking/scraping to get the old paint off. A bunch of the other parts are going to get vapor blasted but I figured I'd try doing the triple clamps by hand. Repainted with Rustoleum primer and semi gloss black. I looked at some NOS triple clamps online from HVA and they looked either semi gloss or satin so I grabbed some semi gloss. Bearings were in good shape as were the races in the frame so I reused what I had.

Airbox stripped and sanded, filter clip hardware stripped and sanded. Drilled out the rivets that held in the hardware, pulled the hardware and stripped/painted, same process as the triple clamps. Sanding the airbox took some time. 400/600/800/1200/2000 grit in soapy water and then hit it with a buffing wheel in my hand drill. Rubbed it with some Maxima SC1 right before I installed it into the frame. Came out pretty good but I will say I am not a fan of restoring plastic.

Installed the triple clamps and airbox onto the frame and called it good.

Gathering up a batch of parts for the vapor blaster next.
 

Attachments

  • Airbox 1.jpg
    Airbox 1.jpg
    77.2 KB · Views: 6
  • Airbox 2.jpg
    Airbox 2.jpg
    65.1 KB · Views: 6
  • Installed 1.jpg
    Installed 1.jpg
    57.1 KB · Views: 8
  • Installed 2.jpg
    Installed 2.jpg
    58.8 KB · Views: 6
I wonder if Cerakote ceramic trim coat would hold up on the black plastic air cleaner. A few months ago I purchased some for the 20 yr old bumpers on my pickup and was impressed at the difference it made in the gray plastic. Its been through three washes and still looks like the day I applied it. Only caveat is the stuff isn't cheap.

Progress is looking good. :thumbsup:
I've never heard of that product, appreciate the tip! I'm only familiar with the Cerakote used on firearms etc. That airbox convinced me that I probably shouldn't try restoring a bike with a plastic tank. I went through the sanding routine twice. First time I wasn't happy with the results so i redid it. Second time I was OK with it but it's definitely not up to the level of what I see from well restored plastic tanks.
 
I've never heard of that product, appreciate the tip! I'm only familiar with the Cerakote used on firearms etc. That airbox convinced me that I probably shouldn't try restoring a bike with a plastic tank. I went through the sanding routine twice. First time I wasn't happy with the results so i redid it. Second time I was OK with it but it's definitely not up to the level of what I see from well restored plastic tanks.

Application was done months ago, still looks as black today. Like many things, prep is key. Its strange that prep instructions didn't come with the kit I bought but their website had a comprehensive video.
 

Attachments

  • 20241109_125947 25%.jpg
    20241109_125947 25%.jpg
    73.5 KB · Views: 5
Application was done months ago, still looks as black today. Like many things, prep is key. Its strange that prep instructions didn't come with the kit I bought but their website had a comprehensive video.
Wow! That looks great! Noted for future use
 
Back
Top