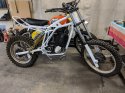
• Husqvarna Motorcycles Made In Sweden - About 1988 and older

  • Hi everyone,

    As you all know, Coffee (Dean) passed away a couple of years ago. I am Dean's ex-wife's husband and happen to have spent my career in tech. Over the years, I occasionally helped Dean with various tech issues.

    When he passed, I worked with his kids to gather the necessary credentials to keep this site running. Since then (and for however long they worked with Coffee), Woodschick and Dirtdame have been maintaining the site and covering the costs. Without their hard work and financial support, CafeHusky would have been lost.

    Over the past couple of weeks, I’ve been working to migrate the site to a free cloud compute instance so that Woodschick and Dirtdame no longer have to fund it. At the same time, I’ve updated the site to a current version of XenForo (the discussion software it runs on). The previous version was outdated and no longer supported.

    Unfortunately, the new software version doesn’t support importing the old site’s styles, so for now, you’ll see the XenForo default style. This may change over time.

    Coffee didn’t document the work he did on the site, so I’ve been digging through the old setup to understand how everything was running. There may still be things I’ve missed. One known issue is that email functionality is not yet working on the new site, but I hope to resolve this over time.

    Thanks for your patience and support!

1983 XC500

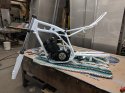
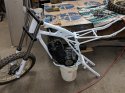
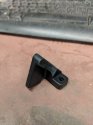
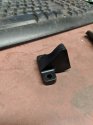
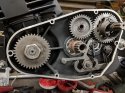
Thanks for the pictures of how you’re changing the kick starter engagement point , I just couldn’t picture what you were trying . I changed mine also but in a different place . What I did was a little grinding on that same curved piece that you were welding on . I ground some off , not a lot , but if you look at that curved piece where it gets narrower and the pawl opens to engage the gear letting the pawl open a little earlier . I tried the straight aluminum Kickstarter but with my size 13 boots it didn’t feel right so i’m Using the original ks lever . I didn’t grind too much off as I wanted to make sure that the pawl would release if my 430 did kick back again . Already had to replace cases on an original numbers bike .
 
Picked it up on ebay, same with the clutch cover. I like them both, you can see the pin go into the shift return spring. Much better than a welded, dented cover.


It wasn't too awful bad to make happen. In the first pic is my first attempt to move the stop. when I test fit it I found the lever was about 2oclock not enough to get onto the next forward spline. The closer to the first cam lobe the more it brings the engagement forward. But you have to watch how the lever stops. It has to stop before hitting the cover. Thru trial and error(3 tries) I got it to the second picture, the chalk points at the starting point. The third pic shows the new engagement point. A much better engagement point I believe. But I HAVE NOT TRYED TO START THIS 500XC MOTOR WITH THIS SETUP!! The fourth pic shows the clearance at the cover for the lever and pivot. I do not have an bumper stop yet but will show it when I get it. For now I think it is pretty good. If it works out for me I'll probably have a few made. The factory made that piece that way for a reason, and I'm just a field hack! My problem might be the combination of a newer lever and an even newer cover I do not know. I will probably use the upgrade to use that spare hole on top of the cover too. If this looks like a problem please let me know BEFORE I try to start the motor. Thanks Chris

should be pretty good that way...sometimes if its too tight engagement you will hear it knocking while its idling.

the kick lever bumper is NLA, so when you make some make a few, a nice softer urethane would work nicely. im a big fan of the newer covers on the air cooled bikes..i truly hate the bullhorn kicker...Photo35t.jpg
 
ct cr430 said:
What I did was a little grinding on that same curved piece that you were welding on
I was concerned that grinding the release cam back would not give me the correct stop point for the lever. How did you lose the original cases? Kicker blowout?


justintendo said:
the kick lever bumper is NLA
I'm not talking the stop Justin, the spring retaining plate is what I might make a few of. The way I have it setup seems to be pretty good. And thanks for the pics of the late model cover change.You showed me that it could be done, so thanks for that! Unfortunately I'm going to look at another Husqvarna in the morning, like surprise said smack addicts got it easy!!
 
I was concerned that grinding the release cam back would not give me the correct stop point for the lever. How did you lose the original cases? Kicker blowout?


I'm not talking the stop Justin, the spring retaining plate is what I might make a few of. The way I have it setup seems to be pretty good. And thanks for the pics of the late model cover change.You showed me that it could be done, so thanks for that! Unfortunately I'm going to look at another Husqvarna in the morning, like surprise said smack addicts got it easy!!

was my friends 84 250 years ago...we ran it with the 90s four stroke transmission....took awhile to get going! thing was mean once it was on the pipe haha..and yes he was a little rough with fasteners and losing them...shifters too..
 
Once I found that bike and bought it back some damage was already done . Seller showed the idler gear shaft that snapped off and a temp repair that was made so as to not leak oil . I was able to replace the idler gear shaft and ran it like that for a while . So one day I try to start it in my yard before bringing it to Vt for one of our ride weekends and it kicked back hard and my foot was sore for a while . When it kicked back there was a metal to metal noise so I removed the clutch cover and saw the damage .
 
Sorry to hear that. Now days I just bite the bullet and rip it down to pieces, gotta replace those seals and bearings anyhow!:oldman: Then the spending begins!:lol:
 
Well at the time I was running it to see what it needed and get some enjoyment out of it . That and being off 2 wheels for 17 years and the new bikes having so much adjustability I couldn’t tell if it was me or the other bike causing me to not being able to get comfortable riding . Then I found my old friend , my 81 430 . Didn’t take long to feel comfortable again and gave me the direction I needed on the set up for my other bike . As for matching numbers ,well best I figured I could do is keep the original case , have it hanging on my workshop wall .
 
So have started the assembly, and didn't get as far is I hoped. The rear axle wouldn't go through the bearings after zinc so I sanded it and now it will fit with the help of a rubber mallet. I'll be doing the wheels later as I just want to get all the parts assembled so I can roll the bike around instead of having a thousand parts laying around. More tomorrow. Chris
 

Attachments

  • IMG_20181230_142128.jpg1.jpg
    IMG_20181230_142128.jpg1.jpg
    391.4 KB · Views: 50
  • IMG_20181230_142135.jpg1.jpg
    IMG_20181230_142135.jpg1.jpg
    108.5 KB · Views: 50
  • IMG_20181230_170925.jpg1.jpg
    IMG_20181230_170925.jpg1.jpg
    449.9 KB · Views: 50
coat your axle with waterproof grease upon your final assembly..im also a big fan of popping the seals off the bearings, washing out the grease and adding my own....or at least topping them off some. the tip of a razor blade on the outer part of the seal pops em right out. bearings last much longer. i like belray waterproof for bike stuff, holds up well.
 
I haven't done the wheels or the shocks, when I have the funding I'll do them right.
justintendo said:
coat your axle with waterproof grease upon your final assembly
That is what will happen. Although I'll have too get some Belray!
Michel Dufayard said:
They both use Belray grease on their axles!
Happy New Year To Everyone. Chris
 
99540_P3710.01_Waterproof_Grease_Tub_MED.png


the oil stays in it very well, never runs out...so its good for steering headsets. plain lithium complex will constantly bleed and drip on your fender, or get windblown all over your streetbike
 
justintendo said:
the kick lever bumper is NLA, so when you make some make a few, a nice softer urethane would work nicely
I bought one from hva and it is incorrect for this cover. Anyone have the correct one? It's a 1992 TE350 part # 8000--67194 / 8A00-75764 oem. A pic or measurement as I'll probably build one from scratch, any help is welcome. Chris
 

Attachments

  • IMG_20190115_125730.jpg1.jpg
    IMG_20190115_125730.jpg1.jpg
    61.4 KB · Views: 30
  • IMG_20190115_125736.jpg1.jpg
    IMG_20190115_125736.jpg1.jpg
    75.5 KB · Views: 31
Got the ignition in and timed. And installed the new clutch drum and mocked the clutch cover to check the kick stroke. It engages pretty late, even after I welded the spring holder. I think I'll weld the holder some more to bring the engagement point a little higher.

93092-a4dcc79f986760608b02133bf15b970b.jpg


Sweet build:thumbsup:
That plastic caged needle roller on input shaft.....looks yellow and old, will fail sooner than later particularly when a 500 XC really loads up.
Later style is steel caged and readily available from good bearing agent.
 
I was wondering when I put the clutch on about the plastic cage. Thanks for the input. I'll find the steel cage and use that before I start the motor. It's still a long way from start up.
 
Back
Top