• Husqvarna Motorcycles Made In Sweden - About 1988 and older

  • Hi everyone,

    As you all know, Coffee (Dean) passed away a couple of years ago. I am Dean's ex-wife's husband and happen to have spent my career in tech. Over the years, I occasionally helped Dean with various tech issues.

    When he passed, I worked with his kids to gather the necessary credentials to keep this site running. Since then (and for however long they worked with Coffee), Woodschick and Dirtdame have been maintaining the site and covering the costs. Without their hard work and financial support, CafeHusky would have been lost.

    Over the past couple of weeks, I’ve been working to migrate the site to a free cloud compute instance so that Woodschick and Dirtdame no longer have to fund it. At the same time, I’ve updated the site to a current version of XenForo (the discussion software it runs on). The previous version was outdated and no longer supported.

    Unfortunately, the new software version doesn’t support importing the old site’s styles, so for now, you’ll see the XenForo default style. This may change over time.

    Coffee didn’t document the work he did on the site, so I’ve been digging through the old setup to understand how everything was running. There may still be things I’ve missed. One known issue is that email functionality is not yet working on the new site, but I hope to resolve this over time.

    Thanks for your patience and support!

1985 CR500 Project Bike by Husky 37

Foot Pegs.....

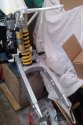
Slowly but surely it's starting to look like something I can ride..... just something as small as foot pegs can make a bike look more like a bike.... if you get what I mean.

Anyway enough dribble...

I have the Foot pegs powder coated when I had the frame done (job lot) so they have been sitting around for a while. They were not in bad condition so no before pictures.

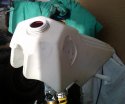
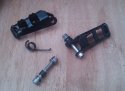
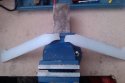
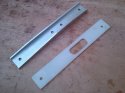
Picture 1: Bits laid out ready to put on the frame. I cleaned off the springs and sprayed them Matt Black along with the spacers (just to tidy them up). New S/Steel Bolts.

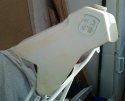
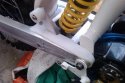
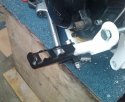
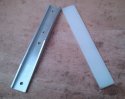
Picture 2: Fitted to frame and ready for me to catch my leg on as I walk past.....

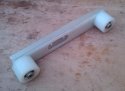
Next big thing to do (which I must admit I am not looking forward to) is putting the new bearings in the Swinging Arm and fitting that.

Stu
 

Attachments

  • Foot Pegs - before fitting - CH.jpg
    Foot Pegs - before fitting - CH.jpg
    82.8 KB · Views: 59
  • Foot Pegs - Fitted - CH.jpg
    Foot Pegs - Fitted - CH.jpg
    37.7 KB · Views: 72
Husky37;85585 said:
Somebody told me that dancing around a tree naked at midnight on the 3rd Wednesday in the month would help...... All I'm going to say is that it didn't....

Stu

So THAT'S how you get them to start. I think they left that out of the owners manual.
 
Nah, you got it all wrong.

Hold a B9ES spark plug between your teeth during a solar eclipse while wearing your Husky jersey backwards. It should start on the first kick.:ride:
 
Hwy;86197 said:
Nah, you got it all wrong.

Hold a B9ES spark plug between your teeth during a solar eclipse while wearing your Husky jersey backwards. It should start on the first kick.:ride:

Tried that and it just made me look like Einstein after kicking the bike over.....

Ohh... Did you mean just the spark plug not attached to the coil?

Stu
 
Broke it....

Lousey weekend....

Spent a lot of time making a rub strip for the swinging arm in Nylon 6....

Picture 1: Shows old strip, starting piece of Nylon and then the finished item.

All looking good just had to bend it around the swinging arm whilst applying some heat to the bend..... Did that and everything was great. Got it to the right shape and fitted. Took it off to clean it up and bent it a little bit more but forgot that it had gone cold....

Picture 2: The result..... the frustration didn't come from the fact that it had snapped but rather that I was the Muppet holding it at the time :banghead:

Back to square one.....

Stu
 

Attachments

  • Swinging Arm Rub Plate - before - CH.jpg
    Swinging Arm Rub Plate - before - CH.jpg
    85.4 KB · Views: 47
  • Swinging Arm Rub Plate - Afterwards - CH.jpg
    Swinging Arm Rub Plate - Afterwards - CH.jpg
    32.2 KB · Views: 55
Hwy;84318 said:
If it's a single shock bike, I believe the cut out was to achieve maximun clearance between the lower shock linkage- that's the case on my '87.

+1, thats the reason for the one side milled away. The single shock axle bolt will hit the roller bracket when the suspension is fully extended. Just figured that out on my 85 400 XCE tonight. Like a fool I kicked my rolling stool out from under the swing arm.
 
Chain slider fab.

Here's how I made a chain slider.
I used a material called Star Board. It is available at boat supply stores or from : http://www.boedeker.com/index.htm These guys cut to size and take CC.
I started out with 3/8" material and half sawed it to 3/16" on my band saw. I made a pattern of wood from an original rubber slider I got when I bough my 250. Then drill the mount holes, attach to the pattern, and trim to size with a router. Next heat the palstic in the wifes oven to 250 DF. Quickly attach to swing arm with mounting screws and swing up into position and clamp in place so as to form tight to arm. Let cool clamped up.
index.htm


823144777_ZRSxf-S.jpg


I'll be installing the arm tonight. Big long story comming about repairing swing arms via welding and shot peening and the resto. of my 86 400 XCE.

823145116_LENgK-S.jpg
 
Hi Fritzcoinc,

That's good going. Nice Pictures. I'm glad I'm not the only one trying to make these rub strips...

http://www.husqvarna-parts.com/catalog/item/6417224/6297142.htm

These guys supply them but they seem a bit too pricey for me at the moment hence the reason for making it.

Has anyone bought one of these from husqvarna-parts and if so did it just fit and did it wear well?

Well after the slight accident with my first try.....

Picture 1: This is Mk2.... and still in one piece at the moment :) Will have to do until Mk3 gets done.

Haven't put a picture up but I picked up my shock today which had been serviced so that's the last big spend I hope....

Stu
 

Attachments

  • Swinging Arm Rub Plate Mk2 - CH.jpg
    Swinging Arm Rub Plate Mk2 - CH.jpg
    35.3 KB · Views: 25
Shock and swinging arm....

I must apologise for the lack of assembly pictures but as I didn't want to stop during the process of inserting the swinging arm bearings. So a verbal description will have to do I'm afraid....

Picture 1: Shock and Swinging Arm install along with lower suspension linkage...

I put the Swinging Arm on the bathroom radiator to warm through while I put the new bearings and inserts in the freezer.... I had already tried a test fit to find out how much the inner bearings had to pushed in. It worked out that they had to be near enough level with the swinging arm.

So I started by inserting the inner most (frame side) bearings first using silcon grease to ease the way. By using my vice I could (with surprisingly little effort) press the bearings in using the insert. This meant that I could then accurately know how far they had to go in... Once I have pressed in both inner bearings I offered the swinging arm to the frame for a test fit to make sure all was right.

Having done that and made sure it fitted I then pressed in the outer bearings making sure I didn't push or move the inner ones.

I then re-furbished the shock linkage making one good one from two linkages... re-greased and sealed.

I have now spent as much money as I can for now due to some hefty car bills... so I have taken the decision that some bits will have to make do... (like seat cover, rear wheel rebuild, new chain) just so I can get it running and hopefully do one event. And do these things I wanted to do before the big event in Sept this year....

So the progress from here probably will just be assembly pictures and then the planned Video of it starting for the first time.... :)

I just need to throw my leg over it.....

Stu
 

Attachments

  • Swinging Arm Installed - CH.jpg
    Swinging Arm Installed - CH.jpg
    48.9 KB · Views: 80
New Chain U/Lower Rollers and Bracket

My original bracket was is a tired state. A friend offer to machine another one after I had tried to cut it myself....

Picture 1: New bracket with Nylon rub 'blank'

Picture 2: New Bracket with Nylon rub cut and drilled.

Picture 3: New bracket complete with new rollers (home made) and rub strip (home made - took about 15 mins and cost of nylon £2 if that)

Quite please how it turned out.

Stu

Next: Sealed the inside of the tank..... that's the next thing I will post (probably)
 

Attachments

  • Chain Rollers Bracket Assembled - CH.jpg
    Chain Rollers Bracket Assembled - CH.jpg
    26.7 KB · Views: 43
  • Chain Rollers Bracket 2 - CH.jpg
    Chain Rollers Bracket 2 - CH.jpg
    90.1 KB · Views: 36
  • Chain Rollers Bracket 1 - CH.jpg
    Chain Rollers Bracket 1 - CH.jpg
    56.2 KB · Views: 36
Sweet!!! Nice progress. You are moving forward at a good clip. One component at a time. Keep working and posting up. I'm intrigued!!
Rick
 
Tank - Sealed and Painted

I bought the tank sealer a while ago in a spending spree... (when I had some cash...) and now as the weather has got better, a bit warmer to cure the sealant.....

Picture 1: You can see just inside the tank the 'red' sealant. I blocked up the fuel tap hole and poured the sealant in and rolled the tank around until it covered the whole of the inside as evenly as I could. I made sure the tank was bone dry and washed out before starting.

Picture 2: Tank - Before

Picture 3: Tank - Before

Picture 4: Tank - After. Sprayed with a plastic paint from a can. I know some people have said that spray paint gives the tank too much of a gloss. That is true so I gave it a gentle rub with some fine wire wool just to take the sheen off it. It's not as good as a new tank but very acceptable.

Picture 5: Tank - After

Materials/Products used:

Paint: Krylon Satin White Spray Paint (in a can) - used only one can to do the tank and the Rad scoops but bought two just incase (cheaper shipping too)
Tank Sealer: Tank Care Products (www.tankcareproducts.co.uk) 250ml tin was all I needed for the '85 tank.

Ohhh.... also set the timing and torqued down the head. Connected up the coil and tried turning it over to see if I had a spark.... bearing in mind that the engine had sat still for at least 18+ years.... I got a spark :applause: 
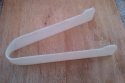
Just hope it's good enough.

Stu
 

Attachments

  • Tank - sealer - CH.jpg
    Tank - sealer - CH.jpg
    19.9 KB · Views: 82
  • Tank - before 1 - CH.jpg
    Tank - before 1 - CH.jpg
    22.7 KB · Views: 78
  • Tank - before 2 - CH.jpg
    Tank - before 2 - CH.jpg
    24.6 KB · Views: 80
  • Tanks - after 1 - CH.jpg
    Tanks - after 1 - CH.jpg
    25.5 KB · Views: 91
  • Tank - after 2 - CH.jpg
    Tank - after 2 - CH.jpg
    24.4 KB · Views: 88
Assembly is picking up a pace....

Rads are on...... left side panel on.... Exhaust on.... I shan't bore you with just putting bits but.... I did mount up the chain guide bracket and rub strip....

Picture 1: All nice and new :)

Stu
 

Attachments

  • Swinging Arm Rub Plate fitted - CH.jpg
    Swinging Arm Rub Plate fitted - CH.jpg
    39 KB · Views: 70
Really fun thread. Should also be a big help when I get to work on my 85. Loved the USD fork info, and the chain guide and roller stuff.

Is there a thread on the engine specifically, or no????
 
The aim of all the restoration threads is to provide a single location where you could find info specific to the model you were rebuilding.... Glad to hear that it works.

With regard to the engine.

Everything which has been done to the engine should be here however I might have missed some stuff so here's an overview:

I have had a limited budget so therefore some things have been left if they could easily be done later or they were within limits.

I had new big end bearings and seals fitted and anything internal changed if needed (but nothing did... phew) The engine had been ported so that didn't need doing.

Things I decided to leave were:

Piston Ring - just within the limit but I thought I would wait and have a rebore later in the year.

Everything else was pretty tight but the acid test is starting it up in a couple of weeks....

Anything else just ask.

Stu
 
Stu, the bike is looking really cool. Do you intend to ride it at any Evo events in the UK this season?
 
One thing that got my attention, was the pic of your cylinder where you were noting prior porting having been done/ Maybe it was just the pic, but I could only see a blending from the liner into the port, that my cylinder has and I had taken to just be factory clean up blending, and not actual porting. Is there more than just that blending from the liner done on yours that I just couldn't see???? I've actually looked through all the newsletters, and other info trying to find info on porting the 500 water cooled jugs, and didn't see any. Even though I saw great detailed info on doing the cylinders and pistons on earlier models. Was hopeing to see that for the 85-87's or so, and never did find any.
 
Back
Top