chris squires
Husqvarna
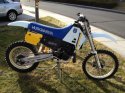
AA Class
Chris is that the original/factory plastic? If so how did you get it so white? When I was starting my 86 Auto rebuild I wanted to up grade to the 87 plastic and was going to use a spare 87 frame that I had but when tried to put the 86 swing arm and linkage on the 87 frame the "Y" link would not line up to the frame properly. The 87 frame bracket was more centered than the 86 so I cute the fuel tank brackets off the 87 and welded them to the 86 frame. Just wondering if your linkage is not binding some how.
Jim, yep it is the original plastics. I first degreased them using domestic washing machine powder, this removed all the ingrained oil and grease marks. Then I used cutting compound mid grade, which is normally used to bring the lustre back to aged car paint work (think T-cut but a little coarser). After that I just used macquiers auto paint polish, which in itself, is just a very,very fine grade of cutting compound. This stage gave the plastic quite a bit of a shine! Finally I used acetone to remove any of the old sticker adhesive, just steal your wife's nail varnish remover, works like a charm! It took alot of scrubbing but the improvement was apparent with each stroke!!!
I am quite sure that my '86 linkage and swingarm are from a WR or XC as the the brake stay channel, on the right hand side (inner) of the swingarm has been ground down by a previous owner, to make way for the CR 250 'floating' brake plate and rear hub / wheel assy. The spherical bearing in the front of the 'Y' linkage where it bolts to the '87' frame has alot of play and when fully assembled and torqued to factory specs, along with the '86 shock, it does look misaligned and slightly twisted (as if not designed to be couple up). But it does fit without too much drama and it does work really well on a high preload as clearance is an issue with soft settings! No binding or interference issues.....
Thinking back to when I rebuilt the linkage and reinstalled it back on the frame. I connected the 'Y' link to the frame first, whilst the shock bottom eye was bolted between the two vertical links. These two links were also connected loosely to the swingarm at their top needle holes. This allowed for the frame and linkage to be tightened up first at the 'Y' linkage front. Then without connecting the shock's top eye to the bike, I greased up and slid in the swingarm at the frame pivot points. A bolt was pushed through the three parts (arm,frame &engine) and a nut turned loosely on the thread at opposite pivot point. This again felt slightly misaligned and was awkward. Then with gentle persuasion from nylon mallet, the shock fell forward into the frame recess and all was torqued up. In that order on a 900mm tall bench for support. Probably the wrong way round but it worked for me!!!
I remember why the ohlins shock was bolted to the linkage during this whole process! The linkage steel dust covers kept falling on to the floor due to the new o-rings that had now replaced the original seals. The o rings were just too fat! Without the shock being bolted in i couldnt stop this from happening, thats why I took this route of re assembly!!!
Chris


 I think I paid £70 duty/taxes to HRH Queen Liz, just for the privilege of receiving goods from the US. The pipe really lets the bike roar and improves the bottom end, there is quite a saving on weight too. Get one you wont regret it! I am going to have one on the 500cc when funds allow!
 Should have waited.

 And a good reference for others caught out by clearance issues.
")