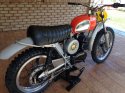
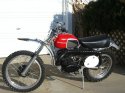
• Husqvarna Motorcycles Made In Sweden - About 1988 and older

  • Hi everyone,

    As you all know, Coffee (Dean) passed away a couple of years ago. I am Dean's ex-wife's husband and happen to have spent my career in tech. Over the years, I occasionally helped Dean with various tech issues.

    When he passed, I worked with his kids to gather the necessary credentials to keep this site running. Since then (and for however long they worked with Coffee), Woodschick and Dirtdame have been maintaining the site and covering the costs. Without their hard work and financial support, CafeHusky would have been lost.

    Over the past couple of weeks, I’ve been working to migrate the site to a free cloud compute instance so that Woodschick and Dirtdame no longer have to fund it. At the same time, I’ve updated the site to a current version of XenForo (the discussion software it runs on). The previous version was outdated and no longer supported.

    Unfortunately, the new software version doesn’t support importing the old site’s styles, so for now, you’ll see the XenForo default style. This may change over time.

    Coffee didn’t document the work he did on the site, so I’ve been digging through the old setup to understand how everything was running. There may still be things I’ve missed. One known issue is that email functionality is not yet working on the new site, but I hope to resolve this over time.

    Thanks for your patience and support!

'71 400 Cross resto

oh really! that's an interesting nugget of info, thanks!

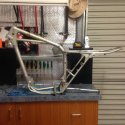
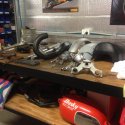
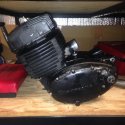
Pics will come, unfortunately there's very little of the bike in my possession at the moment. wheels are being laced, hardware is being plated, frame and silver bits are being painted, engine is at a mates place as we have tried unsuccessfully to get the barrel off for the last couple of weeks...

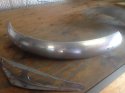
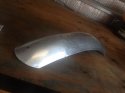
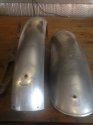
As soon as i get stuff back i'll post up more but here's the bits before.
 

Attachments

  • IMG_0461.jpg
    IMG_0461.jpg
    178.7 KB · Views: 92
  • IMG_0745.JPG
    IMG_0745.JPG
    118 KB · Views: 89
  • IMG_0746.JPG
    IMG_0746.JPG
    114.8 KB · Views: 90
  • IMG_0748.JPG
    IMG_0748.JPG
    97.6 KB · Views: 91
LOL, don't let the pics deceive you! i bought it sight unseen and while it's complete with the original carb, girlings, exhaust etc, the PO loved the aerosol! there was so much paint on the thing, the rear fender is trashed and had been filled with bog and painted grey, but i'm getting a new one made (edit** actually repaired the original). It's still on it's original bore and so far the inside of the engine looks untouched, it ran ok but was definitely eating trans oil so i'll assess the bearings when i split the cases and replace the seals and gaskets, piston and ring and who knows what else, aside from the paint everywhere it's a pretty good starting point so i'm hopeful of a good result. Time will tell.
 
Here's a scan that might help you. The sleeve/ bushing that gets stuck in the frame is #20. The spring #19 holds the kick stand into its detents is behind it, so when you try to remove it there is a feeling of it being spring loaded. Again, try as stated above, you'll get it worked out of there.
View attachment 51593


I got the stand out, took a torch to just about boil the lube i had in there before it would budge, the corrosion looks bad but after a blast both the frame and side stand assembly look ok. What a pig of a job!
 
Can't believe you're not going to keep that seat cover, that and a set of "ape hanger" handlebars would be sweet. :lol:

All kidding aside, glad to see you're making progress, keep going.

Steve
 
Any corrosion in the magnesium cases can be repaired with J-B. I use both the putty type and the more liquid type. I fill the larger voids with the putty and the smaller cavitations with the liquid type. After sanding the repaired areas carefully, the areas are ready for paint.

The best paint for the engine cases that I have found is Ceracoat, a coating used for firearms. This stuff won't come off even if you use acetone on it. The coating finish remains untouched with no signs of change to the sheen of the finish. This stuff doesn't chip or is nearly bulletproof. I was totally surprised by this stuff.

Desmo
 
I've almost finished doing my repairs to the metalwork, my mate roy, who repaired my front fender mount has offered to help and he's done an amazing job on parts i thought were scrap. He's about to start on the fenders, the front isn't _too_ bad, the rear looks knackered, it's been over backwards and torn the edge and crinkled up the aluminium. When i bought it it was painted grey and after stripping them they look like below, i can't wait to see if they can be repaired, the rear being original is longer than the repro and the front has a cut off flat front rather than a trimmed edge like the repro so i would definitely like to keep them, we'll see.
 

Attachments

  • IMG_0786.jpg
    IMG_0786.jpg
    81.7 KB · Views: 30
  • IMG_0787.jpg
    IMG_0787.jpg
    81.6 KB · Views: 33
  • IMG_0788.jpg
    IMG_0788.jpg
    46.5 KB · Views: 33
Any corrosion in the magnesium cases can be repaired with J-B. I use both the putty type and the more liquid type. I fill the larger voids with the putty and the smaller cavitations with the liquid type. After sanding the repaired areas carefully, the areas are ready for paint.

The best paint for the engine cases that I have found is Ceracoat, a coating used for firearms. This stuff won't come off even if you use acetone on it. The coating finish remains untouched with no signs of change to the sheen of the finish. This stuff doesn't chip or is nearly bulletproof. I was totally surprised by this stuff.

Desmo


My cases are mint, the outer covers are really really good, the clutch side has a groove cut in it where a spring retainer came loose but it's not deep. The main cases and barrel look sweet too, but i can't separate them! they're stuck tight! i may have to sacrifice the piston (scored anyway) and maybe the rod jacking the cases off the bottom of the barrel, we'll see. Once they're apart i'll get them all soda blasted and painted satin black in 2 pack.
 
Just a note regarding the front fender. The original front fenders had a slight curve and a rolled edge, although it was hidden by the fender flap, which was mounted on top of the fender. Your front fender has been cut off, possibly due to previous damage to the front edge. Wanted to mention it before a lot of polishing of the metal was undertaken. Project is looking good.
 
Just a note regarding the front fender. The original front fenders had a slight curve and a rolled edge, although it was hidden by the fender flap, which was mounted on top of the fender. Your front fender has been cut off, possibly due to previous damage to the front edge. Wanted to mention it before a lot of polishing of the metal was undertaken. Project is looking good.


i'm not so sure about that, the sportsman and later bikes had it with the trimmed edge top and bottom, but mine is definitely the original fender and it doesn't have any damage to speak of. there's a few original pictures getting around that don't show it without the rubber fender flap but they do show the flap sitting flat across the top, most of the restos i've seen have a real high curve to the flap which looks to me like it's sitting proud on the folded edge.

My rear guard is original too and is a lot longer than the repro one, the short one looks better on the bike but to be correct it should be longer, McQueens bike in on any sunday shows it and i've tried to have a close look at the front too but i guess i'll have to look harder.
 
So i had another look at "on any sunday" great movie, sounds a bit wanky looking at it like this but it's a really good resource for accurate pics of the bike as it was in the day.

In the desert where the guy "accidentally sets his bike on fire (heartbreaking, i know!) you can clearly see the guard is as described by steve with the trimmed front edge.

In the scene where they're on the beach Where McQueen flips it and hams up being hurt, as he gets back to his bike the flap is turned up and you can very clearly see the straight cut front guard. And when McQueen low sides it's not as clear because it's moving but it sure looks to me like a straight cut off edge, given that the original owner insists he hasn't chopped it and it's original (everything else he told me has panned out so far, including the std bore) i'm inclined to believe him.

I've had resellers of the reproduction stuff tell me my guards are incorrect but the rear is clearly longer on all the bikes in the movie so i'm not convinced they're just after a sale....
 
Just a note, certainly possible that some were delivered that way... My 70 model 400 Cross is original to our family, my dad bought it new (first time I rode the machine I was 13). The same year he bought me a new 250 Cross, which we took home in the crate. Memory may fail me as to whether the front fender on the 250 was cut since the bike no longer exists, but I think it had a rolled lip. The 400 however had a broken cylinder liner in 1972 and sat unused for many years, in 2007 I did a rider restore on it. At the time, I replaced the original front fender with a repro, but the original had a rolled lip. It may be possible that the front fender was supposed to be cut before installing the flap, but mine wasn't. Front fender part # is listed as same for both 70 & 71.
Sometimes (as you are finding) it is hard to determine what is correct on these bikes. Just an example, my 400 came with the long steel rear fender, which has never been changed. Every other 70 I've seen had the short aluminum rear fender, including my 250. Of course this only applies to 70's, only given as an example.
So, certainly not intending to disagree, just hoping to be helpful.
I will be very interested in what you ultimately decide since I intend to stop racing my 400 in a couple of seasons and restore it properly, what you discover may be helpful.
In any case, we use any means at our disposal to try to determine what is right as memory can fail us. Watching movies and hitting the pause is not uncommon in my opinion. You are going to lengths to get it right. At the moment, I would say your documentation regarding the front fender may be more correct than mine as I have only based it on 1 bike (2 if memory serves me). Looking forward to your progress.
Steve
 

Attachments

  • Husky2.JPG
    Husky2.JPG
    143.4 KB · Views: 36
that's great information, and you're very helpful which is appreciated.
Yep, it's no surprise that they were supplied in various states which makes an absolute 100% correct restoration difficult to achieve when there's always variations of some kind.
For me i think because mine was almost complete and i can talk with the guy i bought it from and his father owned it for so long if i can verify the parts on it haven't been changed i'll restore and reuse them, especially if i can compare to an old sales brochure or authentic movie footage from the era.
There's other footage that shows the cut off guard much more clearly at about 33 minutes so i'm definitely going to keep it if it can be saved, the rear guard is pretty obvious too so again, if it can be saved i'll use it.
I got a call yesterday, my wheels are ready to pick up so i'll get them and post up pics, at last some progress to show.....
 
guys, i have 2 questions.

the welded bracket that the side stand swings against when it's down, can someone measure the cutout or "L" that the stand sits against please? mine has had a piece welded in i think

and is there a thread that explains how to decoke a 2 stroke exhaust?

cheers!
 
Thanks Steve,
On another note, roy, the guy who is repairing the fenders has already done an amazing job! he's unpicked the folded seam and got the rear back to it's correct shape, the wrinkles are gone and he's test fitting it back in the frame before welding up holes and cracks and finishing up. The guy is amazing, i can't wait to see the finished products all polished...
 
Here's a hand drawn diagram of the piece, dimensions in millimeters. Diagram is drawn as if you were looking at the metal stop from the rear of the machine. I also took pictures from as many angles as I could get with the bike assembled. Seems to be welded along the top and inner sides, but the lower rear side just has one tack weld. Forgive the dirt and grease, the bike is used for vintage racing.
 

Attachments

  • 00001.jpg
    00001.jpg
    29.7 KB · Views: 35
  • 043.jpg
    043.jpg
    46.4 KB · Views: 36
  • 049.jpg
    049.jpg
    49.7 KB · Views: 35
  • 056.jpg
    056.jpg
    43.6 KB · Views: 34
Back
Top