-
Hi everyone,
As you all know, Coffee (Dean) passed away a couple of years ago. I am Dean's ex-wife's husband and happen to have spent my career in tech. Over the years, I occasionally helped Dean with various tech issues.
When he passed, I worked with his kids to gather the necessary credentials to keep this site running. Since then (and for however long they worked with Coffee), Woodschick and Dirtdame have been maintaining the site and covering the costs. Without their hard work and financial support, CafeHusky would have been lost.
Over the past couple of weeks, I’ve been working to migrate the site to a free cloud compute instance so that Woodschick and Dirtdame no longer have to fund it. At the same time, I’ve updated the site to a current version of XenForo (the discussion software it runs on). The previous version was outdated and no longer supported.
Unfortunately, the new software version doesn’t support importing the old site’s styles, so for now, you’ll see the XenForo default style. This may change over time.
Coffee didn’t document the work he did on the site, so I’ve been digging through the old setup to understand how everything was running. There may still be things I’ve missed. One known issue is that email functionality is not yet working on the new site, but I hope to resolve this over time.
Thanks for your patience and support!
- Husqvarna Motorcycles
- Husqvarna Motorcycles - Sweden
- Vintage/Left Kickers
- Vintage Restoration Projects
You should upgrade or use an alternative browser.
'71 400 Cross resto
- Thread starter loony888
- Start date

loony888
Husqvarna
AA Class
loony888
Husqvarna
AA Class
cheers
SteveJ
Husqvarna
AA Class
As Rosco400 noted, there should be no side to side movement on the shock mount. When the mounting bolt is tightened down tight, the sides of the clevis should clamp down tight against both sides of steel sleeve in the shock, otherwise you will have wear occur on the clevis bolt holes.
Nice looking frame.
loony888
Husqvarna
AA Class
Steve, cheers mate, is 200ml the correct amount? i've bought some Motul 15w from my favourite husky shop, i was in there drooling over the new FE.......


loony888
Husqvarna
AA Class
I've got my bearings located in my cases, retainers, seals etc. the crank has been pressed together with a new Rod and bearings and i'm currently assembling the gearbox shafts and shifter mechanism.
I've laid everything out and i have everything i need but i need to ask about the screws/bolts that hold the cases together, the outer covers are held on with slot head screws, the inner cases are assembled with hex head bolts, there is one location under the inlet manifold that holds the two case halves together and is seen from the outside once fully assembled, is it a screw or a hex head? i've seen both but mine definitely had a hex head bolt and my replacement screw set only has enough for the outer cases.
Can someone (steve?) confirm what should be there please?
cheers
**EDIT* Never mind, i looked in the parts catalogue, it's a screw apparently, although my hex head bolt has the EXACT same pattern as the others that hold the cases together, Hmmm........
SteveJ
Husqvarna
AA Class
Hi guys,
I've got my bearings located in my cases, retainers, seals etc. the crank has been pressed together with a new Rod and bearings and i'm currently assembling the gearbox shafts and shifter mechanism.
I've laid everything out and i have everything i need but i need to ask about the screws/bolts that hold the cases together, the outer covers are held on with slot head screws, the inner cases are assembled with hex head bolts, there is one location under the inlet manifold that holds the two case halves together and is seen from the outside once fully assembled, is it a screw or a hex head? i've seen both but mine definitely had a hex head bolt and my replacement screw set only has enough for the outer cases.
Can someone (steve?) confirm what should be there please?
cheers
**EDIT* Never mind, i looked in the parts catalogue, it's a screw apparently, although my hex head bolt has the EXACT same pattern as the others that hold the cases together, Hmmm........
You are correct, it is a slot head screw, but this screw is different from all the other screws in the engine cases. While the outer case screws have an oval (rounded off) head when viewed from the side, this screw has a flat top and the top is a slightly smaller diameter than the case screws. The part # is 20 56 327-01. All of the 4 speeds I have disassembled/ reassembled also had slot head screws holding the inner cases together, which sounds different than the bolt kit you have. Nice looking work, really making progress.
Steve
loony888
Husqvarna
AA Class
Yeah, mine has cap/allen head bolts that hold the inlet manifold on, the exhaust manifold on and the two halves of the cases together, they all have a distinctive pattern on the outer edge, including the one we're talking about under the inlet manifold. there's service bulletins that note the change from slotted heads to allen heads for the outer cases, which no one likes using as they just don't look right, but the bulletin is there, i'm assuming mine being a late '71 had the allen heads as std with the slot head screws for the outer cases, dunno, i don't have the correct slot head screw for the case so i'll go with the allen head that came out of it i guess.
Rosco400
Husqvarna
AA Class
loony888
Husqvarna
AA Class
The brake pull rods on the originals were clear zinc plated, not painted the frame color. Sorry for the late chime in, but yours should look just fine.
Hi Taylor,
Got your brake rod today and despite mine being freshly painted and shiny the difference is huge, thanks for the tip, and for selling me a NOS one that is spot on!
loony888
Husqvarna
AA Class

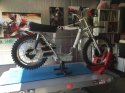
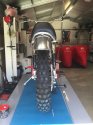
I've moved the bike from my spare room to the lift in my workshop in preparation for assembly, i couldn't help myself and put the wheels on it, attached the rear brake rod and located the brake lever assembly, i won't add anything more until the engine is in the frame to save scratching anything or making it more difficult to get in there but it looks like a bike again!