-
Hi everyone,
As you all know, Coffee (Dean) passed away a couple of years ago. I am Dean's ex-wife's husband and happen to have spent my career in tech. Over the years, I occasionally helped Dean with various tech issues.
When he passed, I worked with his kids to gather the necessary credentials to keep this site running. Since then (and for however long they worked with Coffee), Woodschick and Dirtdame have been maintaining the site and covering the costs. Without their hard work and financial support, CafeHusky would have been lost.
Over the past couple of weeks, I’ve been working to migrate the site to a free cloud compute instance so that Woodschick and Dirtdame no longer have to fund it. At the same time, I’ve updated the site to a current version of XenForo (the discussion software it runs on). The previous version was outdated and no longer supported.
Unfortunately, the new software version doesn’t support importing the old site’s styles, so for now, you’ll see the XenForo default style. This may change over time.
Coffee didn’t document the work he did on the site, so I’ve been digging through the old setup to understand how everything was running. There may still be things I’ve missed. One known issue is that email functionality is not yet working on the new site, but I hope to resolve this over time.
Thanks for your patience and support!
- Husqvarna Motorcycles
- Husqvarna Motorcycles - Sweden
- Vintage/Left Kickers
- Vintage Restoration Projects
You should upgrade or use an alternative browser.
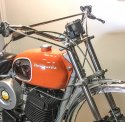
72 450 WR Tank Restoration
- Thread starter Altos75
- Start date
stormer254
Husqvarna
AA Class
After rebuilding the engine and turning it over by hand I think a compression release is definitely in order. Is there a standard used on vintage Huskys?The 450 is a bit of a lump to kick over, are you fitting a decompressor?
justintendo
klotz super techniplate junkie
it never hurts to ever do a compression test.. then you will have a good baseline.After rebuilding the engine and turning it over by hand I think a compression release is definitely in order. Is there a standard used on vintage Huskys?
DeathFromAbove
My Cat Says AREAR!
Is that a speedo on the bars clamps? Do you have a better pic. I have one that looks like it clamps to the crossbar. I'd like to see how yours is mounted. Is it front or rear wheel drive? You did an awesome job on the tank and the rest of the bike looks great.

Sorry for the delayed response. The speedo is mounted off the bar risers via 2 brackets and anti vibe rubber mounts. The speedo is cable (1460mm) driven from the rear wheel (left side).
DeathFromAbove
My Cat Says AREAR!
DeathFromAbove
My Cat Says AREAR!
Crashaholic
Husqvarna
Pro Class
After rebuilding the engine and turning it over by hand I think a compression release is definitely in order. Is there a standard used on vintage Huskys?
Not really a standard that I'm familiar with. I've used a chainsaw decompression valve and it works good. Since this photo, which has a plastic handle, I've found a decompression valve with a chrome steel handle that's longer making it easier to pull open while wearing a glove. These run the risk of coming apart and falling inside which doesn't go well with a traveling piston so its prudent to weld a washer to the bottom of the reducer bushing you'll need for the 10mm decompression valve to fit the 14mm sparkplug hole.

First kick over:
Sorry hit the wrong button.View attachment 75035View attachment 75036
Very similar set up except for mounting to the crossbar rather than the risers. Was it stock with your bike?
Not really a standard that I'm familiar with. I've used a chainsaw decompression valve and it works good. Since this photo, which has a plastic handle, I've found a decompression valve with a chrome steel handle that's longer making it easier to pull open while wearing a glove. These run the risk of coming apart and falling inside which doesn't go well with a traveling piston so its prudent to weld a washer to the bottom of the reducer bushing you'll need for the 10mm decompression valve to fit the 14mm sparkplug hole.
View attachment 75153
Thanks Crash, haven't had an problem kicking her over yet but I can foresee it being an issue for the girlfriend.
DeathFromAbove
My Cat Says AREAR!

DeathFromAbove
My Cat Says AREAR!
Crashaholic
Husqvarna
Pro Class
Crashaholic
Husqvarna
Pro Class
That dynamo ignition is probably a big contributor to the easy start. Very nice.


 buying feed for hay burners now ...which is good as no argument about spending $$ on toys


