• Husqvarna Motorcycles Made In Sweden - About 1988 and older

  • Hi everyone,

    As you all know, Coffee (Dean) passed away a couple of years ago. I am Dean's ex-wife's husband and happen to have spent my career in tech. Over the years, I occasionally helped Dean with various tech issues.

    When he passed, I worked with his kids to gather the necessary credentials to keep this site running. Since then (and for however long they worked with Coffee), Woodschick and Dirtdame have been maintaining the site and covering the costs. Without their hard work and financial support, CafeHusky would have been lost.

    Over the past couple of weeks, I’ve been working to migrate the site to a free cloud compute instance so that Woodschick and Dirtdame no longer have to fund it. At the same time, I’ve updated the site to a current version of XenForo (the discussion software it runs on). The previous version was outdated and no longer supported.

    Unfortunately, the new software version doesn’t support importing the old site’s styles, so for now, you’ll see the XenForo default style. This may change over time.

    Coffee didn’t document the work he did on the site, so I’ve been digging through the old setup to understand how everything was running. There may still be things I’ve missed. One known issue is that email functionality is not yet working on the new site, but I hope to resolve this over time.

    Thanks for your patience and support!

73' CR400 Restoration...

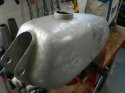
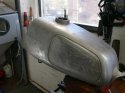
This is my second gas tank - its going to be my race tank as its got a few dings in it.... in these shots I have just taken it out of the blast cabinet.

The chrome on the sides is Ok - one small bubble and a shallow dent. I masked it off with clear packing tape that seems to hold up well to 100psi of aluminum oxide!

Any suggestions on color scheme...? (the other tank is in original maroon so this one can be just about any color)

Happy turkey day to all.
 

Attachments

  • P1070479.jpg
    P1070479.jpg
    84 KB · Views: 107
  • P1070477.jpg
    P1070477.jpg
    85.4 KB · Views: 104
Tom, that 'race tank' looks like its in great shape...
just my 2c....but I saw a guy paint a car engine hood and he had 'water spots' in painted onto it...interesting effect.. get your base color, spray water droplets, then airbrush white paint and let the water evaporate...
I'll look for the link..
I say go wild maybe maroon top, and purple sides?....LOL

I post the above but actually I'm conservative and would probably go with the vintage husky red or orange..
 
I would be real interested in your latest chain slipper in Stainless. I figure you can apply teflon sheet to it for more protection.
Let me know.
 
I agree with you regarding the teflon cover for my stainless chain slipper - A good idea I suspect.

I can do more if you want one.

Once this bike is running we will see if it serves any purpose!
 
FINISHED********************************************************************************!

Here are some pictures ...

As bought just over a year ago
Before.jpg

Today ....

P1070715.JPG
Runs very well and starts far easier than I was expecting. Absolutely everything has been done I think (hope) that I have left no stone unturned to get this bike right.

Here are some of the mile stones in pictures that I covered in the last few months...

I chose to send the engine out to John Leferve - I refinished the cases before hand. The barrel was bored locally to a 1st over with an original mahle.

I also assembled a complete tranny with the least visable wear. I upgraded the final drive shaft to accept the later splined sprokets - rather than the conical variety.

The motoplat was rebuilt by Vance Smith and seems to work just fine.

The cases were from a CR250 - they took a bit of machining and have the added benefit of an ignition side bearing oil cooling channel.

P1070710.JPG

Cases before assembelyP1070410.JPG

I have chosen to make a chain tensioner ... I am not 100% sure that it was necessary but I really enjoyed making it and I think I did a good job of it! - Once I get a chance to spend some time out on the bike out on the track I will truly be able to gauge if it has had a positive effect... Husky could have done this but did'nt .... Any thoughts??

Heres how it started... A skate board wheel amd some mild steel stock. The spring is from a 79' RM125/250/400 - still available.

DSCN0121.JPG
 
DSCN0125.JPG
This is after I turned down the end of the bush before tig welding it onto the arm ...

_________________________________________________________________________________

Here is my first trial fitment... I drilled the frame in order to pass the bolt all the way through to support both sides of the tensioner... There is a bolt on the back.DSCN0205.JPG

Another veiw with a new red skate board wheel, these wheels seem ideal as they are tough and come with bearings ...DSCN0223.JPG

Finished product ... DSCN0221.JPG
 
A couple of extra views of the tensioner. As viewed from under the bike looking up.DSCN0212.JPG

Side on ...DSCN0233.JPG

I have not run the bike with the tensioner on yet so I am guessing I may have to play around with it a bit to get it dialed in but its not exactly brain surgery so I am in with a chance of making it work right.

I may look at removing the rear chain guide or opening it up... any thoughts??

Here are some more random images...

DSCN0129.JPG _________________________________________________________________________________
Below is making a custom throttle cable from racing bicycle gear cable (very slick and rigid) and the smoothest throttle cable I have ever used. (and cost $6 bucks to make)

P1070569.JPG P1070568.JPG
 
Muddy.jpg

And I did it all because this is what I want to do........CANT WAIT****************************************!!

If any of you are doing any vintage racing here in the NY, NJ or CT area this summer please let me know.

A special big thank you to all of you that said such great things as I skinned my knuckles, scratched my head, wondered if Id ever finish this bike!

THANK YOU!
 
SHE'S GORGEOUS**************************************** You have given me some ideas for my 73 WR. I'm getting close to the finish. You've done some beautiful work. I wish I had a small bench lathe. It's fun to make your own parts.
 
Tom....wow she looks GREAT!.. I like the mods you did!..
Enjoy !!

I need to apply some barrel ends on a set of cables, what did you use to solder them with.
The reason I am asking is because I read somewhere to use silver solder...Comment?
 
Tom....wow she looks GREAT!.. I like the mods you did!..
Enjoy !!

I need to apply some barrel ends on a set of cables, what did you use to solder them with.
The reason I am asking is because I read somewhere to use silver solder...Comment?

Mike - thank you. You know what a labour of love these things are ...

I will email you all the info I have collected on making cables as soon as I get a chance. Its actually quite a fiddle but the end results are better than the stuff you can buy (in my opinion)
 
Beautiful! Can we see a shot from the left side... want to see how that custom exhaust you modded came out. I see you turned the Falcon's the other way around (shaft end down). Nice.
 
Beautiful! Can we see a shot from the left side... want to see how that custom exhaust you modded came out. I see you turned the Falcon's the other way around (shaft end down). Nice.

Here you go .... Its pretty much standard except you can remove the heat sheild with two M6 bolts. DSCN0379.JPG
 
how was the work ... of John ?... I bet started right up?..

John has done a good job, the bike started third or forth kick... there were some minor issues with the clutch that I got sorted pretty quick.

The Bing is performing well (fully rebuilt) - No complaints so far.

Next week I am putting it on the track. So far the only run time has been on the road.... It served well to get the carb and clutch dialed in.
I love the HUGE great big wall of power... A friend of mine rode it and said it was quicker off the line than his vintage Ducati 500. (and probably better off road too - lol)

Overall I am very pleased with the bike. Im intrested in the possible upgrading of the front brake hub - Early 80's double cam unit maybe. I would also like to fit some pro fab tripple trees or the ones John or Husky junk sell.
 
Nice resto ! I went with a set of Husky Junk triples and love them . I noticed the rear brake pedal is riding high and this is a common problem on the these old bikes . The tab at the bottom of the pedal that is supposed to limit its upward travel is too wimpy ; it wears and bends allowing the pedal to move too far upward . That position makes you take your foot off the peg and stomp down on the pedal with little" feel " for the brake which can result in locking it up and stalling the engine . I had this problem on my Mag . Tried bending the tab , beefing it up , etc. all to no avail . I ended up fabbing a bracket and welding it to the back side of the pedal . The bracket has a threaded hole for a bolt that goes up against the back cradle portion of the frame . This bolt creats an adjustable pedal stop . Use a nut on the bolt threads to lock it into position . You may want to weld a piece of metal on the frame for the bolt to contact so it doesn't wear into the frame . This setup works well and is out of the way . Sorry , no picture but I hope I have described the adjustable stop well enough that an excellent fabricator such as yourself can easily make one .
 
Back
Top