• Husqvarna Motorcycles Made In Sweden - About 1988 and older

  • Hi everyone,

    As you all know, Coffee (Dean) passed away a couple of years ago. I am Dean's ex-wife's husband and happen to have spent my career in tech. Over the years, I occasionally helped Dean with various tech issues.

    When he passed, I worked with his kids to gather the necessary credentials to keep this site running. Since then (and for however long they worked with Coffee), Woodschick and Dirtdame have been maintaining the site and covering the costs. Without their hard work and financial support, CafeHusky would have been lost.

    Over the past couple of weeks, I’ve been working to migrate the site to a free cloud compute instance so that Woodschick and Dirtdame no longer have to fund it. At the same time, I’ve updated the site to a current version of XenForo (the discussion software it runs on). The previous version was outdated and no longer supported.

    Unfortunately, the new software version doesn’t support importing the old site’s styles, so for now, you’ll see the XenForo default style. This may change over time.

    Coffee didn’t document the work he did on the site, so I’ve been digging through the old setup to understand how everything was running. There may still be things I’ve missed. One known issue is that email functionality is not yet working on the new site, but I hope to resolve this over time.

    Thanks for your patience and support!

73' CR400 Restoration...

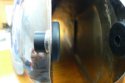
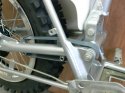
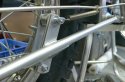
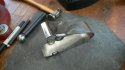
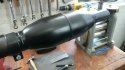
Today I finished up with the seat... The seat pan was rust free but had some damage on the rear mounting tab - the usual spider cracks.

Husky did not do a great job on that bit of engineering - :thumbsdown:

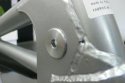
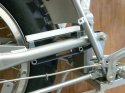
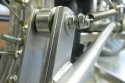
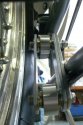
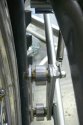
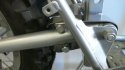
I welded in a new section from another old seat base - To prevent the same problem of cracking from coming back I decided I needed to do a bit of strengthening......

So I looked around my workshop for some scrap metal that looked the right size to become a strengthening gusset.... I found one pretty quickly! - it was the brace from my steel shelves..... I removed that nice and quickly (feeling just a bit guilty) it was after all just the right size and thickness.

I welded it into place and I hope that it serves to prevent future cracking - we will see!

Mean time I need to fix the shelves.

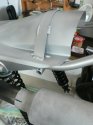
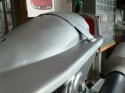
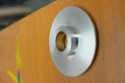
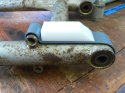
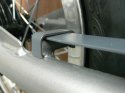
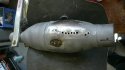
To finish I media blasted the pan after welding and sprayed it with silver paint.... if it had been a perfect original I would have had it plated but lifes short and who's to know.

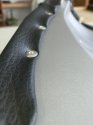
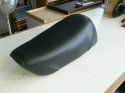
After that came the vynal cover which I pop rivited on to great effect. No glue needed.
 

Attachments

  • P1060949.jpg
    P1060949.jpg
    93.9 KB · Views: 137
  • P1060950.jpg
    P1060950.jpg
    87.3 KB · Views: 139
  • P1060951.jpg
    P1060951.jpg
    92.5 KB · Views: 139
  • P1060952.jpg
    P1060952.jpg
    95.9 KB · Views: 145
  • P1060954.jpg
    P1060954.jpg
    94.1 KB · Views: 142
Just a few more pictures of bits and pieces...

New Pirelli tires: 120-100-18 Rear. 80 - 100 - 21 Front.

Seems you cant get the old style sizes...? eg; 4.50x18 or 3.00x21

I hope they fit.
 

Attachments

  • P1060957.jpg
    P1060957.jpg
    92.3 KB · Views: 135
  • P1060962.jpg
    P1060962.jpg
    95.1 KB · Views: 146
  • P1060965.jpg
    P1060965.jpg
    92.6 KB · Views: 149
Some bits of restoration are needed and some bits are purely self indulgent.

In between real work today I faffed around with the tank mounting bolts and rubbers until I decided that with a bit of engineering some improvements could be made...

I turned an alloy bush that fits into the frame that has a precise 8mm through hole that makes up for the 10mm hole in the frame that Husqvarna provided...

I figure some progress is better than none at all!
 

Attachments

  • P1060968.jpg
    P1060968.jpg
    96.8 KB · Views: 166
  • P1060971.jpg
    P1060971.jpg
    106.2 KB · Views: 175
  • P1060970.jpg
    P1060970.jpg
    98.3 KB · Views: 172
  • P1060973.jpg
    P1060973.jpg
    98.1 KB · Views: 180
  • P1060967.jpg
    P1060967.jpg
    93.1 KB · Views: 177
Thanks for the encouragement Guys.

- Mike I could be talked into making a pair for you... PM me your details.

- Schimmelaw - from you thats a compliment.
 
The fenders arrived last week along with the number boards. All from Chuck at Husky junk. (good quick service)

I was supposed to be too busy with real work to stop and spend the best part of half a day fitting all the parts but the temptation was too great. The fit of these after market fenders is very good - having wrestled in the past with some pretty bad after market stuff this is far better...

I am also in the process of developing a chain slipper for my mag swing arm as one does not seem to be available - I am toying with the idea of an all alloy peice althougth in the picture below I have created a steel model that could be covered in teflon.

The problem lies in attaching it in a simple manner that is efficent and strong without being over complicated. Its also got to look stock.

These are mostly just ideas at this point.
 

Attachments

  • P1060980.jpg
    P1060980.jpg
    96.1 KB · Views: 174
  • P1060983.jpg
    P1060983.jpg
    95.4 KB · Views: 177
  • P1060982.jpg
    P1060982.jpg
    96.7 KB · Views: 177
  • P1060981.jpg
    P1060981.jpg
    92.8 KB · Views: 185
  • P1060975.jpg
    P1060975.jpg
    99.3 KB · Views: 202
So during the weekend I made up my own version of the chain guide .... the old rubber rollers were shot to bits and the steel U shaped section that houses the rollers is a bit agriculutral.....

So time for a bit of "I did it my way" engineering.

This is an all alloy piece - I figured it would wear slowy and would certainly not have any impact on chain life... The rollers are alloy with a bronze bush... there are two bronze washers each side.

I made a small steel peice to attach the brake rod retention spring - which has worked out cleanly.

It all looks stock so I am happy. I will laugh if the chain its it in 5 minutes though!!! (laugh/cry)
 

Attachments

  • P1060987.jpg
    P1060987.jpg
    91.7 KB · Views: 167
  • P1060989.jpg
    P1060989.jpg
    95.4 KB · Views: 158
  • P1060990.jpg
    P1060990.jpg
    94.7 KB · Views: 165
  • P1060991.jpg
    P1060991.jpg
    94.2 KB · Views: 175
Absolutely incredible workmanship. (And thanks for that last photo. Was wondering where to hook up the brake return spring on my 450. Thought it snapped to the chain guard, which has disappeared ! )

I continue to be amazed by your effort and bike!
 
offyatindy;115115 said:
Absolutely incredible workmanship. (And thanks for that last photo. Was wondering where to hook up the brake return spring on my 450. Thought it snapped to the chain guard, which has disappeared ! )

I continue to be amazed by your effort and bike!

Thank you for your kind words -

I have not been able to get near the bike for a few weeks as work has got in the way .... I still managed a few minutes to clean the intake and transfer ports on the barrel today as the engine is the current project... I am hoping to get at least a shake down ride in before winter sets in.... it kills me to see the bike so almost finished yet in reality quite a long way off.
 
Progress is an erratic thing with this restoration.... That said I have been making small steps in the right direction.

I have bought a number of engine cases in a bid to find a near perfect set - Most all seem to suffer from corrosion insidse the crank cases - Probably not much of an issue admittedly.

Having repainted to original spec I felt pretty pleased that I finally had the job done properly.... That is right up the moment that I tried to fit the barrel..... turns out I was sold 250 cases as 400 cases!!!

The 400 barrel sleeve is way too big to slide down into the 250 cases...

What an idiot. I could'nt beleive I had made such a simple, dumb mistake.

I took a few measurements with my calipers and called my local machinist. (they laughed at me)

The cases are now at the machine shop - Fortunatley they are essentially the same cases.... plus/minus a bit of metal around the crank case opening!
 

Attachments

  • P1070410.jpg
    P1070410.jpg
    99 KB · Views: 93
Here is my addaption for the brake rod - It was too long and I needed to shorten it up so here is what I came up with.

A bronze threaded bush that also seats the spring.

Foot pegs are refinished Ebay items ($15) from an 85' WR
 

Attachments

  • P1070403.jpg
    P1070403.jpg
    97.7 KB · Views: 134
  • P1070402.jpg
    P1070402.jpg
    96.1 KB · Views: 141
  • P1070400.jpg
    P1070400.jpg
    93.6 KB · Views: 145
As there seems to be no chain slipper available for my bike I have invented my own.

I beleive this is an acceptable upgrade... if you read the early magazines - 70's Dirt Bike and they alike there are a wealth of gadgets available, both good, bad and totally useless.
Malcolm Smith and they alike were making just about every bolt on extra you can imagine.

So - after speaking to a friend we drew up a cad image and he cut it from stainless steel on his water bed plasma cutter.

(we can do more if it turns out to be a functional design)

Slippers to my knowledge are usually teflon or rubber - this one is stainless steel! (we will see how it fairs)
 

Attachments

  • P1070417.jpg
    P1070417.jpg
    94.5 KB · Views: 118
  • P1070420.jpg
    P1070420.jpg
    95 KB · Views: 124
  • P1070427.jpg
    P1070427.jpg
    94.7 KB · Views: 119
This now looks much better - a formally pretty beaten up end pipe.... four or so hours of dent removal and some paint.

These end pipes are pretty hard to get hold of so I really did not have much of an option other than to repair this one.
 

Attachments

  • P1070207.jpg
    P1070207.jpg
    94 KB · Views: 118
  • P1070421.jpg
    P1070421.jpg
    92.7 KB · Views: 120
Just collected the tank form the paint shop ... its a big moment and really makes the bike look complete - :D
 

Attachments

  • P1070438.jpg
    P1070438.jpg
    95.4 KB · Views: 156
  • P1070429.jpg
    P1070429.jpg
    90.4 KB · Views: 147
  • P1070440.jpg
    P1070440.jpg
    106.2 KB · Views: 137
Back
Top