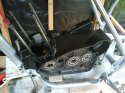
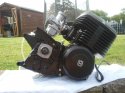
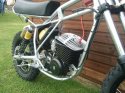
• Husqvarna Motorcycles Made In Sweden - About 1988 and older

  • Hi everyone,

    As you all know, Coffee (Dean) passed away a couple of years ago. I am Dean's ex-wife's husband and happen to have spent my career in tech. Over the years, I occasionally helped Dean with various tech issues.

    When he passed, I worked with his kids to gather the necessary credentials to keep this site running. Since then (and for however long they worked with Coffee), Woodschick and Dirtdame have been maintaining the site and covering the costs. Without their hard work and financial support, CafeHusky would have been lost.

    Over the past couple of weeks, I’ve been working to migrate the site to a free cloud compute instance so that Woodschick and Dirtdame no longer have to fund it. At the same time, I’ve updated the site to a current version of XenForo (the discussion software it runs on). The previous version was outdated and no longer supported.

    Unfortunately, the new software version doesn’t support importing the old site’s styles, so for now, you’ll see the XenForo default style. This may change over time.

    Coffee didn’t document the work he did on the site, so I’ve been digging through the old setup to understand how everything was running. There may still be things I’ve missed. One known issue is that email functionality is not yet working on the new site, but I hope to resolve this over time.

    Thanks for your patience and support!

79 or 390 resurection

engine lookin good

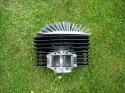
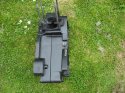
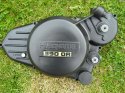
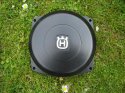
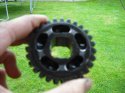
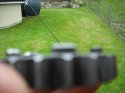
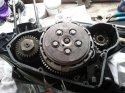
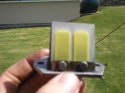
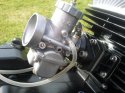
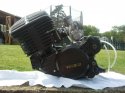
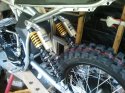
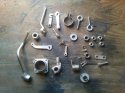
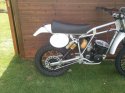
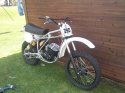
hi guys made small amount of progress,removed bearings/seals from cases and bead blasted all parts and painted,cleaned and replaced bearings and put in all new seals,and some graphics.decicded to bead blast head at 40 psi gives near polished look then paint with some vht paint and baked in oven on full for 1hr or so(she was happy) now just awaiting some transmission gears from america to arrive then can go ahead with re assembly,this is my first complete engine rebuild so any tips appreciated.
 

Attachments

  • bike engine 001.jpg
    bike engine 001.jpg
    96.8 KB · Views: 75
  • bike engine 002.jpg
    bike engine 002.jpg
    102.4 KB · Views: 76
  • bike engine 003.jpg
    bike engine 003.jpg
    99.1 KB · Views: 72
  • bike engine 004.jpg
    bike engine 004.jpg
    102.3 KB · Views: 75
  • bike engine 005.jpg
    bike engine 005.jpg
    100.4 KB · Views: 70
Patgas,
Doesn't look to me as though you need any tips. Looks as though you have everything well in hand. Nice work. Keep posting up what you doing - I'm watching.
Rick
 
yep

yes blasted everything myself,brought a compressor and blast cabinet best thing i ever brought,rebuilt a cr 500 few years back and paid to hav parts blasted and bottom end rebuilt,and thought this time i want to do it myself as its not rocket science if your pretty hands on.
 
operation engine

as you can see my shed is like a operating theater,
main shaft and lay shaft inspected and put back in,3rd gear replaced and 5-6th you can see in pics the wear on dogs just about,noticed somethig strange that there was a shim/washer missing between 3rd 5-6th gear so waiting for this and gaskets shift drum put back in and all other components inc shift forks,didnt remove gears from shafts just removed them complete and put cable ties over ends to keep them on splines.
 

Attachments

  • engine 004.jpg
    engine 004.jpg
    97.2 KB · Views: 52
  • engine 003.jpg
    engine 003.jpg
    95.6 KB · Views: 53
  • engine 002.jpg
    engine 002.jpg
    95.8 KB · Views: 51
  • engine 001.jpg
    engine 001.jpg
    89.2 KB · Views: 62
no not levers

no didnt blast levers but can get good shiny finish with glass beads and drop pressure to about 40-50 psi,or pads that we use in work for cleaning copper pipes,you can get these on a arbor to put on drill and that gives nice finish.
 
time for re assembly

well guys rest of my gaskets arrived today and the replacement shim for gearbox that was missing just a few pics of assembly.allso fitted some boysen reeds along the way.
 

Attachments

  • en7.jpg
    en7.jpg
    92.2 KB · Views: 43
  • en6.jpg
    en6.jpg
    89.1 KB · Views: 42
  • en5.jpg
    en5.jpg
    94.5 KB · Views: 48
  • en4.jpg
    en4.jpg
    95.4 KB · Views: 47
more progress

bead blasted carb and fitted new vent hoses and assembly is complete,just awaiting kick start and engine is ready to go back in frame .
 

Attachments

  • en3.jpg
    en3.jpg
    92.9 KB · Views: 78
  • en2.jpg
    en2.jpg
    92 KB · Views: 69
  • en1.jpg
    en1.jpg
    92.7 KB · Views: 66
Cracking job mate.

Did you split the cases yourself? If so, did you use the correct tool for this job?
 
yep

yes i did split cases,really is very straight forward my friend welded up a puller using a puller from one of those £10 three jaw sets bit of tube and square of plate,and i brought a flywheel puller,worked a treat.looks a bit primative but works fine,should work with most engines will just hav to drill holes acording to crank cases.
 
Bit more progress

as im waiting for parts,decided to tackle airbox,removed filter to find a coat hanger type item being used as filter cage mmm.so removed filter bracket and rubber carb thingy,bead plasted parts and re painted and re siliconed rubber boot back in and ready for re assembly.
 

Attachments

  • AIRBOX.jpg
    AIRBOX.jpg
    90.5 KB · Views: 64
looking good

well guys after getting bit side tracked with camper project i decided to get back on with her,nickel plated parts arrived re fitted those and re mounted airbox,fitted refurbed ohlins and now at long last removed her from bench so i can dry fit exhaust to check clearance of front mudguard,first time out of shed so managed to get a look at bigger picture and im very happy so far.
 

Attachments

  • Photo016.jpg
    Photo016.jpg
    98.2 KB · Views: 120
  • Photo018.jpg
    Photo018.jpg
    99.4 KB · Views: 97
  • Photo017.jpg
    Photo017.jpg
    97.6 KB · Views: 107
  • Photo007.jpg
    Photo007.jpg
    98.1 KB · Views: 98
  • Photo002.jpg
    Photo002.jpg
    96.2 KB · Views: 90
Looking like a bike

managed to skive of work today and got all plastics fitted and lined up and even deacals on front number board really shaping up now.
 

Attachments

  • Photo005.jpg
    Photo005.jpg
    96.7 KB · Views: 96
  • Photo004.jpg
    Photo004.jpg
    95.8 KB · Views: 95
airbox cover

well after searching for a new cover decided i was going to have to re use old one,forgot to take pick of start so here is one half way through,cover had some deep scratches so sanded them out starting with i think 150 and going all way up to 1500 this a very time consuming task i did this on a cr 500 tank once and took hours,this pic is after severall hours of sanding,after this i polish with plastic scratch repair kit not quit finished yet but will post pic when complete.
 

Attachments

  • Photo003.jpg
    Photo003.jpg
    92.5 KB · Views: 30
patgas;110032 said:
it was a company called collins chemical blacking in surrey did good job but not cheap.

Thanks mate - I may have a need for a service like theirs at some point. :thumbsup:
 
finished air box and fitted shocks

i managed to finish air box cover not 100% happy with out come but better than before will leave it for now maybe i will come across a nos item or hav another go at it at some time,allso managed to fit some rubber washers to top heim bearings on shocks,after searching for sometime used rubber gromets from metal elecktrical boxes cut in half, fit on the stepped washers a treat and close gap up and look spot on allso used plasic 3/4 black p clips used for elecktrical cables to mount airbox cover fit a treat.
 

Attachments

  • Photo009.jpg
    Photo009.jpg
    91.3 KB · Views: 64
Back
Top