• Husqvarna Motorcycles Made In Sweden - About 1988 and older

  • Hi everyone,

    As you all know, Coffee (Dean) passed away a couple of years ago. I am Dean's ex-wife's husband and happen to have spent my career in tech. Over the years, I occasionally helped Dean with various tech issues.

    When he passed, I worked with his kids to gather the necessary credentials to keep this site running. Since then (and for however long they worked with Coffee), Woodschick and Dirtdame have been maintaining the site and covering the costs. Without their hard work and financial support, CafeHusky would have been lost.

    Over the past couple of weeks, I’ve been working to migrate the site to a free cloud compute instance so that Woodschick and Dirtdame no longer have to fund it. At the same time, I’ve updated the site to a current version of XenForo (the discussion software it runs on). The previous version was outdated and no longer supported.

    Unfortunately, the new software version doesn’t support importing the old site’s styles, so for now, you’ll see the XenForo default style. This may change over time.

    Coffee didn’t document the work he did on the site, so I’ve been digging through the old setup to understand how everything was running. There may still be things I’ve missed. One known issue is that email functionality is not yet working on the new site, but I hope to resolve this over time.

    Thanks for your patience and support!

83 430 Rider Project

Your very welcome. Whilst I have been doing other stuff and working on the project (seems like I have too many projects) I didn't like the bar mounts and stripped them and painted them black with a satin clear coat on them. I like this look better than the plain blasted ones.


I got the footpegs mounted yesterday. I had to machine the bolts a little shorter as there was too much thread showing. I forgot how hard grade 8 is till I cut in on the lathe.


Today's adventure may be getting the carb out of the pinesol concoction and cleaning it up. I am pretty sure I will have to soda blast the body and bowl.

More to come.
 
I have accomplished some more stuff since Saturday. I totally messed up my blasting air compressor pressure regulator switch. I won't even go into that.

I got the carb out of the pinesol concoction and soda blasted it, so I will start putting that together this week.


Received my new to me tank from Darin on Monday. I had to strip the gas cap as it was painted white.............who would have guessed. I then polished it out with some Mothers metal polish. It all looks pretty good.


More to come in a few.
 
Hey, looking good! Can't wait to see tank on your silver frame. Cap looks good.

What is your pinesol concoction? How long do you let it soak? I have one kinda corroded some but not real bad. How was that one when you started with it? When you soda blast it, are you doing inside and out?
 
Hey, looking good! Can't wait to see tank on your silver frame. Cap looks good.

What is your pinesol concoction? How long do you let it soak? I have one kinda corroded some but not real bad. How was that one when you started with it? When you soda blast it, are you doing inside and out?

You use pinesol with water. On the bottle it says for heavy grease removal 1 part pinesol to four parts water. I have tried it straight but IMO it works the best at 1:2 or 1:3. I let it soak a day to a day and a half and I agitate the bucket every few hours to swish it around. This carb was pretty bad to start with, it had paint and grime all over and inside it. It took some of the paint off and most of the dried up fuel in the bowl. Wash it off with water and see how it looks. I don't usually soda blast the passage ways in the carb as I don't know if it will plug up or not. I usually just use air pressure through the passage ways and blast the outside of the carbs and the parts.
 
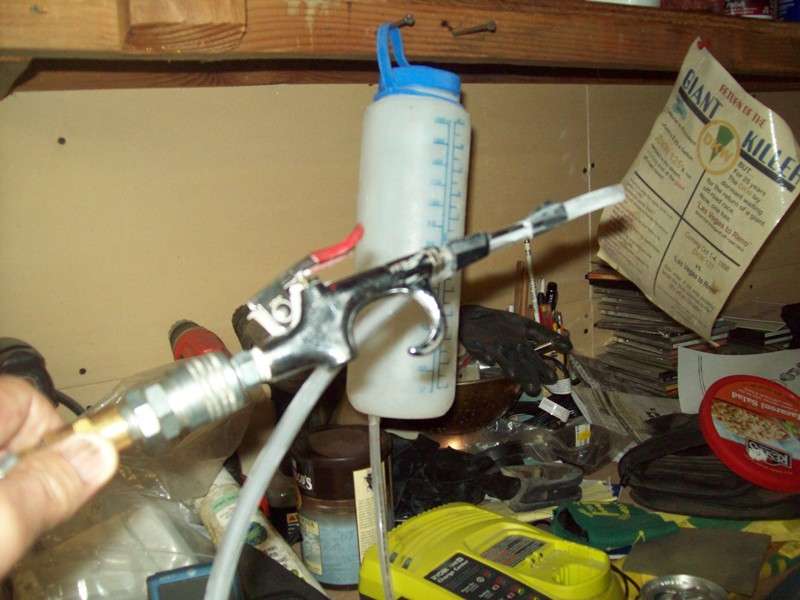
I made this small soda blaster out of Nalgene bottle and some plastic tubing. It works good for the little stuff I do. Cost me about $5.

 
Here is my two cents, cause I almost shot these on. I wanted to real bad and think this would go good on your 83.

Make up a stencil using blue painters tape. Then take them to local graphic place to make up the tanks stripes.

That h logo I placed should be good.

But replicate the blue/yellow stripes in this attachment and stick them on tank. Use black and silver as the colors instead of blue/yellow.

Then you can get some side plate ones done in the silver/black/engine size in red.

Your fork legs would look good black with husqvarna highlighted in red.

Look good with black rims.

That would be a bad arse bike!

http://www.vintagehusky.com/products/decals/d0009.htm
 
For my two penneth worth. Keep it simple then maybe backtrack to shiny bits. I like the tank as it is, I think the '83 is THE best looking Husky and am looking forward to seeing this one. Liking the black rims suggestion too !
 
I agree, both of those bikes look cool. Wildbeest, I told you this before! You did a great job, you got talent!

The other red one looks like an 82 left over going on 83 factory bike.

Mr Pilot, your bike is looking great, anyway it ends up will look good.
 
I finished up Ron's Curnutts so now I'm bored so here are a couple of my other Huskys.
This one is in one of my sheds, I may do it next.


This one I may go ride tomorrow since I am a non-essential gubment employee.

 
I worked on the bike a little last night and cleaned up the coil/CDI box. Getting all the paint off stuff has been a chore. I hooked up the three wires that I knew belonged with each other. The rest of the wiring harness is a mess. I only plan on riding this around in the desert so I will not be using the lights anyway. Here is the question for you experts in wiring. That is my weak point, and besides I haven't looked around for a diagram anyway. I am going to assume the non plugged in wire that the arrow is pointing to is the kill switch wire. Correct? There is no other place I can find in the harness that it would plug into. The bike has spark as it is wired now.

 
Back
Top