schimmelaw
Husqvarna
AA Class
81" 430XC street legal motard conversion in progress.
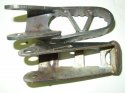
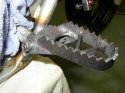
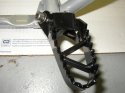
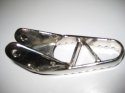
Photo 1: Comparison btwn after-market on top and stocker on the bottom.
Stocker: 1/16" stamped steel w/cap welded on. Just like everbdy elses. Mine were packed w/ CA mud/dirt, bent, rusted, mounting holes wallowed out, teeth rounded over, wore out mounting hardware and finally, painted (sort of) the wrong color. Not much tolerance remained in the stock peg set up. Alot of slop back/forward and up/down at the mounting/pivot location.
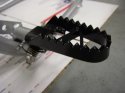
Aftermarket: 1/8" steel. Much beefier setup. Teeth look to be laser cut - very sharp. Peg are about 1 5/8" wide at the widest point (closest to the bike) and tapering down to about 1 1/4" wide at the tip.
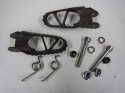
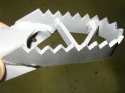
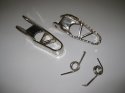
Photo 2: Parts. I love new parts. The above pegs (Phillip in Arizona -$80.00 - Husky Product reproduction), nickle plated springs, 10mm nylon bushings, 8X55mm stainless allens, 8mm ssteel flat washers and 8mm nylock flange nuts.
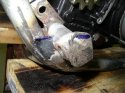
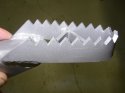
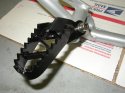
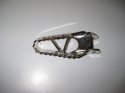
Photo 3: Work done. The blue marks indicate where I did some welding to raise those areas. The "hooked end" of the spring had worn down the mount on the frame and hence had lost alot of its tension. By raising the material where the spring loops over the frame, the tension (preload) on the spring increased and the peg became significatly tighter. The new pegs also drooped at the ends when mounted up and necessiated a build up of the peg stop. A couple of beads were laid across the top and ground/filed down to match the contor of the underside of the pegs while keeping the peg level. Pegs don't droop and are now level. (This welding/grinding procedure was done on both sides of the bike)
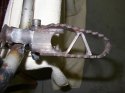
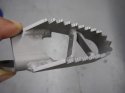
Photo 4: Right side peg monted up. Notice where the mount got torched to bend the whole assemby forward (just left of the end of the peg). Pegs pointed backwards - now - post torching and a 2lb. sledge - pegs are straight and level.
Photo 5: Left side view. Same as above. Frame mount got welded, ground/filed and torched & bent just like above. Straight and level too.
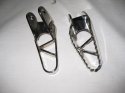
These Husky Product reproduction pegs are bad ss and a huge improvement over the stockers. Heavy duty design, good beefy welds, sharp teeth, straight and level, rotate up easily without a lot of slop and "snap" back down with authority. I'm stoked.
Black powder.
Photo 1: Comparison btwn after-market on top and stocker on the bottom.
Stocker: 1/16" stamped steel w/cap welded on. Just like everbdy elses. Mine were packed w/ CA mud/dirt, bent, rusted, mounting holes wallowed out, teeth rounded over, wore out mounting hardware and finally, painted (sort of) the wrong color. Not much tolerance remained in the stock peg set up. Alot of slop back/forward and up/down at the mounting/pivot location.
Aftermarket: 1/8" steel. Much beefier setup. Teeth look to be laser cut - very sharp. Peg are about 1 5/8" wide at the widest point (closest to the bike) and tapering down to about 1 1/4" wide at the tip.
Photo 2: Parts. I love new parts. The above pegs (Phillip in Arizona -$80.00 - Husky Product reproduction), nickle plated springs, 10mm nylon bushings, 8X55mm stainless allens, 8mm ssteel flat washers and 8mm nylock flange nuts.
Photo 3: Work done. The blue marks indicate where I did some welding to raise those areas. The "hooked end" of the spring had worn down the mount on the frame and hence had lost alot of its tension. By raising the material where the spring loops over the frame, the tension (preload) on the spring increased and the peg became significatly tighter. The new pegs also drooped at the ends when mounted up and necessiated a build up of the peg stop. A couple of beads were laid across the top and ground/filed down to match the contor of the underside of the pegs while keeping the peg level. Pegs don't droop and are now level. (This welding/grinding procedure was done on both sides of the bike)
Photo 4: Right side peg monted up. Notice where the mount got torched to bend the whole assemby forward (just left of the end of the peg). Pegs pointed backwards - now - post torching and a 2lb. sledge - pegs are straight and level.
Photo 5: Left side view. Same as above. Frame mount got welded, ground/filed and torched & bent just like above. Straight and level too.
These Husky Product reproduction pegs are bad
ss and a huge improvement over the stockers. Heavy duty design, good beefy welds, sharp teeth, straight and level, rotate up easily without a lot of slop and "snap" back down with authority. I'm stoked.Black powder.