• Hi everyone,

    As you all know, Coffee (Dean) passed away a couple of years ago. I am Dean's ex-wife's husband and happen to have spent my career in tech. Over the years, I occasionally helped Dean with various tech issues.

    When he passed, I worked with his kids to gather the necessary credentials to keep this site running. Since then (and for however long they worked with Coffee), Woodschick and Dirtdame have been maintaining the site and covering the costs. Without their hard work and financial support, CafeHusky would have been lost.

    Over the past couple of weeks, I’ve been working to migrate the site to a free cloud compute instance so that Woodschick and Dirtdame no longer have to fund it. At the same time, I’ve updated the site to a current version of XenForo (the discussion software it runs on). The previous version was outdated and no longer supported.

    Unfortunately, the new software version doesn’t support importing the old site’s styles, so for now, you’ll see the XenForo default style. This may change over time.

    Coffee didn’t document the work he did on the site, so I’ve been digging through the old setup to understand how everything was running. There may still be things I’ve missed. One known issue is that email functionality is not yet working on the new site, but I hope to resolve this over time.

    Thanks for your patience and support!

Air box access to new pod filter.

zeph

Husqvarna
C Class
Thanks to those who put this modification online. Completed mine yesterday with just a couple of slight extra differences.
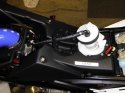
I couldn't figure how to disconnect the fuel pipe so I removed the screws and lifted out the fuel pump.This meant I could raise the tank much more and it made removing the air box very easy.
To access the filter pod it seemed easier to have the front section of the top air box cover cut open. It was easy to make two straight cuts with a fine bladed metal hack saw.
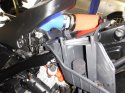
I cut the base of the bend on a slight slope so it tilted down into the air box when fitted over the inlet. This gave a bit more clearance for the pod filter.
The bike does have a bit more induction roar and seems to be a little smoother.
 

Attachments

  • DSCF1136 (800x600).jpg
    DSCF1136 (800x600).jpg
    301.5 KB · Views: 255
  • DSCF1138 (800x600).jpg
    DSCF1138 (800x600).jpg
    344 KB · Views: 277
  • DSCF1142 (800x600).jpg
    DSCF1142 (800x600).jpg
    345.6 KB · Views: 262
Is the pod made at a angle ??? What is the part # and source of the filters you used ??

Thanks
Rod
 
This a direct cut and paste from Quirky's post on Adventure Rider. I used his information to buy my parts.
See the link on our forum to the ADVR site on how to do the air box mod. http://www.advrider.com/forums/showpost.php?p=23687271&postcount=3347

"From UNI Filter in the US. 2 stage foam filter Part # UP-6229AST (reminder the "A" is important for the 15 degree angle)

From Silicon intakes. 90 degree 2.25" elbow Part # SIL000360
Silicon tube joiner 2.25" Part # JOI000111

From UNI Filter in Oz. Crankcase breather pod, 13mm intake 40mm x 40mm."

Here is the video on how to do the mod without removing the airbox. It is official, we modded one successfully

http://youtu.be/a_5mKsVW_-Y
 
I now know how easy it is to remove the pipe that goes into the fuel pump.
Just push down on the clip at the base of the pipe where it enters the pump housing and lift the fuel pipe up and out.
Way easier than when I lifted the whole pump up to remove the air box.
Thanks to the man who put up the link to the full 301 page workshop manual.
 
If you have the side panel off on the right side, the radiator scoop/shroud off on the right and the radiator loosened and dropped then you should be able to drill the hole for the crank case filter relocation from the bottom of the air box (maybe).
 
You were able to do all of the work necessary without removing the airbox at all? Does this include drilling holes/crank case breather mod? I'm ordering parts to do this now. :P
Yes, mod was done in place. Really only needed to remove the left panel.

I haven't done the breather mod. There is a coarse filter material within the box. I might get a small inline gas filter and just add it into the hose. Probably would be a good idea. The filters I have seen by others sure can't hurt either.
 
You were able to do all of the work necessary without removing the airbox at all? Does this include drilling holes/crank case breather mod? I'm ordering parts to do this now. :P

I did mine this way, although I cut closer to the 3rd screw to give myself more clearance when cleaning the Pod
I was not happy, given how meticulous I am reading air filter cleanliness to find find dust in the airbox & throttle body
I also cut around the rubber, using it to give an accurate circle
Used my Dremel & a hole saw, then a soldering iron to clean up the edges
Two lugs on the front of the seat fit under the airbox lugs, supporting the airbox
I'm looking forward to fitting the Pod (& pleased that I might never have to remove the OEM air filter cover plate again)
 
Back
Top