schimmelaw
Husqvarna
AA Class
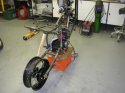
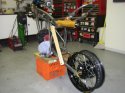
81' 430XC street legal motard conversion in progress.
Preliminary mock up - much more to do.
Stock rear wheel assembly is in the "for sale" box. We all know what it looks like.
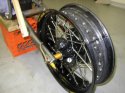
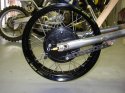
Photo 1: Parts. Black excel 4.25 X 17" 36 hole motard rim. Powdered 82' 430 hub with refurbished hardware and new innards. Powdered stock 81' backing plate with wide EBC pads and plated hardware. Cleaned and polished "shouldered" stock 82' WR spokes and nipples (previous "before and after" thread).
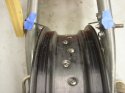
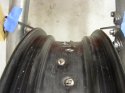
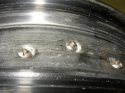
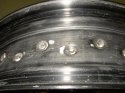
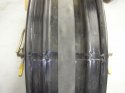
Photos 2, 3, 4 and 5: Spoked and mounted. WHAT A BITCH****************************************!!! I have respoked several hub/rim combos in the past BUT this was a monster. Big hub - small rim. Not much "wiggle" room. Glad that is over w/. I always enjoy the projects of a rebuild, but this one wasn't fun. No joy in this respoke. Went to bed late with a BAD SS migrane. Anyways, came out as anticipated.
Still need: truing (not this wkend - I've had enough), chain, sprocket and tire.
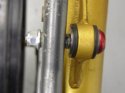
Preliminary mock up - much more to do.
Stock rear wheel assembly is in the "for sale" box. We all know what it looks like.
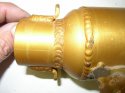
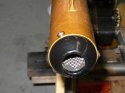
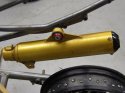
Photo 1: Parts. Black excel 4.25 X 17" 36 hole motard rim. Powdered 82' 430 hub with refurbished hardware and new innards. Powdered stock 81' backing plate with wide EBC pads and plated hardware. Cleaned and polished "shouldered" stock 82' WR spokes and nipples (previous "before and after" thread).
Photos 2, 3, 4 and 5: Spoked and mounted. WHAT A BITCH****************************************!!! I have respoked several hub/rim combos in the past BUT this was a monster. Big hub - small rim. Not much "wiggle" room. Glad that is over w/. I always enjoy the projects of a rebuild, but this one wasn't fun. No joy in this respoke. Went to bed late with a BAD
SS migrane. Anyways, came out as anticipated. Still need: truing (not this wkend - I've had enough), chain, sprocket and tire.