schimmelaw
Husqvarna
AA Class
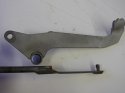
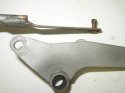
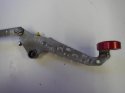
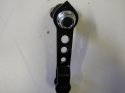
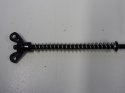
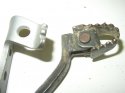
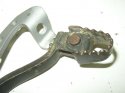
First and second photo: The stock brake rod and pedal. Brake rod has been straightened. Bent all up - hammer and concrete. Notice the wallowed out hole on the pedal and the worn down clevis pin. At that juncture the slop was considerable. Alot of downward movement at the pedal before any brakes. Fixing that is what started this whole re-do.
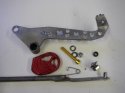
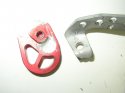
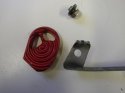
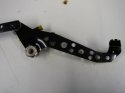
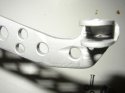
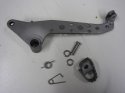
Third photo: The pedal where the clevis pin goes thru has been drilled for the insertion of a rubber bushing. (Cut down rubber hose - lifetime supply). The brake rod clevis pin has been welded up and filed back down to what was stock circumfrence. Also drilled and chamfered ten holes along the arm of the pedal. Why not. Small hole drilled for a "brake snake" and a large hole drilled through the top of the pedal for the brake extension mounting. Misc other parts for the rebuild: rubber bushing, couple of metal washer (changed these to nylon), long anodized allen bolt, lock nut, small barry clip and a Joker Machine brake pedal extension w/ attachment bolt.
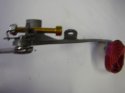
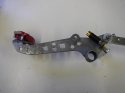
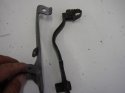
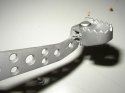
Fourth photo: This is how eveything mounts together. Clevis pin fits through the rubber bushing in the drilled out pedal, sawdwiched between the two nylon washers. It's all buttoned up with the small barry clip on the inside. No cotter pins for me, if I can get around it. The difference is dramatic. NO SLOP! NO FREE-PLAY! Its tight in all directions and the action is smooth. Move the pedal and the brake rod moves. The long anodized bolt has been sleeved with a hose and the lock nut put on correctly. I also put a plastc screw protector on this bolt where it contacts the frame (not shown in these pictures).
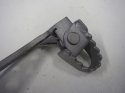
Fifth photo: Side view. Metal components ready for black powder. Street-legal motard conversion in progress.
Third photo: The pedal where the clevis pin goes thru has been drilled for the insertion of a rubber bushing. (Cut down rubber hose - lifetime supply). The brake rod clevis pin has been welded up and filed back down to what was stock circumfrence. Also drilled and chamfered ten holes along the arm of the pedal. Why not. Small hole drilled for a "brake snake" and a large hole drilled through the top of the pedal for the brake extension mounting. Misc other parts for the rebuild: rubber bushing, couple of metal washer (changed these to nylon), long anodized allen bolt, lock nut, small barry clip and a Joker Machine brake pedal extension w/ attachment bolt.
Fourth photo: This is how eveything mounts together. Clevis pin fits through the rubber bushing in the drilled out pedal, sawdwiched between the two nylon washers. It's all buttoned up with the small barry clip on the inside. No cotter pins for me, if I can get around it. The difference is dramatic. NO SLOP! NO FREE-PLAY! Its tight in all directions and the action is smooth. Move the pedal and the brake rod moves. The long anodized bolt has been sleeved with a hose and the lock nut put on correctly. I also put a plastc screw protector on this bolt where it contacts the frame (not shown in these pictures).
Fifth photo: Side view. Metal components ready for black powder. Street-legal motard conversion in progress.