-
Hi everyone,
As you all know, Coffee (Dean) passed away a couple of years ago. I am Dean's ex-wife's husband and happen to have spent my career in tech. Over the years, I occasionally helped Dean with various tech issues.
When he passed, I worked with his kids to gather the necessary credentials to keep this site running. Since then (and for however long they worked with Coffee), Woodschick and Dirtdame have been maintaining the site and covering the costs. Without their hard work and financial support, CafeHusky would have been lost.
Over the past couple of weeks, I’ve been working to migrate the site to a free cloud compute instance so that Woodschick and Dirtdame no longer have to fund it. At the same time, I’ve updated the site to a current version of XenForo (the discussion software it runs on). The previous version was outdated and no longer supported.
Unfortunately, the new software version doesn’t support importing the old site’s styles, so for now, you’ll see the XenForo default style. This may change over time.
Coffee didn’t document the work he did on the site, so I’ve been digging through the old setup to understand how everything was running. There may still be things I’ve missed. One known issue is that email functionality is not yet working on the new site, but I hope to resolve this over time.
Thanks for your patience and support!
You should upgrade or use an alternative browser.
Best Spark Plug 4 Terra: Show me your PLUGS
- Thread starter mag00
- Start date
Ogre_fl
Husqvarna
Pro Class
What you need to do is unplug the wires that attach to the top of the coil.
Its a bit fusty if you have big meat hooks like I do.
Mark what wire goes to what plug.
Then you wiggle, twist & pull the coil up.
It can take some effort.
Riding Again
Husqvarna
AA Class
mag00
Husqvarna
Pro Class
I don't think you are supposed to use anti seize on the plug threads. Especially now with the newer technologies. The plug heat range is determined on how it transfers heat from the plug to the engine---via threads. If you put goop on the threads, you change the heat transfer co efficient. Highly not recommended. I doubt it will hurt anything, but that stuff goops up and can fall into the engine after you have changed the plugs a couple times.I did both spark plugs with silicone grease on the boots and anti seize on the plugs in 15 minutes this morning before I went to work( forgot to do them last night). The first time takes longer but after you see how easy it is no time at all. Trick with the coils, take a small straight screw driver pry up a little on the clip and pull the plug out. With the coil turn them from side to side as you pull up on the top and push up on the bottom of the coil with your finger. The plug wires actually have a yellow dot on the outside plug wire to let me know which wire goes where. Check yours. maybe they are the same.
http://www.ngksparkplugs.com/pdf/tb-0630111antisieze.pdf They don't even mention the heat transfer, but talk about other issues.
I never use anything on spark plug threads, never had a problem. I have used it on o2 and have had problems.
mag00
Husqvarna
Pro Class
I hate to ask this but could someone tell me how to change the plugs? Is that a stick coil on top? How do you get them out? I'd like to try a laser iridium plug and see how that works out.
Get a good flashlight. You will need a very small flat tip or some sort of pointy thing.
Take a good look at the top of the "stick" thing. Where the wires plug in, an oval plug, on the top of the assembly above where the wires go in, you should see a little tab that locks the plug in. You need to gently pry/lift that tab as you pull the wire connector plug (oval shaped) out.
You can wrap a piece of tape on the outboard wires and coil (stick) to know how to put back together. Lifting the coil and boot of is fairly straight forward. Grab the top with one hand, and reach in on the boot with the other and twist and lift. Mine came of easy. The center is harder to reach. The coils are different, easy way to tell is pay attention to the color of the rubber parts that fit the valve cover.
If you could, take a sharpie and mark the spark plug on the outside edge so once the plug is out, you can see how the electrode was positioned in relation to the intake. I'm just gathering info on indexing and how it may affect the TR650. It will be easy to tell the plugs apart, as the inboard plug cannot be marked down low.
The plug is 14 mm.
If you don't get them both plugged back in proper, you will get the engine light. It can run on one plug.
Before you install new plugs, mark them in line with the ground electrode wire that will be inside the combustion chamber on the outside so you can see if they aligned the same as the ones removed. Mine were different, and this may or may not make a difference in how it idles and runs.
Be careful to torque properly, I do not have the torque values handy. These are 14mm threads, and torquing by feel could easily strip the smaller thread diameter. Do not use anti seize. NGK says not to. It can affect the torque values being slicker on install.
Riding Again
Husqvarna
AA Class
drzcharlie
Husqvarna
Pro Class
OK, I am finally back on the bike again. My wonderful smooth bike is back.
Did new plugs fix it? I still don't know.

I think your spoofer was learned by the ECU and the reset helped. It'll be interesting to see if the Spoofer is once again learned by the ECU or not. I am not saying that adjusting spark gap or installing new plugs didn't help but having done all three will make it very hard to discern for sure what the cause was. I'm happy for you that your bike is running good again. Way to stick with it.
Riding Again
Husqvarna
AA Class
Ogre_fl
Husqvarna
Pro Class
I think your spoofer was learned by the ECU and the reset helped. It'll be interesting to see if the Spoofer is once again learned by the ECU or not. I am not saying that adjusting spark gap or installing new plugs didn't help but having done all three will make it very hard to discern for sure what the cause was. I'm happy for you that your bike is running good again. Way to stick with it.
FWIW I had done 2 ECU resets prior to messing with the plugs.
The first reset I left the spoofer hooked up through the whole process and the bike ran like crap. Lots of stalling, vibes and surging.
The 2nd reset I disconnected the spoofer until after the 10 min/fan cycle idle, then re-connected it immediately afterwards. The bike no longer stalled, but still vibed and surged.
Yea, bottom line is I like my bike again. I was getting pretty close to "throwing the towel in" there for a while.
")
Sorry my process did not work out well for a good answer as to why/how.
Greg Jetnikoff
Husqvarna
AA Class
tweber
Husqvarna
AA Class
Attachments
Riding Again
Husqvarna
AA Class
Ogre_fl
Husqvarna
Pro Class
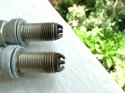
FWIW my new plugs had over spec > .8 mm gaps and I had to tighten them.
Oh yea, took the dirt roads home today.
Bike ran like a top.
I forgot how sweet it was sliding around turns in that buttery smooth 5-7k rev range.
Riding Again
Husqvarna
AA Class
Ogre_FL- How did you tighten them? Just bend them on a table? I can not get a hold of it with the spark plug gapper that I have but they must make a smaller one because the gap is too small for the spark plug gapper tool I end up using feeler gauges. Still getting proper tools together for motorcycles. All of my tools were for cars and big trucks. Glad to hear the bike is buttery smooth as well! I will get there when I change my front tire.
mag00
Husqvarna
Pro Class
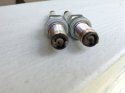
Ogre, you see how the color down the threads is different from yours? Yours are a little darker. From reading, the number of threads and color indicates how hot the plug is running. If you are running more fuel, your combustion temps would be lower. I need to study up on it more.
mag00
Husqvarna
Pro Class
the vta 3d spark plug that Mag showed in the video looks very promising. Although more research suggests the company is not even selling them yet.
I have no idea about the 3d plugs. I just like the video of the multi prong vs standard plug.
Mag is right. Sorry old habit with anti seize. I used a small amount but not needed due to the newer plating on the threads.
I just hate the mess, and that is good enough for me not to use thread goop. I have a jar of it on the shelf, and every time I pass by or look at it, I turn into an alien, shiny silvery, head to toe. How?

Ogre_fl
Husqvarna
Pro Class
Ogre_FL- How did you tighten them? Just bend them on a table?.
Fishing pliers.
Squeeze a bit, check, squeeze a bit, check. ......ect.

Ogre_fl
Husqvarna
Pro Class
Ogre, you see how the color down the threads is different from yours? Yours are a little darker. From reading, the number of threads and color indicates how hot the plug is running. If you are running more fuel, your combustion temps would be lower. I need to study up on it more.
I think you are reading too much into my crapy camera and lighting in my garage.
My plugs "look" like everyone else's to me.
tweber
Husqvarna
AA Class
Tweber, how many miles on them, spoofer? Mods? Type of fuel?
Ogre, you see how the color down the threads is different from yours? Yours are a little darker. From reading, the number of threads and color indicates how hot the plug is running. If you are running more fuel, your combustion temps would be lower. I need to study up on it more.
Plugs------Premium gas...18900 mls.....wuka king....paper filter with 5/8 oiled uni as pre-filter. Last 1000 mls i ran two 5/8 uni-sheet filter oiled.... back to back....until i go for the podmod or highfive.