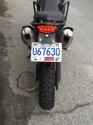
Seen a few on here and thought I'd take a crack at it. It's destructive, but came out well IMO. I installed these integrated tag/blinker lights: http://www.ebay.ca/itm/Licence-Numb...d-Indicator-Turn-Signal-Blinker-/171482111461
I was hesitant at first but they worked perfectly; No inline resistors are needed and the flash speed is unaffected. Can't speak to the legality of the signals but they are BY FAR brighter than the stock blinkers and shoot more light than stock. Tag lights provide more illumination as well.
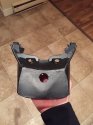
I 'welded' a DVD case to the cut section of the tail. Open air and breathing care is a must, as well as a soldering iron you don't care about. I melted the perimeters together and followed up with a shopping bag as 'solder.' It worked surprisingly well. I didn't take too much caution to clean up the surface before plasti-dipping and that was it. Surprisingly strong bond.
Cleans up well. I figure I'd cut the tail before letting it break on its own. Surprisingly, the entire tail end is connected only to another piece of plastic by two screws...
I was hesitant at first but they worked perfectly; No inline resistors are needed and the flash speed is unaffected. Can't speak to the legality of the signals but they are BY FAR brighter than the stock blinkers and shoot more light than stock. Tag lights provide more illumination as well.
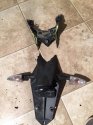
I 'welded' a DVD case to the cut section of the tail. Open air and breathing care is a must, as well as a soldering iron you don't care about. I melted the perimeters together and followed up with a shopping bag as 'solder.' It worked surprisingly well. I didn't take too much caution to clean up the surface before plasti-dipping and that was it. Surprisingly strong bond.
Cleans up well. I figure I'd cut the tail before letting it break on its own. Surprisingly, the entire tail end is connected only to another piece of plastic by two screws...