glitch_oz
Husqvarna
Pro Class
Looking around the various threads here/ ADV and other places, removing the factory thermostat from the right header tank of the radiator seems to be fraud with problems.
"Thors Hammer"...bashing the thermostat cage to smithereens...the need to remove the rad from the bike to proceed with the harsh treatments on the bench...
All that put the brakes on installing the T-stat delete, as I was looking at a bag of potential problems and f&*&-ups with the associated bike-out-of-action...waiting-for o/s parts, costly parts and shipping etc etc
With some time at hand over the Xmas period, I kept looking at "Tinken's Mona Lisa" every time I walked into the garage.
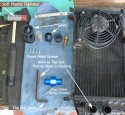
First I took the R-hand panel off to gain access. Then I "wasted" an hour to have a real good look at things....and there's an option!
1) remove R-hand front plastics
2) warm up bike for about 5 mins, just enough to get a little temp into the plastic header tanks to make them expand the tiniest bit.
3) disconnect expansion tank (have you done the re-route of the hose yet??)
4) disconnect and drain both in+out radiator hoses.
5) remove both top hanger bolts of radiator and slide rad off bottom lug (keep eye on rubber grommet****************************************)
6) now there is enough wriggle-room for the rest of the job
7) loosen and remove bottom clip of thermostat with screw-driver
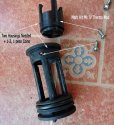
8) check the thermostat-cage from below....veeeery carefully, It's perfectly round but has one single lug facing out!!!
9) the lug is the key to the whole thing. Check the position of the lug carefully and find the corresponding notch/ recess in the header tank housing.
10) insert a matching! screwdriver blade in the recess and lever OEM T-stat cage downward, and/ or rotate screwdriver blade gently but firmly to dislodge the the rubber O-ring
11) I replaced the screwdriver with another I quickly ground to size and shape on the belt-sander to fit the recess/ slot in the header tank. Pry and lever until the thermostat just pops out and you're taking a Glycol-bath in blue, green, yellow or whatever colour your coolant is.
On re-assembly, lube the rubber O-ring with pure Glycol concentrate as a lubricant to seat the T-stat (or the T-stat_delete) with just thumb-pressure.
Thermostat_Delete:
Do NOT force/ hammer the T-stat Delete into the housing, check for the "notch" to line up with the housing and make sure to line up the bottom groove with the C-clip to hold things in place.
The unit will push into place with a good shove of thumb-pressure (after lubing the O-ring!!)
NB: looking at the factory T-stat I have to agree with Tinken... the cage construction allows an enormous amount of continuous coolant bypass to render the whole thing barely "half-a-thermostat" worth.
If I'd make my own from the factory parts.... I'd junk the factory T-stat incl. spring and all other bits, then shut off the top of the cage with a couple of alloy washers bolted together, sandwiching the T-stat-seat as a locator.
Not as neat or flow-directing as the Tstat_Delete unit, but most probably doing the job nearly as well and decidedly better than the factory setup.
"Thors Hammer"...bashing the thermostat cage to smithereens...the need to remove the rad from the bike to proceed with the harsh treatments on the bench...
All that put the brakes on installing the T-stat delete, as I was looking at a bag of potential problems and f&*&-ups with the associated bike-out-of-action...waiting-for o/s parts, costly parts and shipping etc etc
With some time at hand over the Xmas period, I kept looking at "Tinken's Mona Lisa" every time I walked into the garage.
First I took the R-hand panel off to gain access. Then I "wasted" an hour to have a real good look at things....and there's an option!
1) remove R-hand front plastics
2) warm up bike for about 5 mins, just enough to get a little temp into the plastic header tanks to make them expand the tiniest bit.
3) disconnect expansion tank (have you done the re-route of the hose yet??)
4) disconnect and drain both in+out radiator hoses.
5) remove both top hanger bolts of radiator and slide rad off bottom lug (keep eye on rubber grommet****************************************)
6) now there is enough wriggle-room for the rest of the job
7) loosen and remove bottom clip of thermostat with screw-driver
8) check the thermostat-cage from below....veeeery carefully, It's perfectly round but has one single lug facing out!!!
9) the lug is the key to the whole thing. Check the position of the lug carefully and find the corresponding notch/ recess in the header tank housing.
10) insert a matching! screwdriver blade in the recess and lever OEM T-stat cage downward, and/ or rotate screwdriver blade gently but firmly to dislodge the the rubber O-ring
11) I replaced the screwdriver with another I quickly ground to size and shape on the belt-sander to fit the recess/ slot in the header tank. Pry and lever until the thermostat just pops out and you're taking a Glycol-bath in blue, green, yellow or whatever colour your coolant is.

On re-assembly, lube the rubber O-ring with pure Glycol concentrate as a lubricant to seat the T-stat (or the T-stat_delete) with just thumb-pressure.
Thermostat_Delete:
Do NOT force/ hammer the T-stat Delete into the housing, check for the "notch" to line up with the housing and make sure to line up the bottom groove with the C-clip to hold things in place.
The unit will push into place with a good shove of thumb-pressure (after lubing the O-ring!!)
NB: looking at the factory T-stat I have to agree with Tinken... the cage construction allows an enormous amount of continuous coolant bypass to render the whole thing barely "half-a-thermostat" worth.
If I'd make my own from the factory parts.... I'd junk the factory T-stat incl. spring and all other bits, then shut off the top of the cage with a couple of alloy washers bolted together, sandwiching the T-stat-seat as a locator.
Not as neat or flow-directing as the Tstat_Delete unit, but most probably doing the job nearly as well and decidedly better than the factory setup.


