-
Hi everyone,
As you all know, Coffee (Dean) passed away a couple of years ago. I am Dean's ex-wife's husband and happen to have spent my career in tech. Over the years, I occasionally helped Dean with various tech issues.
When he passed, I worked with his kids to gather the necessary credentials to keep this site running. Since then (and for however long they worked with Coffee), Woodschick and Dirtdame have been maintaining the site and covering the costs. Without their hard work and financial support, CafeHusky would have been lost.
Over the past couple of weeks, I’ve been working to migrate the site to a free cloud compute instance so that Woodschick and Dirtdame no longer have to fund it. At the same time, I’ve updated the site to a current version of XenForo (the discussion software it runs on). The previous version was outdated and no longer supported.
Unfortunately, the new software version doesn’t support importing the old site’s styles, so for now, you’ll see the XenForo default style. This may change over time.
Coffee didn’t document the work he did on the site, so I’ve been digging through the old setup to understand how everything was running. There may still be things I’ve missed. One known issue is that email functionality is not yet working on the new site, but I hope to resolve this over time.
Thanks for your patience and support!
You should upgrade or use an alternative browser.
Help! Debris found in my engine - 610/630 clutch issues
- Thread starter Rough Rider
- Start date
")
XLEnduroMan
Heroes Ride Huskys. The others follow.
It's OK, it's Ok,I apprecitate your advices
I'll try to contact with a lathe operator (I don't know if it is the way to call a man that makes iron pieces) and I'll ask him how much can it cost to make the improved washers
Look back to post #296 in this very thread.
motranqui
Husqvarna
AA Class
Thanks
Attachments
motranqui
Husqvarna
AA Class
.jpg")
.jpg")
I've compared the old rivets with the new ones (I ordered them months ago) and the head doesn't look equal. What do you think?
.jpg")
motranqui
Husqvarna
AA Class
Brainstorming

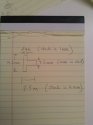
I took these mesurements.
.jpg")
The gap between iron and aluminum part is 6 mm (3 for each side). Springs can be compressed up to 5mm, which is OK. If we make the whashers 1mm thicker each, it's like we preload the springs 2mm. That means that the theoric free play (clearance) between pieces goes from 5mm to 3mm, which is 40% less, that is, 40% less "cush hub" efect.
If you grab a spring with a pliers and try to reduce its lengh 2mm, you'll see that costs quite a lot. And it's only one spring. To reduce it's lenght a little more cost you an arm.
So, upgraded washers implies less free play (less cush hub efffect) and a lot more of preload in the mechanisim. So I wonder why the upgraded pieces were not made of a better treated iron, but keeping their original measurement so that the characteristics and performance of the mechanism were kept.
I've hamered one of the old washers grabing it with a vice and it has not broken even bending it up to 45º several times. Also I pressed it with the vice a lot and almost has keep it's shape.
Don't get me wrong, I do not want to be the smartass of the party... only wanted to share this thoughts with you
Spice Weasel
Husqvarna
AA Class
Hi
Brainstorming
I've hamered one of the old washers grabing it with a vice and it has not broken even bending it up to 45º several times. Also I pressed it with the vice a lot and almost has keep it's shape.
Don't get me wrong, I do not want to be the smartass of the party... only wanted to share this thoughts with you
The higher the carbon content of steel the higher the hardness, resistance to abrasion and deformation. and vice versa the lower the carbon content.
Youve just proven the low carbon content of the steel that the OEM washers are made from, probablys mild steel, and how unsuitable they are for their purpose. Even EN8 would have been more suitable. This is why we are getting replacements made from tool steel.
You will not like the ones i had made with 3mm thick bases, but i have done 7500 miles with them in my clutch, all on paved roads, and not had any problems.The gap between iron and aluminum part is 6 mm (3 for each side). Springs can be compressed up to 5mm, which is OK. If we make the whashers 1mm thicker each, it's like we preload the springs 2mm. That means that the theoric free play (clearance) between pieces goes from 5mm to 3mm, which is 40% less, that is, 40% less "cush hub" efect.
If you grab a spring with a pliers and try to reduce its lengh 2mm, you'll see that costs quite a lot. And it's only one spring. To reduce it's lenght a little more cost you an arm.
So, upgraded washers implies less free play (less cush hub efffect) and a lot more of preload in the mechanisim. So I wonder why the upgraded pieces were not made of a better treated iron, but keeping their original measurement so that the characteristics and performance of the mechanism were kept.
 My OEM washers were in pieces in my sump by 5000 miles
 motranqui
Husqvarna
AA Class
But I think that after 23.000 km my cup washers looks almost like new ones, so it proves that not all the washers had the same quality. But quality has not necessarily to do only with thickness. That's why I was wondering why every one doubled their original dimension.
If the original ones, made of a "mediocre" steel -as you say- can stand 23.000 km (or more), How much could stand if they were made of a better iron quality?
I mean, if we had increased them by, let's say, a 25% (what is a lot in enginering process), with a good hardened steel, we would have a 1,25 mm thickness "superb quality washers" which would have only decreased the hub cush effect up to a 10%
That's why I think: Should be increased the quality of the washers? Yes, without a doubt, because you never now if you have a good ones (like the ones in my bike) or a bad ones (like some that were broken with only 7.000 km). But, so... Should we increase their thickness. I don't think so, at least not to the double.
Spice Weasel
Husqvarna
AA Class
motranqui
Husqvarna
AA Class
He spent a lot of time (half an hour
 ) an finally he brings the clutch like this:
.jpg")
It's obvios that he has not made the work properly

When I came home, I remove the rivets again (very easy work now) and, guess what I've found:
.jpg")
So, he has broken the clutch housing an also he has bended the metal cap that prevent the springs from coming out
So, a 500€ "joke"

Spice Weasel
Husqvarna
AA Class
Today I took the clutch to a lathe operator so that he put the rivets
He spent a lot of time (half an hour
So, he has broken the clutch housing an also he has bended the metal cap that prevent the springs from coming out
So, a 500€ "joke"
What did you spend 500€ on?
Your clutch housing can be TIG welded, i know i have a TIG welder. V the crack out a bit to its full depth then fill with weld, i would go for 4043, you could tidy up the weld after with a file if you take time and care. I would put a steel dowel the same size through the hole and weld around it, knock it out when finished to leave a neat hole. It wont be an expensive job

Maybe the retaining plate could be used as it is, or maybe it could be straightened a bit?
I dont think the rivets you got were the correct ones.
I peened the rivets myself, cold. I put a hammer in my vice, put the back of the rivet on it and used another hammer with a large flat ended drift to flatten the end. It was surprisingly easy, I believe you could do the same yourself with the correct rivets. I surprised you got someone else to rivet your clutch housing.
John Tsoukalas
Husqvarna
AA Class
I think that this machinist ( lathe operator as you said) should not ever touch a tool or a power tool again. Maybe a desk job...I cannot imagine what would happen to a wireless keyboard without battery though by his hand...HAHAhahahahahHAHAHA...
mg94
Husqvarna
A Class
CJBROWN
Husqvarna
AA Class
My assumption was that the original IndyUlimited spring cup washers were made thicker so if they did wear again they wouldn't come apart so easily. If the material is stronger it's likely they won't wear anyway. I haven't heard from anyone with the update done, what it looked like after another 10K miles.
Anyway, get a set, replace them, and sleep well. Ride the piss out of it.
")
Kt06siggm1
Husqvarna
C Class
motranqui
Husqvarna
AA Class
What did you spend 500€ on?
.
Finally:
320€ clutch housing
15€ retaining palte
motranqui
Husqvarna
AA Class
I peened the rivets myself, cold. I put a hammer in my vice, put the back of the rivet on it and used another hammer with a large flat ended drift to flatten the end. It was surprisingly easy,
Spice, how did you manage to shape the upper part of the rivet in a "round" way?. Do you hit the rivet laterally? I ask you because if you hit it from up to down it could simply happen that the body of the rivet fill the entire diameter of the hole (which is what the turner has done) but you can not make a rounded shape on top.I'm a bit concern that it can happens again...
Indy unlimited adviced us :
- Take the unit to a bike shop to rivet without damaging your clutch basket. (what I did without success, as you know )
- If you do it your self remember it takes 2 people to rivet this with an air hammer and anvil. You must support the head inside the basket and rivet the back side with the air hammer. I takes about an hour since the rivets are very good quality.
motranqui
Husqvarna
AA Class
Took about an hour yesterday morning. Easy job, but I have peened a lot of rivets in my time so knew what I was getting into. Hammered cold with a small ballpeen hammer, hardest part was figuring out something to use to buck the head - ended up using a body metal dolly.
Some of the stock cup washers are very thin. One in particular did not look worn at all, was polished on the top surface. Oh well, I don't have to worry about this again now. The Indy kit is a slam-dunk.


Could you explain in more detail how do you manage to make this work? Did you make it on your own or did you need help? Which way do you grab "everything" while you hit the rivet? How did you get the "round shape" of the rivet?
Thank you
Spice Weasel
Husqvarna
AA Class
I ordered the rivets and there was more than needed in the packet, so i sacrificed one in an experiment and put it on my vice and hit it with a hammer to find out if i needed to heat them up before riveting them. I found the rivets to be surprisingly soft, and decided no heat was needed.Spice, how did you manage to shape the upper part of the rivet in a "round" way?. Do you hit the rivet laterally? I ask you because if you hit it from up to down it could simply happen that the body of the rivet fill the entire diameter of the hole (which is what the turner has done) but you can not make a rounded shape on top.I'm a bit concern that it can happens again...
Indy unlimited adviced us :
- Take the unit to a bike shop to rivet without damaging your clutch basket. (what I did without success, as you know
- If you do it your self remember it takes 2 people to rivet this with an air hammer and anvil. You must support the head inside the basket and rivet the back side with the air hammer. I takes about an hour since the rivets are very good quality.
Like i posted before, i clamped a hammer in my vice to reach passed the fingers of the basket and use as an anvil and started off using a big flat ended drift and ball peen hammer to try and get a nice neat flat profile, but just ended up using the ball face of the hammer. I didnt hit them hard (like REALLY pound on it) I took my time and flattened the end of the rivet with many smaller blows.The results i got were very similar to the picture in CJBROWN's post you quoted My clutch is still good with about 8000 miles since. HTH