• Husqvarna Motorcycles Made In Sweden - About 1988 and older

  • Hi everyone,

    As you all know, Coffee (Dean) passed away a couple of years ago. I am Dean's ex-wife's husband and happen to have spent my career in tech. Over the years, I occasionally helped Dean with various tech issues.

    When he passed, I worked with his kids to gather the necessary credentials to keep this site running. Since then (and for however long they worked with Coffee), Woodschick and Dirtdame have been maintaining the site and covering the costs. Without their hard work and financial support, CafeHusky would have been lost.

    Over the past couple of weeks, I’ve been working to migrate the site to a free cloud compute instance so that Woodschick and Dirtdame no longer have to fund it. At the same time, I’ve updated the site to a current version of XenForo (the discussion software it runs on). The previous version was outdated and no longer supported.

    Unfortunately, the new software version doesn’t support importing the old site’s styles, so for now, you’ll see the XenForo default style. This may change over time.

    Coffee didn’t document the work he did on the site, so I’ve been digging through the old setup to understand how everything was running. There may still be things I’ve missed. One known issue is that email functionality is not yet working on the new site, but I hope to resolve this over time.

    Thanks for your patience and support!

Husqvarna wheel lacing instructions

watto450

Husqvarna
AA Class
I seem to recall seeing a HVA produced "how to" for lacing - respoking a rear wheel ..I am about to attempt to respoke the rear wheel on my 510..it has the rear hub like from 1981 - 1985 ish... Anyone have a copy..??
 
I can tell you what I did:

First, I measured the offset of the hub to the rim by simply laying the wheel on my steel table and measuring the gap between the table and the rim (both sides).

Second, I took good clear photos of the wheel, printed them out and used colored markers to apply a different color to each different spoke (length and spoke angle bend).

Third, I use paint markers and color each replacement spoke with a matching color to the spokes marked with different colors in the photos.

Fourth, start lacing the painted spokes ( just a inch if paint is all you need) to match the photos you took. You will not lose track of you work as long as everything is color coded and matched to your photos. Don't forget to reference your colored spokes to the proper starting point on you rim.

Next, true those wheels up... Then after you have them trued up,wipe the paint marks off the replacement spokes with acetone... Voila, you're done!

Desmoducky
 
Thanks Des..it is more about in what order do the spokes go in....do you do one side completely first..or put all the spokes in the hub first..or..do a pair on one side then a pair on the other.. I have one side completely in... but now can't swing the other side spokes around to go into the rim.. there must be a starting sequence... I don't really want to pay the local guy $100 to spoke my wheel if I can learn something along the way myself...
 
The offset I measured before I took the wheel apart...in the pre 81 model wheels it was quite easy to lace up ( apart from the 12/6 on the brake side) because you had the pressed tin small flange with the slotted holes..
 
So . I have seen the HVA instructions for the front wheel.. but...does anyone have a 1981/2/3/4/5 rear wheel how to..??
 
I rebuilt my 88 rear wheel a few weeks ago. I took a few photo’s for reference before stripping it down. I laced one side very loosely first and then turned the wheel over – then fitted the spokes into the hub and laced the other side. With loose spokes the wheel is really flexible so you can get the spokes into the holes easily. You will need to install the inner spokes into the hub first and point them all in the correct direction and then install the outer spokes into the hub and point them in the correct direction. Then once content that they are all orientated correctly you then put them into the holes and fit the nipples. It was a doodle ! once you work out what you need to do it’s a walk in the park. I have since used the bike once only and the spokes have all come loose, so will need to tighten them all again – so how tight should they be?
 
i used a cordless driver with a bit that matched the allen/slot on the back of the nipple to speed the processs then put the spindle in a vice and set up a pair of adjustable spanners with the jaws either side of the rim like a tuning fork this gave me side to side and up and down reference points for truing, final stage is to fit to the bike and re tension after riding, make up your own spanner by cutting a slot into some thick metal, i used an old spanner, spoke should twang when tapped with the spanner once tensioned if your going to go on road at this stage i would go and get the wheel balanced for a smoother ride.
 
The instructions I saw on here were for the old style lacing that was common on the mid to late 70's that have a rather unique cross pattern. I have several examples of anything I would attempt to relace. There is a sequence where you install all the inners on one side, then flip over and install the inner spokes on the other side. You have to keep everything loose until you get all the spokes in. Then you start centering and truing for concentricity.
 
I have laced a couple of Vintage Bikes in the last 3 years or so. I have watched a number of u-tube video's on the correct way to do it. Only problem is that every video has a different way to do it. I have come to the conclusion that there isn't any instructions that do a lot of good. Most Spoke one side and flip it over and do the other side. Some do all the inside ones on both sides then do the out side ones. Probably the biggest trick I have learned is that on any used hub it is easy to look at the Spoke holes and tell which way the Spokes used to point. Only problem is that on the front of my 82 430 XC I had to put one side opposite of the way they were originally. But this was because I used a Sun Rim from Buchannan's and they had to of drilled the Rim differently. So the bottom line is that there really isn't a right or wrong way to do it, so long as You end up with it right. Once You get your system down, the next bike will be different, and You will have to figure out a way of doing it all over again. Wish I could give you a black and white right and wrong way to do it, but I can't. It can be frustrating to deal with, but its rewarding in the end.
 
I even have a complete laced up wheel as a sample...:excuseme: 
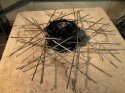
it is just about the sequence..as I stated above.. I got one side completely done..then there is no room to thread the otherside thru...I am thinking that all the spokes in the hub and then cross them over , tape them together at the cross and go from there.. I am about to start the 3rd night in the loungeroom with it..!!
 
There is more than 1 spoke overlay laceing pattern you can use and this has an effect on the spoke length - so just be careful and patient and be prepared to 'walk away' if it is not going well**************************************** The make and style of the rim you use also may effect spoke length too. Most new rims - unless specified are drilled for disc style hubs and are not suitable unless you re-align the spoke seat in the rim. If in doubt - give them to a professional wheel builder.

Andy.
 
rear non conical husky....all same spokes. 36...all wheels are groups of 4.....like washing....lather, rinse, repeat. The Nordisks are directional rims though. Got to put all spokes in hubs (drum brake ones) cant get em in (by the bend) unless you then take some out (counter productive)

Husky is also a reverse lace (outside to inside)
 
Yep, am using the original Nordisk , just had some stainless spokes made ......so drum brake, all equal length. 4th hole repeat...grrrrrr...I went that way last night..put all the spokes in the hub....got all the way around and found one that is in the little square boss on the flange..facing the wrong way.......I have it set up with the stamped "numbers" on the side of the rim to the brake side...I seem to recall (didn't take a photo) this being the correct way up.... anyone confirm..??
 
Well....I finally got it together....Put all the spokes in the hub....do the brake drum side first..... make sure the numbers on the side of the Nordisk is on the brake side.... made the mistake of not having the correct cross on the brake side...phew.... I learnt something this week..
 
This is what the wheel looks like now.. a local guy here in Western Australia makes spokes..just went along with a sample rear and the two fronts and said..make me some of these... I had the rim re-anodised... I sandblasted the hub and used brake caliper paint..may be a bit too glossy...
20140406_144709_zps42b7a014.jpg~c200
 
Sorry for the late response... I lace the entire wheel loosey- goosey and then start tightening the spokes one at a time. Pay attention to the way the spokes are layered and layer them up the same way. I did one side and then I flipped the wheel and did the other side. Pay attention to the wheel offset and pull the wheel in the right direction as you tighten up the spokes.

Desmo
 
Here the last year or so have laced up half dozen wheels. One thing that I find helpful is to lace the spokes in the hub and lightly tie them in place, just to hold them in the general position. The rim then can be installed by shifting the spokes a bit.

The one photo is with the spokes tied together are “Z” spokes on a 200 yam, the others are the husky rims, laced all in the same manor.
 

Attachments

  • 200 rims 001.JPG
    200 rims 001.JPG
    193.3 KB · Views: 100
  • Husky build shock wheel 002.JPG
    Husky build shock wheel 002.JPG
    134 KB · Views: 93
Back
Top