• Husqvarna Motorcycles Made In Sweden - About 1988 and older

  • Hi everyone,

    As you all know, Coffee (Dean) passed away a couple of years ago. I am Dean's ex-wife's husband and happen to have spent my career in tech. Over the years, I occasionally helped Dean with various tech issues.

    When he passed, I worked with his kids to gather the necessary credentials to keep this site running. Since then (and for however long they worked with Coffee), Woodschick and Dirtdame have been maintaining the site and covering the costs. Without their hard work and financial support, CafeHusky would have been lost.

    Over the past couple of weeks, I’ve been working to migrate the site to a free cloud compute instance so that Woodschick and Dirtdame no longer have to fund it. At the same time, I’ve updated the site to a current version of XenForo (the discussion software it runs on). The previous version was outdated and no longer supported.

    Unfortunately, the new software version doesn’t support importing the old site’s styles, so for now, you’ll see the XenForo default style. This may change over time.

    Coffee didn’t document the work he did on the site, so I’ve been digging through the old setup to understand how everything was running. There may still be things I’ve missed. One known issue is that email functionality is not yet working on the new site, but I hope to resolve this over time.

    Thanks for your patience and support!

Mikuni Starting Jet?

390wr Jon

Husqvarna
AA Class
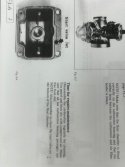
Still tying to get my 1980 390WR to start easily, so I’m back to cleaning the the Mikuni carburetor again. While looking through the workshop manual it talks about a “ starting jet” (see attached photo of manual). However, when disassembling the carb, I can’t see where there is a removable jet in the starting jet orifce. The orifice passage way is clear and not blocked. Is there supposed to be a removable jet in this passage way or is it simply a passageway along the side of the bowl from the bottom to the top?

Any insight would be appreciated.

Thanks,

Jon
 

Attachments

  • 647C34C7-0778-40FB-8F3C-EA540301DAAD.jpeg
    647C34C7-0778-40FB-8F3C-EA540301DAAD.jpeg
    46.7 KB · Views: 4
What do you have the float level set at? What spark plug are you using and what is the gap set at?
I have my 1980 390OR and it was hard to start also but now fairly easy to start. One of the big problems with the 1980 390s is the magneto. The large 139mm Motoplat magneto doesn't throughout a strong spark to begin with. I run a non-resistor spark plug cap and non-resistor spark plug and set the gap to .018". Those things helped mine a lot.

Marty
 
Marty,

I ended up shelving the Motoplat and installed a VAPE. Running a Champion N3C, but I will double check the gap.

I think it is either a timing (currently set at 1.8 mm BTDC) or a fuel issue (currently cleaning the carb a second time).

Jon
 
Marty,

I just doubled checked the float lever and it is currently set at 13mm, whereas the manual says 17-19mm, so I’ll have to readjust it. Do you think it’s better to set it at 17 or 19 mm?

Also, I’ve tried using an NGK B8ES plug. Any thoughts on which plug (Champion N3C or the NGK) is better?

Thanks,

Jon
 
(currently cleaning the carb a second time).
What exactly does your carb cleaning entail? The reason I ask is because the carb, with all its jets removed for cleaning, is only truly clean after sitting in a carb cleaner bath for 2 to 8 hours depending on the amount of sludge present. After the bath a quick rinse with brake cleaner or acetone and finally compressed air throughout. Once this is done you can eliminate the carb as a problem and move on to electrical, unless the OEM carb has been changed out for some bastard carb off of who knows what. If this is case then your hard start issue may be jetting.

Still tying to get my 1980 390WR to start easily
BTW, what does this mean? When kicking It only pops and coughs, or theres absolutely no sign of life from the enigine, or its starts but only spits and sputters?

I just doubled checked the float lever and it is currently set at 13mm, whereas the manual says 17-19mm, so I’ll have to readjust it. Do you think it’s better to set it at 17 or 19 mm?
Set it to what the manual says. 13mm means the float bowel fuel level is fill 5mm higher than it should be. This has the potential to lead to bogging from sloshing fuel flooding the carb venturi while riding rough terrain at low to mid throttle.
 
Jon.
For your float level, I take the carb and turn it upside down and make sure the float arms are level with the carb float bowl flange. I think that ends up being about 15mm. I never liked the 17-19mm the Husky manuals always show. That 17-19mm level just makes the entire RPM range run leaner including the starting circuit. Also make sure you float valve will hold 4-5 psi. With your 13mm float height and a weak float valve will really make your float/fuel level in the bowl very high and cause your bike to run rich.
The NGK B8ES is the spark plug I use. If you are not using the original spark plug boot then take your spark plug boot off the spark plug wire and check the ohms reading on it. It should have Zero resistance. If there is resistance, then all the available voltage is not getting to the spark plug.

Marty
 
That 17-19mm level just makes the entire RPM range run leaner including the starting circuit.
A lean condition is more likely a jetting issue rather than a 2mm fuel level issue and if fuel starvation does come into play then the fuel flow from the tank to carb should be checked for restriction. As for the starting circuit, 2mm probably won't make a noticeable difference in a difficult starting issue.
 
What exactly does your carb cleaning entail? The reason I ask is because the carb, with all its jets removed for cleaning, is only truly clean after sitting in a carb cleaner bath for 2 to 8 hours depending on the amount of sludge present. After the bath a quick rinse with brake cleaner or acetone and finally compressed air throughout. Once this is done you can eliminate the carb as a problem and move on to electrical, unless the OEM carb has been changed out for some bastard carb off of who knows what. If this is case then your hard start issue may be jetting.
I originally cleaned the carb in a heated ultrasonic cleaner with spray gun cleaner. I was simply going through it again out of an abundance of caution with spray carb cleaner. BTW, I know it’s the original Mikuni carb because I bought the bike new in 1980 and still own it.
BTW, what does this mean? When kicking It only pops and coughs, or theres absolutely no sign of life from the enigine, or its starts but only spits and sputters?


Set it to what the manual says. 13mm means the float bowel fuel level is fill 5mm higher than it should be. This has the potential to lead to bogging from sloshing fuel flooding the carb venturi while riding rough terrain at low to mid throttle.

No popping or coughing, it simply won’t start easily although I can get it started after I kick my brains out. Once running, it
seems to run fine.

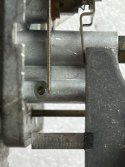
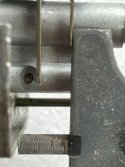
Also, if I set the brass float arm to 17mm, the arm is no longer parallel to the carburetor base. When the arm is parallel, the measurement is about 13m (see below photos).

At this point, I think it is either a 1.) timing issue, 2.) carb issue or 3.) intake leak between carb and cylinder (I installed new crank seals already). I just need to go through and recheck everything at this stage.
 

Attachments

  • 687DF54E-1986-43DD-9CE0-C186DF8CB880.jpeg
    687DF54E-1986-43DD-9CE0-C186DF8CB880.jpeg
    101.8 KB · Views: 3
  • 6445F3F7-CA51-490F-8DA8-575DFBB47CA7.jpeg
    6445F3F7-CA51-490F-8DA8-575DFBB47CA7.jpeg
    103.4 KB · Views: 3
Crash et al,

I’m still awaiting a different dial indicator to finish the timing work. In the meantime, I thought I would take a look at the intake manifold connection.

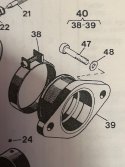
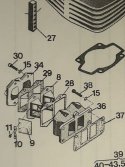
The surfaces of the inlet manifold (34), reed holder(8), and valve housing (36) are all clean, without imperfections and true, so I plan on installing new gaskets (28, 29 & 37).

Do you put a sealant on both sides of the above noted gaskets? If so, what sealant do you recommend (I used Permatex High Tack spray in the past but I do don’t know if that was the best choice).

I have less confidence in seal between the inlet manifold (34) to muff (39) connection since there is no gasket between the two (2) surfaces. Do you recommend a gasket sealer at this connection like Permatex Ultra Black?

As always, any help is greatly appreciated in order for me to avoid trail and error to the greatest extent possible.

Thanks,

Jon
 

Attachments

  • 2BEFA3A1-E12B-4904-8F29-C23D4E6EF193.jpeg
    2BEFA3A1-E12B-4904-8F29-C23D4E6EF193.jpeg
    100 KB · Views: 2
  • 52C63881-0BA1-448E-B8FC-77A44B62E78F.jpeg
    52C63881-0BA1-448E-B8FC-77A44B62E78F.jpeg
    124 KB · Views: 2
I don't use gasket sealer on the intake surfaces seeing the factory doesn't unless the conditions require using old gaskets. Glad to hear the surfaces on your parts are clean and flat and that you're installing new gaskets. Keep in mind that the flange to spigot connector (39) has a tendency to bow at the two flange bolt holes. Any daylight between the mating surface and a straight edge can cause a starting problem, although minor in most cases, and/or a lag in throttle response from an idle.

If the rubber intake flange connector (39) is old I'd replace it. I've never seen an old one that was in good condition, i.e. straight and no signs of cracks under the clamp, thats not to say they don't exist. If yours looks pretty good then try sealing it with Permashield gasket dressing #85420. Its gasoline resistant, doesn't dry hard and cleans up easily with brake cleaner or acetone. I like Ultra Black for leaky side cases only. Mfg only says its oil resistant.

I also like to run a tap in all threaded holes to make sure they torque evenly. Not saying I use a torque wrench, just want to make sure nothing is interfering with the fastener doing its job.
 
Back
Top