• 4 Stroke Husqvarna Motorcycles Made In Italy - About 1989 to 2014
    TE = 4st Enduro & TC = 4st Cross

  • Hi everyone,

    As you all know, Coffee (Dean) passed away a couple of years ago. I am Dean's ex-wife's husband and happen to have spent my career in tech. Over the years, I occasionally helped Dean with various tech issues.

    When he passed, I worked with his kids to gather the necessary credentials to keep this site running. Since then (and for however long they worked with Coffee), Woodschick and Dirtdame have been maintaining the site and covering the costs. Without their hard work and financial support, CafeHusky would have been lost.

    Over the past couple of weeks, I’ve been working to migrate the site to a free cloud compute instance so that Woodschick and Dirtdame no longer have to fund it. At the same time, I’ve updated the site to a current version of XenForo (the discussion software it runs on). The previous version was outdated and no longer supported.

    Unfortunately, the new software version doesn’t support importing the old site’s styles, so for now, you’ll see the XenForo default style. This may change over time.

    Coffee didn’t document the work he did on the site, so I’ve been digging through the old setup to understand how everything was running. There may still be things I’ve missed. One known issue is that email functionality is not yet working on the new site, but I hope to resolve this over time.

    Thanks for your patience and support!

New look with the IMS Tank 2

=You guys really want something that permanent? Maybe just glue a stud of plastic to the tank and screw into that?

I was contemplating adhesive backed velcro with multiple pieces to bear the load but I don't think the adhesive would hold up to fuel exposure very well. We use this industrial strength velcro to fasten accessories to our flight helmets and it's pretty resilient to the elements. I'm leary (sp) of the permanent mounting as well, but it sure does look sharp.
 
Made a call to IMS tech department today looking for a recommendation on adhesive for this purpose.

The tech individual I spoke to did not have a recommendation and suspected that unless the adhesive was able to cope with petroleum it would not last. I did mention that allot of guys were considering this modification thus the reason for the call.

I mentioned the WaterWeld by J&B and he had not heard of it.

He did ask that I let him know how the product works.

BTW, he also only recommended ~ 4 NM on the tightening torque of the fasteners for the fuel pump and any other related bolts fastening into the tanks mounting points to avoid any stripped fasteners.

I had to remove some of the exterior edge (rim) of the fuel pump surface with a flat file to allow the fuel pump to sit deeper into the tank allowing the black round seal to seat and eliminate any fuel seapage.

When my dealer installed a replacement fuel pump in my stock tank he just torqued it down as tight as possible to ensure a leakproof seal with the consequences of stripped tank fasteners. Use caution during this process.
 
The IMS website indicates that their tanks are made with polyethylene.

This is is one of the few products I've located for use as a polyethylene adhesive:

3M™ Scotch-Weld™ High Performance Industrial Plastic Adhesive 4693H Clear, 5 oz Tube
A clear, elastomeric adhesive with exceptional adhesion to metal and plastic. This adhesive is unique in its ability to bond hard-to-hold materials like polypropylene, polyethylene, and high-impact polystyrene.

Stock Number: 62449526318
UPC: 0-21200-30088-2


I also found this on the Goop website:

Don’t use Amazing GOOP on styrofoam or polystyrene (because it will cause them to dissolve), or on polyethylene or polypropylene plastics (because it will not adhere well).

http://www.amazinggoop.com/amazinggoop/index.html


Found this on the J&B Weld website:

Q: Is there anything that J-B Weld WON'T bond to?
A: J-B Weld will not adhere to, or bond well to:

Any flexible rubber surface
Leather
Vinyl
Canvass
Polypropylene plastic
Polyethylene plastic
 
Good Find.... Fast1
The "Goop is holding ok for now and I've been in some pretty tough bush riding so far. all is well.
I did a little trials test on the tank with the "Goop" before going ahead. It seemed to stick ok. Ya know I also didn't test it agaist fuels....
I gonna pick up some 3M™ Scotch-Weld™ High Performance Industrial Plastic Adhesive 4693H Clear, 5 oz Tube
just in case.
Thanx for the input.

Ha did you do yours yet? If you use the 3M stuff can you test it against fuels and let us know TIA
 
Fast1;4383 said:
Contacted 3M, locally headquartered here in St. Paul MN, and asked about the Scotch Weld Product. The customer service tech, after hearing about my intended use, had an all together different product he suggested I use.

3M™ Automotive Acrylic Plus Attachment Tape 06397 along with the adhesion promoter due to use on polyethylene.


Details here:
http://multimedia.3m.com/mws/mediawebserver?66666UuZjcFSLXTtlXTXnXF6EVuQEcuZgVs6EVs6E666666--

Thoughts?


I read it a couple of times - looks good to me. Now someone needs to get some of that and some "3M™ Automotive Adhesion Promoter 06396" who also has a new IMS tank and needs to experiment.

.
 
1st off.. I have to give HuskyDude credit again for taking the initiative and having the ingenuity for this idea.

Tonight I went ahead with adhearing the side panels on my IMS tank using the 3M Acrylic Plus Attachment tape after cleaning both the panels and tank with the adhesion promoter. Total out of pocket cost for these 3M items was less than $20.

Here is my quick synopsis:

The 3 gallon tank will certainly improve the range of the bike and it does offer very good ergonomics for the rider.

Tank fit is mediocre, not perfect but should settle with fuel and time. I noticed some movement from front to back depending on where you applied pressure. Also some side to side movement if you grab each wing and apply force. Like others have stated, I found a variance in the gap from the tank wing to the radiator panel cover from side to side.

The OEM red side panels REALLY improve the appearance, more than a decal would IMO, since they have contours and are not just flat. Also, I've never had too much success at getting decals to stick for any period of time on aftermarket tanks in the past. I was ready to exchange my black tank for the white until I saw this post by HuskyDude.

The 3m product I used makes the process of gluing quick.. No waiting for anything to dry.. Stick and ride!

With the 3M product, once you touch the two pieces together they are STUCK.. so ensure that you have them lined up if using the 3M product. You don't get a second chance. I practiced fitting them several times, starting with the back of the tank panel stuck into the side panel before pressing them to the tank, practicing to make sure they would go on and the panel tips would match up with the point of the tank wings. After plenty of practive I applied the attachment tape and found that my practice did pay off when I finally stuck them permanently onto the tank.

An alternative adhesive that has some cure time would certainly make it easier to place the tank panels in the correct location before the glue dryed and would allow some re-positioning if necessary.

I'll report back in this thread about how effective the 3M acrylic attachment tape is at keeping them in their place and have a photo of HuskyDude's twin bike soon.
 
Fast1;4421 said:
1st off.. I have to give HuskyDude credit again for taking the initiative and having the ingenuity for this idea.

Tonight I went ahead with adhearing the side panels on my IMS tank using the 3M Acrylic Plus Attachment tape after cleaning both the panels and tank with the adhesion promoter. Total out of pocket cost for these 3M items was less than $20.

Here is my quick synopsis:

The 3 gallon tank will certainly improve the range of the bike and it does offer very good ergonomics for the rider.

Tank fit is mediocre, not perfect but should settle with fuel and time. I noticed some movement from front to back depending on where you applied pressure. Also some side to side movement if you grab each wing and apply force. Like others have stated, I found a variance in the gap from the tank wing to the radiator panel cover from side to side.

The OEM red side panels REALLY improve the appearance, more than a decal would IMO, since they have contours and are not just flat. Also, I've never had too much success at getting decals to stick for any period of time on aftermarket tanks in the past. I was ready to exchange my black tank for the white until I saw this post by HuskyDude.

The 3m product I used makes the process of gluing quick.. No waiting for anything to dry.. Stick and ride!

With the 3M product, once you touch the two pieces together they are STUCK.. so ensure that you have them lined up if using the 3M product. You don't get a second chance. I practiced fitting them several times, starting with the back of the tank panel stuck into the side panel before pressing them to the tank, practicing to make sure they would go on and the panel tips would match up with the point of the tank wings. After plenty of practive I applied the attachment tape and found that my practice did pay off when I finally stuck them permanently onto the tank.

An alternative adhesive that has some cure time would certainly make it easier to place the tank panels in the correct location before the glue dryed and would allow some re-positioning if necessary.

I'll report back in this thread about how effective the 3M acrylic attachment tape is at keeping them in their place and have a photo of HuskyDude's twin bike soon.

I don't think I can live with the fitment. I finally got it to sit down, but I can put half my fingers between the seat and the tank and it feels like it's going to damage the seat eventually. I'm trying to decide if I should just keep it for the very occasional long trip or not.
 
gandalf;4423 said:
I don't think I can live with the fitment. I finally got it to sit down, but I can put half my fingers between the seat and the tank and it feels like it's going to damage the seat eventually. I'm trying to decide if I should just keep it for the very occasional long trip or not.

Did your seat stick up on your factory tank? Did you use the same hardware from your origional tank into the aftermarket tank that the slot in the front of the seat slips into? Mine fits down nicely on the tank. Can you tell if the front slot in the seat is under the bolt head or on top of it? Good luck, Ken
 
gandalf;4423 said:
I don't think I can live with the fitment. I finally got it to sit down, but I can put half my fingers between the seat and the tank and it feels like it's going to damage the seat eventually. I'm trying to decide if I should just keep it for the very occasional long trip or not.


post a photo of this issue
 
gandalf;4423 said:
I don't think I can live with the fitment. I finally got it to sit down, but I can put half my fingers between the seat and the tank and it feels like it's going to damage the seat eventually.
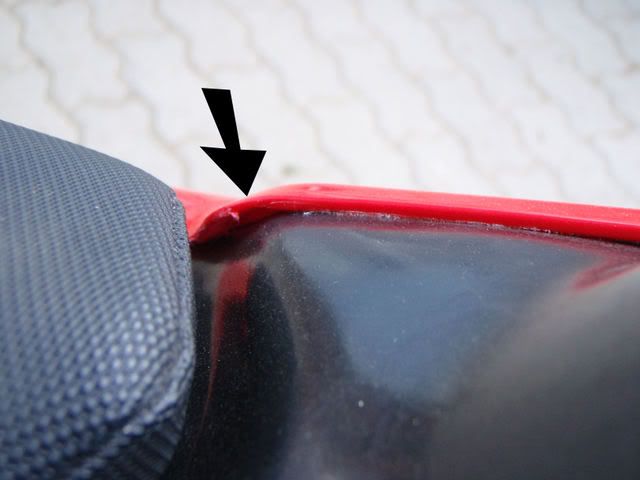
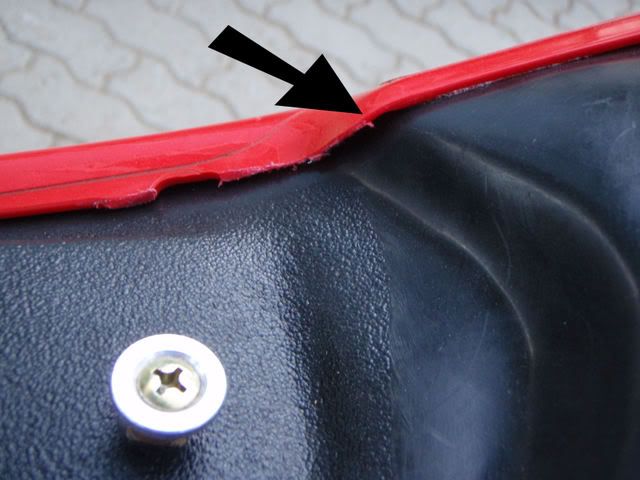
Don't give up yet. If I understand you're having problems with the side panel fitting your new tank. If they are not already glued or taped make sure you do some modification to the contours shape on the top of the panels. I cut lots off of the panels so it would fit the new tank
(see pics)
SidePanels013.jpg

SidePanels012.jpg
 
Ya know that's why I love this place so so much.:D
Someone comes up with an idea. someones else critiques and scrutinizes (spelling) it. Makes it a little better and we all win.

I wish some of you guys lived around here so we could ride together.

thumbsup.gif
Fast1
 
I've read some of his other posts (on TT) and his issue is with the IMS tank fitment, not related to modifying the side panels for the IMS tank.

However the photos you provided would sure help those considering your idea of attaching the side panels to the IMS tank.
 
Fast1;4510 said:
I've read some of his other posts (on TT) and his issue is with the IMS tank fitment, not related to modifying the side panels for the IMS tank.

However the photos you provided would sure help those considering your idea of attaching the side panels to the IMS tank.

That is correct. I am having trouble with the fitment of the tank and not side panels. Thanks for the pics and comment though. My tank is difficult to get to sit down and even when it does, it rocks like a 4 legged table that isn't even. Also, the seat won't mount properly. Still looking at it and playing a bit though. I really don't need the range for jersey enduros though so I'm not sure I really want to keep hassling with it.

Thanks for the help though from everyone that has offered their thoughts! :thumbsup:
 
Joliet;4454 said:
Did your seat stick up on your factory tank? Did you use the same hardware from your origional tank into the aftermarket tank that the slot in the front of the seat slips into? Mine fits down nicely on the tank. Can you tell if the front slot in the seat is under the bolt head or on top of it? Good luck, Ken

The seat fits perfectly with the factory tank. I need to get batteries so I can take a pic(will do tomorrow). I used the hardware as recommended by the IMS install instructions. The post does not line up well with the seat mount on the seat. It seems like the post should be a half inch or so closer to the bars and as it is the seat is tough to get on and causes the front sides of the seat to flare out a bit.
 
Fast1;4457 said:
post a photo of this issue

Will do. I need to pick up batteries though so it'll be tomorrow before I can post anything. Even just looking at the tank sitting on a table, the tank seems to be off a bit with it's shape though.
 
HuskyDude;4509 said:
Ya know that's why I love this place so so much.:D
Someone comes up with an idea. someones else critiques and scrutinizes (spelling) it. Makes it a little better and we all win.

I wish some of you guys lived around here so we could ride together.

Thumbs up to Fast1

not necessarily better but just an alternative way of attaching the side panels..


I'd never turn down riding in BC and it would be all that much better with a fellow Husky rider.
 
Back
Top