• 4 Stroke Husqvarna Motorcycles Made In Italy - About 1989 to 2014
    TE = 4st Enduro & TC = 4st Cross

  • Hi everyone,

    As you all know, Coffee (Dean) passed away a couple of years ago. I am Dean's ex-wife's husband and happen to have spent my career in tech. Over the years, I occasionally helped Dean with various tech issues.

    When he passed, I worked with his kids to gather the necessary credentials to keep this site running. Since then (and for however long they worked with Coffee), Woodschick and Dirtdame have been maintaining the site and covering the costs. Without their hard work and financial support, CafeHusky would have been lost.

    Over the past couple of weeks, I’ve been working to migrate the site to a free cloud compute instance so that Woodschick and Dirtdame no longer have to fund it. At the same time, I’ve updated the site to a current version of XenForo (the discussion software it runs on). The previous version was outdated and no longer supported.

    Unfortunately, the new software version doesn’t support importing the old site’s styles, so for now, you’ll see the XenForo default style. This may change over time.

    Coffee didn’t document the work he did on the site, so I’ve been digging through the old setup to understand how everything was running. There may still be things I’ve missed. One known issue is that email functionality is not yet working on the new site, but I hope to resolve this over time.

    Thanks for your patience and support!

New look with the IMS Tank 2

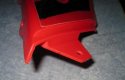
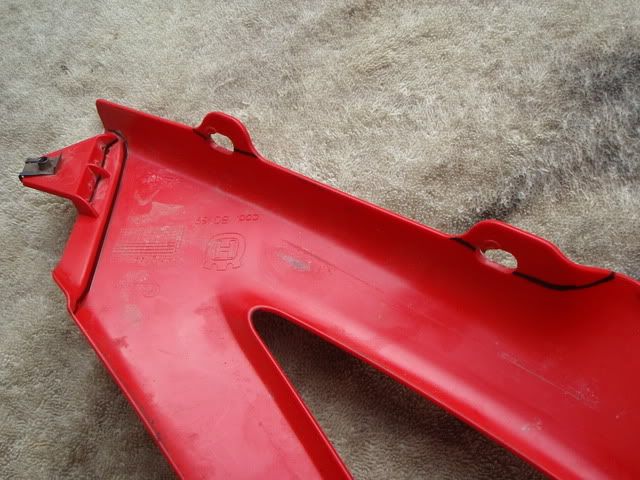
I was hoping I wouldn't have problems with my 08 TE IMS tank leaking, but last Wednesday after filling the tank full I notice gas leaking from the right side. I turned out to be the same problem that others have had with a crack forming on the bottom of the right wing where its has a tight radius inside corner.

Call IMS today, they were very helpful in making arrangements to get a new tank sent out today. They also mentioned that they modified their mold to increase the radius of that corner on each side and the tank they are sending should be the new style. :applause:

They won't be replacing tanks if it's not cracked or leaking, but if you do have problems, give them a call and they said they would make it right. 800-237-9906

IMStankleak6-09.jpg
 
What gets me is no one has had problems with the black ones and yet they are the same mold same plastic just with added color.:excuseme:

Its good to see IMS standing behind their product.:thumbsup:

I wish they were gonna make a Plastic tank for the 125 and have the fuel sit lower.
 
I wish I still had emails I had from when my first IMS tank leaked like that last year (FYI: 2nd revised model is holding up fine)

What I was told is the plastic was different mix, not just color added.......just can not find that email or copy of it.
 
I'm just considering fitting the shrouds to the IMS tank on my 09 TE450 as the decals I put on the tank itself bubbled up (apparently because fuel vapor seeps through the tank walls), but the bracket at the rear of the shroud doesn't fit into the recess on the tank where the bolt goes in. I had hoped to have the shroud bolted as normal at the rear using the bracket so that it at least had one solid attachment point, but if I do that it's going to make both the shroud and the front of the side panel stick out about half an inch further than it used to and it would probably need some sort of spacer behind them to avoid pressure on the tank itself around the edge of the recess (and maybe a longer bolt). This would also leave a slight gap between the panels and the tank.

Looking at the fifth image in the first post of this topic, it looks as if those tank shrouds may be shaped differently to mine around the bracket. Here's mine:
View attachment 1683

Did anyone else hit this problem, and if so how did you solve it? :confused:
 

Attachments

  • IMG_1939-2.JPG
    IMG_1939-2.JPG
    14.7 KB · Views: 95
HuskyDude;43695 said:
Although I never posted cutting off that tab.

I still had to, to get a proper fit.

Thanks for that, just wanted to make sure I wasn't missing something obvious and making a terrible mistake! :doh:

So it's back to the Dremel then...
 
I have had those graphics on for about six to eight months. I had that tool kit holder in my garage but I belive it is off a Suzuki. I had some brakets in a box from when I picked up my bike I think they were from the charcole canister they were square and fit the frame and fit the tool box I have not lost any tools, but I have not needed them so far:D
 
I pulled up this thread to get some suggestions on what to do with the HORRIBLE fittment and graphics problems these tanks come with. I simply need to say it is truly atrocious how purchasing a nearly $300 product can 1- not fit worth a crap 2- completely destroy the cosmetic appearance of the bike. I know I could have chosen to send it back, but I of course chose to keep it because I value functionality over the cosmetics- at the peril of not being able to ever sell it since the fittment is bad and the plastic had to be destroyed to get any fittment at all. Aftermarket products are supposed to improve the appearance and performance of our bikes not sacrifice one for the other.

Sorry had to just get it out. On the other hand this is a good thread with some great ideas to remedy the problem and inspired me to come up with my own. I decided to use strategically placed zip ties to hold on the plastic instead of glues, velcro or double sticky stuff. I'm unsure of how they would last out in the woods and I always carry zip ties with me so I could replace them if they got torn off. I basically tied the red plastic to the lower blk one, one tie on the top pointed part to my rad guard and a tied together the two bold holes on the top together so they are under the seat. You can see the ties but its not super obvious to me anyway. I think if this idea fails I'll get the cemoto stickers.

Anyway thanks to all on this thread for the ingenuity!
 
JasonfromMN;109667 said:
I decided to use strategically placed zip ties to hold on the plastic instead of glues, velcro or double sticky stuff. I'm unsure of how they would last out in the woods and I always carry zip ties with me so I could replace them if they got torn off. I basically tied the red plastic to the lower blk one, one tie on the top pointed part to my rad guard and a tied together the two bold holes on the top together so they are under the seat. You can see the ties but its not super obvious to me anyway. I think if this idea fails I'll get the cemoto stickers.
That's pretty much what I did with mine and the ties have lasted a year so far. As you say, easy enough to replace them anyway if you do break one, and it's simple to get the panels off if you ever want to (e.g. if the tank leaked and had to be replaced).

The tie between the two holes on the top that goes under the seat I actually made a loop of with the back of the loop around something at the back of the tank (I forget what) to help stop the panels sliding forward. Not sure that's really necessary though as the bolts at the rear of the panels and the ties around the horns at the front (two on each horn) hold it pretty solid, so I could probably just have tied the two bolt holes straight to one another like you did. The good thing is that if you find the panels aren't as secure as you like, it's cheap and easy to cut off some of the old ties and try new ones in a different position, so you can keep fine tuning your design if necessary!
 
I took off the rad shrouds. They were leaf and twig catchers! Now the bike looks terrible and I would like to put it back to stock except I cant because I had to destroy the rad shrouds and the lower blk ones to try an get it to fit to the IMS tank. Wish i had never gotten the tank.
 
Whats wrong with having a black and white/clear dirtbike with red highlights? I couldn't wait to hang the stock tank and shrouds in the rafters.

ps. Lots of people get out of my way thinking I'm the forest patrol.
 

Attachments

  • day off ride 020.jpg
    day off ride 020.jpg
    96.2 KB · Views: 189
just an add on to this post. The ZipTy racing Huskies have the same deal, IMS tanks with the OEM side panels epoxied onto them.
 
Your white bike and clear tank look ok. Mine with the blk one doesn't.

Anyway, the tank leaks at the fuel pump so it has gone back. While I wait for the new one I might order the IMS stickers.

So, how do you guys mount the lower blk shroud peices? It jams the tank. Looks like guys are just cutting off the wing-like tab?
 
JasonfromMN;114965 said:
So, how do you guys mount the lower blk shroud peices? It jams the tank. Looks like guys are just cutting off the wing-like tab?

They need to be trimmed... and more than just the tabs, it is easy to cut with some heavy duty scissors, or just use Dremel.
 
Yeah I was going to use my sheet metal scissors, I just didn't know how straight that would come out so thought Id consult other users methods. Thanks.
 
Ok guys I'm ready to install my side panels on my IMS. What has held up the longest? Is Goop still going strong or is there something better these days? :confused:
 
hogwackr;119974 said:
Ok guys I'm ready to install my side panels on my IMS. What has held up the longest? Is Goop still going strong or is there something better these days? :confused:

Goop still do'n great no issues.:thumbsup:

Make sure you let it sit over night before releasing the clamps. And remember the stuff has the viscosity about the same as honey and will oozes out everywhere.:D
 
Thanks! Thats what I wanted to hear! I was going to leave the tank alone untill I saw just how ugly it is in person!
 
Back
Top