• Husqvarna Motorcycles Made In Sweden - About 1988 and older

  • Hi everyone,

    As you all know, Coffee (Dean) passed away a couple of years ago. I am Dean's ex-wife's husband and happen to have spent my career in tech. Over the years, I occasionally helped Dean with various tech issues.

    When he passed, I worked with his kids to gather the necessary credentials to keep this site running. Since then (and for however long they worked with Coffee), Woodschick and Dirtdame have been maintaining the site and covering the costs. Without their hard work and financial support, CafeHusky would have been lost.

    Over the past couple of weeks, I’ve been working to migrate the site to a free cloud compute instance so that Woodschick and Dirtdame no longer have to fund it. At the same time, I’ve updated the site to a current version of XenForo (the discussion software it runs on). The previous version was outdated and no longer supported.

    Unfortunately, the new software version doesn’t support importing the old site’s styles, so for now, you’ll see the XenForo default style. This may change over time.

    Coffee didn’t document the work he did on the site, so I’ve been digging through the old setup to understand how everything was running. There may still be things I’ve missed. One known issue is that email functionality is not yet working on the new site, but I hope to resolve this over time.

    Thanks for your patience and support!

Project 250 Mag Status

warburtonm

Husqvarna
A Class
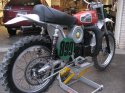
You guys have been generous with your time and advice so I thought I'd give you a status report on how the restoration of a 250 Mag (my first!) is going. Here is the before case. As you can see in the first picture, a good specimen that looks OK from this distance but is a lot rougher up close, especially for a perfectionist. I am doing a frame-up resto (but I did not split the cases).

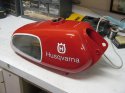
The second pic is of the finished tank - complete with decals on the top. A very nice job by a local Omaha guy for only $200.

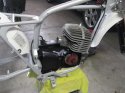
The third is the assembled but yet-to-be-trued front rim, on the stock Akront with Buchanan spokes and a powder coated hub. Nice, if I can get it straight. Never done that before.

I had the frame blasted and powder coated, and blasted the cylinder and head, which I think gives the coolest factory look on the repainted cases.

That's it for now; will keep posted. Thanks for the help

Marc
 

Attachments

  • IMG_3418.jpg
    IMG_3418.jpg
    97.4 KB · Views: 57
  • IMG_3543.jpg
    IMG_3543.jpg
    84.9 KB · Views: 45
  • IMG_3551.jpg
    IMG_3551.jpg
    88.1 KB · Views: 45
  • IMG_3561.jpg
    IMG_3561.jpg
    93.8 KB · Views: 51
That is going to be a nice bike when you're done.

Here's a bad picture of mine.

272034351_qvjaB-M.jpg
 
Looks trick. Two questions: How did you get the IMS pegs to fit properly (and not break your leg)? And what are you using for a silencer? That looks like a Circle F pipe, no? (OK, three questions.)

Thanks Marc
 
Answers. I don't know. I don't know. Circle F yes. I bought the bike turn key. Here is a pic of the silencer(bad name, because it does very little silencing).

272034928_AeSwu-M.jpg
 
Warburton,

Very Nice!!!

Painted cases? I'm extremely curious. I'm in the middle of a resto and was going to paint cases and blast the top end. Your so right - painted cases and non painted top end - VERY COOL! Heres the questions - what paint? what gloss? what prep? where did you get it?

Rim truing - EZ. Snug em all up. Next, work on centering the rim/hub (as looking at the wheel from the side). No eggs! Tighten the spoke/s to bring the rim down (to lower a "high" spot). Loosen the spokes to raise a "low" spot rim. Remeber to compensate w/ the spokes on the other side of the rim you are working on.

While working on "centering" the rim/hub - as looking from the side - you can began to tru the left side/right side - as looking at the rim from above or the rear. No wobble left/right. To true this aspect of the rim you tighten spokes on the "high" side and loosen spokes on the "low" side. To tighten the spoke pulls it "in" and loosening it lets it "out".

Once the rim is pretty close left/right & up/down - your good. Now you are just tightening the spokes in small increments. You do not want to disturb the "truing". Pick a spoke and mark with tape. Small adujustment on that spoke, skip 2 do the next one, skip 2 do the next one and so on and so on. You will end up back at your mark. (You are essentailly tightening an inside spoke and then an outside spoke then an inside and so on.) Once back at your mark, move it 1 spoke up and do the same procedure until back at mark. Move tape one spoke and repeat. You just keep moving the mark one spoke tighten then skip 2 and tightening. Remember to check for "egg" and "wobble" as you tighten. Once you have got lft/right, up/down and the spokes tight you make the final adjustments and your good. Give it a couple of hours.

Again, you bike looks great! - continue on and post up.

Rick

Its intimidating as H, but once you get started its pretty elementary. Tighten to bring in or down and loosen to let out or raise
 
Rick: Thanks for the truing dope. I'll give it a go. On the cases: I chemically stripped the paint of with a paint stripper, then the attendant neutralizer. I went over the metal with fine sand paper; like a 600 grit. Then I wiped them down with alcohol. There were several areas that seemed to have oil on them (the paint wouldn't dry quickly), so I had to re-prep. I used PJ1 Fast Black S (Satin) ordered from Speed and Sport, but I also got some at the local bike shop (they had to order it). The look is perfect, and it seems to be gas resistant, but mind you I have not ridden it yet. Marc
 
2whlrcr: Are there any identifying marks on your "silencer" that would indicate a manufacturer and model number/name? Thanks Marc
 
warburtonm;25677 said:
2whlrcr: Are there any identifying marks on your "silencer" that would indicate a manufacturer and model number/name? Thanks Marc

End cap says "PFR". It may be the silencer Circle F sells?
 
Back
Top