Ignaciob
Husqvarna
Pro Class
There's not a bunch of room in the front headlight area, but there is plenty to host a fused barrier strip power source, auxiliary light switch, and relay. I bought a set of ADV Monster Model 60 LED lights and single throw waterproof push button switch.


At 28 watts each I didn't want to just tap into the existing high beam and potentially fry my wiring harness. The stock high beam H4 is pretty pathetic and yellow compared to the LEDs and I could have rerouted that lead to power just the aux lights, but I like to keep things stock and ADD on whenever possible. Having had some experience with power strips and relays on the FJR1300 I decided I wanted to put the lights on a relay and use the high beam as a trigger...along with an inline switch to choose between stock or stock + aux.
I ran a pair of 16 gauge wires with a fuse from the battery under the plastic to the nose area as well as running light wires through the clutch and front brake cable slots.
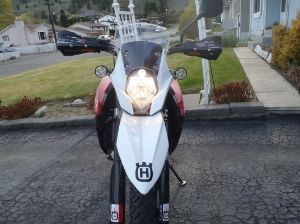
I mounted the lights on my Probend handguards several months ago and been very impressed with the solid mounting points, high position, and general looks. Here's what it all looks like in the end since I didn't start taking pictures until half way through my project.")

The other thing I REALLY didn't want to do was to cut or splice into the existing light harness...so I found some nifty harness extenders on Amazon and bought a few.

I stripped down the extender and spliced in a wire to the blue wire (that's high beam one), plugged it into the existing harness, test it all, and then ran the tirgger wire into into a Hella relay (Hella's make a slightly more compact unit than Bosch).

For those that haven't done relays before I tend to use this one as my baseline:

Key is that #30 is positive from the battery as direct as possible with a beefy wire, #86 is to a ground with the same gauge beefy wire, #37 goes to the thing you want to power, and #85 is the trigger wire (need not be a beefy thing that carries load.
This is the ONE thing I did that takes the motorcycle from stock. I....gasp....drilled a hole in the side of my light cluster and installed the waterproof toggle switch. I can reach it with my left hand while riding.

Alternatively, I considered a handlebar switch, but didn't end up going this way.
I looked for a good way to try and screw the relay to the inside area of the nose, but couldn't make anything work and just dremeled off the tab to make it a little more compact. I then tucked it down behind the right side steelwork. Notice the toggle switch with boot cover on...very discrete and looks factory IMO.

I suppose there's a small risk of touching grounding something unnecessarily, but feel pretty confident in the way I covered the relay and tucked it all in the nose. Truth is I've had the power block in for months now as I used it as a source for direct lit lights and my GPS receiver.

I used the left side space to tuck a bunch of spare light wire in case I ever want to use the lights on something else. The fuse is supplementary to my Garmin 478 power plug and downstream from the distribution block.

And all tucked in ready to put the plastic back on I test it all one last time, tug on wires, and call it good.

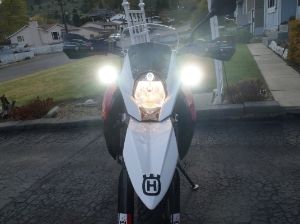
Once again, these LED flood lights are SERIOUS flamethrowers. You can't turn these things on when other traffic is around, but they're great at scaring Bambi.
At 28 watts each I didn't want to just tap into the existing high beam and potentially fry my wiring harness. The stock high beam H4 is pretty pathetic and yellow compared to the LEDs and I could have rerouted that lead to power just the aux lights, but I like to keep things stock and ADD on whenever possible. Having had some experience with power strips and relays on the FJR1300 I decided I wanted to put the lights on a relay and use the high beam as a trigger...along with an inline switch to choose between stock or stock + aux.
I ran a pair of 16 gauge wires with a fuse from the battery under the plastic to the nose area as well as running light wires through the clutch and front brake cable slots.
I mounted the lights on my Probend handguards several months ago and been very impressed with the solid mounting points, high position, and general looks. Here's what it all looks like in the end since I didn't start taking pictures until half way through my project.
The other thing I REALLY didn't want to do was to cut or splice into the existing light harness...so I found some nifty harness extenders on Amazon and bought a few.
I stripped down the extender and spliced in a wire to the blue wire (that's high beam one), plugged it into the existing harness, test it all, and then ran the tirgger wire into into a Hella relay (Hella's make a slightly more compact unit than Bosch).
For those that haven't done relays before I tend to use this one as my baseline:
Key is that #30 is positive from the battery as direct as possible with a beefy wire, #86 is to a ground with the same gauge beefy wire, #37 goes to the thing you want to power, and #85 is the trigger wire (need not be a beefy thing that carries load.
This is the ONE thing I did that takes the motorcycle from stock. I....gasp....drilled a hole in the side of my light cluster and installed the waterproof toggle switch. I can reach it with my left hand while riding.
Alternatively, I considered a handlebar switch, but didn't end up going this way.
I looked for a good way to try and screw the relay to the inside area of the nose, but couldn't make anything work and just dremeled off the tab to make it a little more compact. I then tucked it down behind the right side steelwork. Notice the toggle switch with boot cover on...very discrete and looks factory IMO.
I suppose there's a small risk of touching grounding something unnecessarily, but feel pretty confident in the way I covered the relay and tucked it all in the nose. Truth is I've had the power block in for months now as I used it as a source for direct lit lights and my GPS receiver.
I used the left side space to tuck a bunch of spare light wire in case I ever want to use the lights on something else. The fuse is supplementary to my Garmin 478 power plug and downstream from the distribution block.
And all tucked in ready to put the plastic back on I test it all one last time, tug on wires, and call it good.
Once again, these LED flood lights are SERIOUS flamethrowers. You can't turn these things on when other traffic is around, but they're great at scaring Bambi.


")
