• Husqvarna Motorcycles Made In Sweden - About 1988 and older

  • Hi everyone,

    As you all know, Coffee (Dean) passed away a couple of years ago. I am Dean's ex-wife's husband and happen to have spent my career in tech. Over the years, I occasionally helped Dean with various tech issues.

    When he passed, I worked with his kids to gather the necessary credentials to keep this site running. Since then (and for however long they worked with Coffee), Woodschick and Dirtdame have been maintaining the site and covering the costs. Without their hard work and financial support, CafeHusky would have been lost.

    Over the past couple of weeks, I’ve been working to migrate the site to a free cloud compute instance so that Woodschick and Dirtdame no longer have to fund it. At the same time, I’ve updated the site to a current version of XenForo (the discussion software it runs on). The previous version was outdated and no longer supported.

    Unfortunately, the new software version doesn’t support importing the old site’s styles, so for now, you’ll see the XenForo default style. This may change over time.

    Coffee didn’t document the work he did on the site, so I’ve been digging through the old setup to understand how everything was running. There may still be things I’ve missed. One known issue is that email functionality is not yet working on the new site, but I hope to resolve this over time.

    Thanks for your patience and support!

Round II - '72 450 Restoration

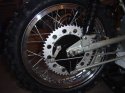
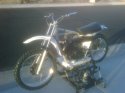
The bike was missing a chain guard, so picked up a new one....
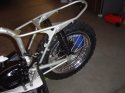
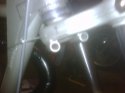
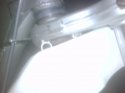
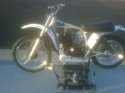
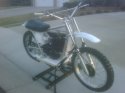
The forks cleaned, repainted, rebuilt...but I think I need "clamps" on the wipers...anyone else agree?
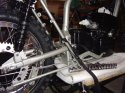
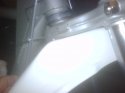
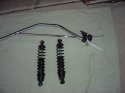
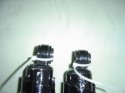
New Progressive shocks...
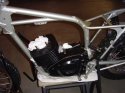
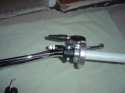
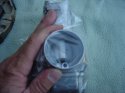
hi rise bars.... Not sure I like the magura black - perch (levers) also new whirlpull throttle.....not sure about that ... I like the trap door magura throttle look... we'll see how it all comes together.. Bing is rebuilt ..cleaned & is going to sit in the plastic bag till I assemble
 

Attachments

  • DSC00028.JPG
    DSC00028.JPG
    153.6 KB · Views: 53
  • DSC00029.JPG
    DSC00029.JPG
    139.9 KB · Views: 56
  • DSC00031.JPG
    DSC00031.JPG
    87.6 KB · Views: 61
  • DSC00032.JPG
    DSC00032.JPG
    90.7 KB · Views: 59
  • DSC00027.JPG
    DSC00027.JPG
    113.2 KB · Views: 58
the shocks have zip ties to keep all the bushings intact....this may sound like a dumb question.. the shocks have one side of the bushing that protrudes further..does that 'protruding' side go towards or away from the wheel?
 

Attachments

  • DSC00035.JPG
    DSC00035.JPG
    85.4 KB · Views: 14
I had the engine rebuilt by John at Vintage Husky & its been sitting in the shipping box..wrapped in plastic wrap & decided to put it in the frame. Get it all set and remove the plastic wrapping..only to find the fins on the right side of the head broken, bent and cracked...
 

Attachments

  • IMG00139-20111119-1836[1].jpg
    IMG00139-20111119-1836[1].jpg
    119.1 KB · Views: 75
  • IMG00138-20111119-1834[1].jpg
    IMG00138-20111119-1834[1].jpg
    116.4 KB · Views: 76
I was totally bummed..John packed the engine very well ..but the fins were still damaged during the shipping. I had friend help me get the engine in & set the bolts.. an he too was like "geesh".
Well I called John ..told him what happened and he said he will send me out another head..no problem!!... THAT is GREAT customer service.. plus he said he will get it done this coming week..
It's still a bummer that this happened but at least it can be rectified with the removal of a few nuts & bolts and replacement of the head.
The first photo shows the second fin crack/bent..the second photo shows the broken outside fin. Photos are not the best...sorry
 
At least, with a Husky, you dont need a head gasket, you might want to lap-in the new head with valve grinding compound.
 
At least, with a Husky, you dont need a head gasket, you might want to lap-in the new head with valve grinding compound.

I always hear that "lap in"...what exactly does that mean?.. I am really ignorant about machine shop stuff.. Ok I read about lapping valves but they are "loose".. the Husky Jug has the studs that come up etc.. Can I "Lap" without pulling the Jug? (Jug set with new base gasket etc..)
 
The valve compound is abrasive and will have a sanding effect on the two sealing surfaces, I once changed a head on one of my Husky's without doing this and there was allways some seepage between the two. The proceedure is in all the Husky manuals, you will have to pull the cyl. off and clean it when your done. http://www.yourhusky.com/files/MK-ML_workshop_manual.pdf

THANKS dumbdotdog....that is better than my Clymers CD....
 
getting the wheels set, sprocket etc... these were taken with camera phone. The Nickel platimng doesnt come out well. I will take better ones later
 

Attachments

  • IMG00143-20111129-2130[3].jpg
    IMG00143-20111129-2130[3].jpg
    130.5 KB · Views: 58
  • IMG00140-20111129-2129[1].jpg
    IMG00140-20111129-2129[1].jpg
    127.8 KB · Views: 55
Some clearer photos. Waiting on the replacement head.
Nickel plated the axels, bolts, replaced all springs - stainless steel
 

Attachments

  • DSC00004.JPG
    DSC00004.JPG
    120.9 KB · Views: 71
  • DSC00005.JPG
    DSC00005.JPG
    123.3 KB · Views: 73
  • DSC00011.JPG
    DSC00011.JPG
    122.4 KB · Views: 79
  • DSC00012.JPG
    DSC00012.JPG
    159.8 KB · Views: 66
And while you are on Ebay, check out the case stickers I'm selling for $5 free shipping. It will dress up that clutch cover and make it look great. Look under Vintage Husqvarna Case Stickers.
 
I think its a good idea to tackle the motor first, because regardless whether you are going to ride it or sell it, if it smokes like an environmental hazard, it needs seals, and while you have it apart, you can check the condition of the gears, shifting forks, and lets not forget some cases experience corrosion so bad that I have actually found holes in the case that have to be repaired from the inside.
 
Do you have this same manual for an MJ? Or know where I could find one?

Thank you!

The valve compound is abrasive and will have a sanding effect on the two sealing surfaces, I once changed a head on one of my Husky's without doing this and there was allways some seepage between the two. The proceedure is in all the Husky manuals, you will have to pull the cyl. off and clean it when your done. http://www.yourhusky.com/files/MK-ML_workshop_manual.pdf
Do
 
I decided to use plastic fenders. The front fender has the bracket molded in it & the fender mounts to 2 metal tubes on the lower triple clamp. My question, what is the best way to mount the fender and 'find' the metal tubes without trial & error - multiple holes in the fender trying to line everythig up
 

Attachments

  • IMG00152-20120312-2110.jpg
    IMG00152-20120312-2110.jpg
    73 KB · Views: 16
  • IMG00153-20120312-2111.jpg
    IMG00153-20120312-2111.jpg
    45.7 KB · Views: 17
  • IMG00155-20120312-2111.jpg
    IMG00155-20120312-2111.jpg
    56.7 KB · Views: 17
lots of measurements & got the fenders fitted...sorry about the photo quality
 

Attachments

  • IMG00158-20120314-1837.jpg
    IMG00158-20120314-1837.jpg
    95.4 KB · Views: 39
  • IMG00160-20120314-1840.jpg
    IMG00160-20120314-1840.jpg
    110.8 KB · Views: 41
  • IMG00161-20120314-1842.jpg
    IMG00161-20120314-1842.jpg
    110.8 KB · Views: 40
  • IMG00162-20120314-1843.jpg
    IMG00162-20120314-1843.jpg
    101.4 KB · Views: 41
With the expansion chamber in place.I also have a silencer/spark arreestor I want to use so I went to a muffler shop and had them make the "shiny" adapter in between the expansion chamber & silencer. My next step is to use a band saw & cut slots into the "adapter" & use stainless steel "aircraft" or "T Bolt" clamps to secure it all together
 

Attachments

  • IMG00163-20120314-1846.jpg
    IMG00163-20120314-1846.jpg
    77.5 KB · Views: 45
  • IMG00165-20120314-1848.jpg
    IMG00165-20120314-1848.jpg
    91.9 KB · Views: 44
  • IMG00167-20120314-1857.jpg
    IMG00167-20120314-1857.jpg
    71.9 KB · Views: 42
Back
Top