-
Hi everyone,
As you all know, Coffee (Dean) passed away a couple of years ago. I am Dean's ex-wife's husband and happen to have spent my career in tech. Over the years, I occasionally helped Dean with various tech issues.
When he passed, I worked with his kids to gather the necessary credentials to keep this site running. Since then (and for however long they worked with Coffee), Woodschick and Dirtdame have been maintaining the site and covering the costs. Without their hard work and financial support, CafeHusky would have been lost.
Over the past couple of weeks, I’ve been working to migrate the site to a free cloud compute instance so that Woodschick and Dirtdame no longer have to fund it. At the same time, I’ve updated the site to a current version of XenForo (the discussion software it runs on). The previous version was outdated and no longer supported.
Unfortunately, the new software version doesn’t support importing the old site’s styles, so for now, you’ll see the XenForo default style. This may change over time.
Coffee didn’t document the work he did on the site, so I’ve been digging through the old setup to understand how everything was running. There may still be things I’ve missed. One known issue is that email functionality is not yet working on the new site, but I hope to resolve this over time.
Thanks for your patience and support!
You should upgrade or use an alternative browser.
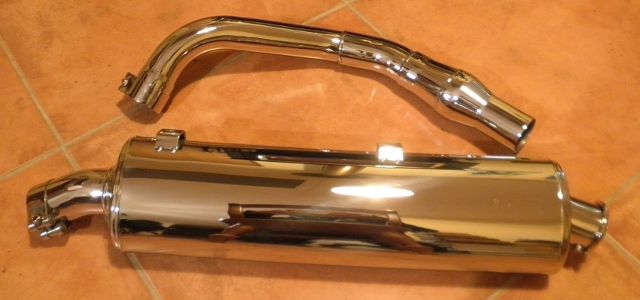
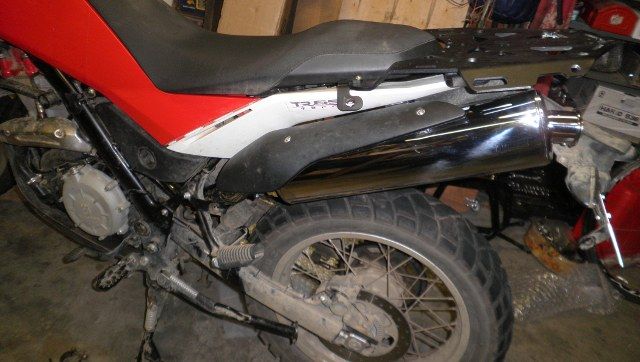
Staintune Exhaust System
- Thread starter Quirky
- Start date
Hey Q, can you turn the AF xied off completely, and act as stock?
Yes easy!
Dial the pot. back to setting 1.
The slightly harder part is that it can take a few miles for the ECU to adapt again. Could be say 1/2 a tank of fuel before it settles down.
What he said /\ /\ /\ /\
Can you take a pick looking into the pipe?
Them staintune look like top shelf stuff.

In this picture of ENGENIA's, I can see the screw that holds the big bore restricter in place, bottom of the spout.
Looks like this fitted. Inside that is a baffle, stainless steel round, similar to the diametre of the spout.
FYI- The baffle inside is actually only internally welded on one end (front) and the end cap secures it cleverly allowing for expansion from heat. The baffle needs room to get longer due to the higher tempratures internally than the outside. If it wasn't done like this and were to be fully fixed welded it would eventually fail.
Riding Again
Husqvarna
AA Class
Engenia
Husqvarna
AA Class
yes. Quirky spotted the screw in my pic that holds it in place. You can see it if you look closely on the under side of the tail pipe.Engenia. Does the pipe have the removable baffle?
As far as the build quality goes, it IS excellent. If you were going to be picky, you can see very fine buffer marks in it if you get the light in the right place. If you wanted that gone and make it a perfect mirror, it could be done on a rag wheel and polish. I don't see the point though on my bike. It's going to be covered in muck soon enough. Check out my pics. I'm well on the way already and I've added a few scratch marks while I was installing it. You can see these in my pics as well.
I rode it to work this morning.
The idle note is slightly deeper than before, but about the same volume.
When you gain some revs it does bark a bit more, and it certainly feels as if it pulls stronger, but the main gains I see are reduced weight and the freeing up of that space on the right.
I'm one happy camper.

Slowflyer
Husqvarna
AA Class
MG
Engenia
Husqvarna
AA Class
- The parts
- Removing the existing pipes is easy, by loosening the clamps, removing the fixing bolts and slipping off the pipes.
- The clips are removed and transferred to the new can. There are spacers and crinkle washers. Don't forget them.
- Undo the splitter pipe clamp and move it back as far as it will go. If there is not enough room for it to slip it off of the header pipe, like on mine, the header pipe must either be rotated up (I don't know if this will provide the extra space you need, I haven't tried it) or removed from the exhaust port completely. If yours is different to mine, so much the better. You can skip to step 10 - 13 then skip again to 19 - 23. (You lucky lucky ......)
- Remove the header pipe heat guard.
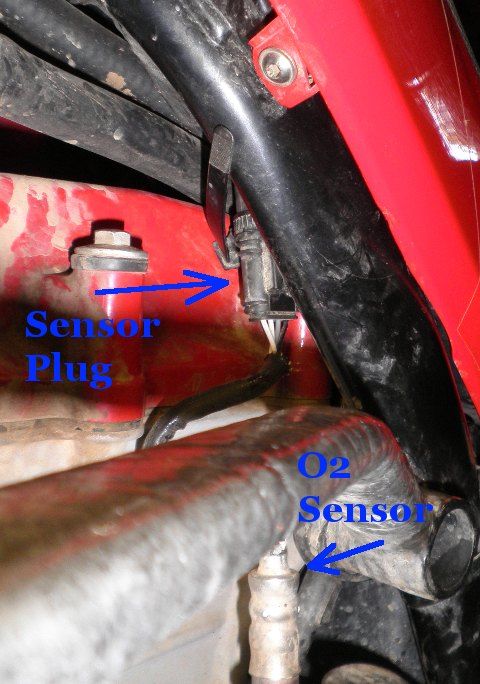
- Slide down the sensor plug, and release the plug from it's mate. You might not need to do this but I thought it would be prudent to be careful.
- Undo the header pipe nuts.
 The top nut is accessible with a 3/8 drive 13mm socket, uni-joint and extender.
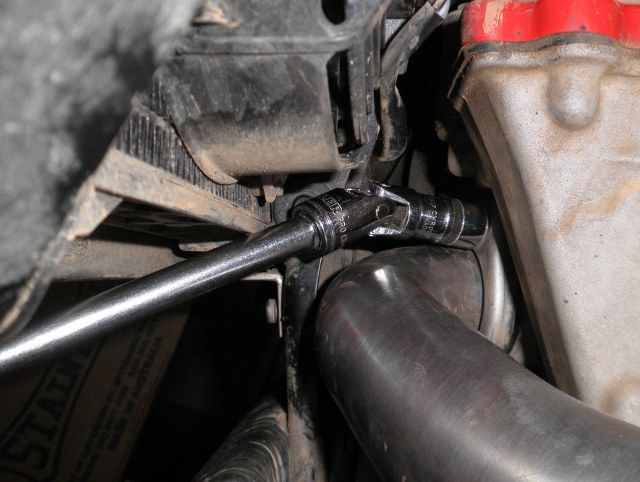
- The bottom nut is "just" accessible through the hole in the down tube using a 1/4 drive 13mm socket and extender.
 It's not quite square with the stud.
 - Slip off the header pipe. There will be two metal gaskets that clip onto the header.
- Separate the header and link pipes and remove the link pipe from the bike.
- Thread the Staintune link pipe into position. If you wrap it first you will protect that mirror finish.
- Slip the clamp over the header pipe.
- Slip the link pipe over the header pipe.
- Fit the header pipe back onto the exhaust port and slip the collar into place. Don't forget those two gaskets. You may need to bend the clips a bit to make them grip the ring enough to keep them in place while lining up the header pipe.
- Thread the top nut onto the stud finger tight
- Put the bottom nut into the 1/4 drive socket and carefully offer it up to the stud. It won't screw on because it is not in alignment with the stud. I used a sharpened flat screwdriver to rotate the nut in the socket until the threads would start. It's fiddly but fortunately, the nut has a flange that allows you to manipulate it's position. Don't drop the nut!
- Tighten the exhaust nuts
- Re-connect the sensor plug and slip it back into place.
- Smear some grease onto the inside pipe joints. High temp silicone grease is best. If you use ordinary grease like me, you'll end up with it burnt onto the pipe when it heats up. Have fun cleaning that up later.
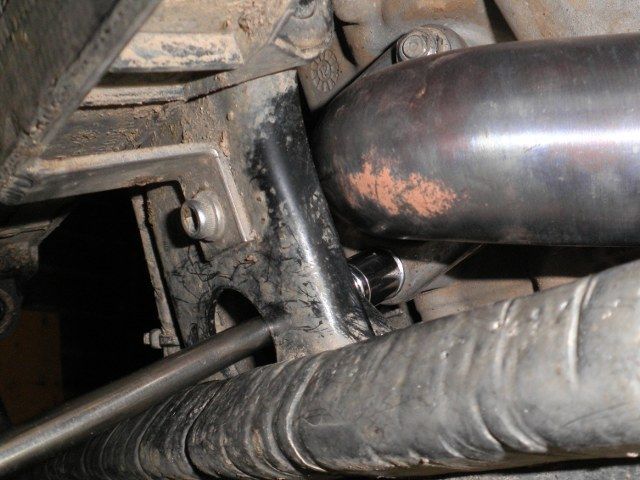
- Slip the muffler into position with it's clamp in place and align it for best position. Make sure that the link pipe does not touch the engine casing.
 The Husky link pipe had witness marks on it from the casing, so minus points to the Italians.....
 - Install the muffler mounting bolt & nut, but leave it loose. Remember the inner rubber washer and the metal one over it.
- Tighten the clamps and finally the mounting bolt
- Fit the heat guard and the job is done


Engenia
Husqvarna
AA Class
Consider yourself blessed!I don't know whether it is because I have an ABS Terra but I had no problem removing the mid pipe and doing the whole install without having to remove or even loosen the header pipe.
You really don't want to remove the header pipe if you don't have to. For me there was no alternative. I tried for half an hour manipulating that splitter pipe in all directions, but I needed 10 more millimeters to get them apart.
megatiker75
Husqvarna
AA Class
Engenia
Husqvarna
AA Class
Either my header pipe is 10 mm longer that it should be, or I didn't twig that simply rotating the header pipe up would have solved the problem.
I'm leaning towards the latter since my splitter pipe was hard up against the engine casing.
I'll never know though, because I don't plan to remove the new link pipe just to find out.
Engenia
Husqvarna
AA Class

It is essentially straight through with a perforated pipe, wrapped in stainless steel wool with a strip of ss wool in each remaining void. Over that is a final wrapping of fine stainless steel wire.
")


Engenia
Husqvarna
AA Class
Found another Terra that wouldn't let me remove the splitter pipe. Two of us tried, but no luck.Two possibilities I guess.
Either my header pipe is 10 mm longer that it should be, or I didn't twig that simply rotating the header pipe up would have solved the problem.
I'm leaning towards the latter since my splitter pipe was hard up against the engine casing.
This one has been touching the engine casing just like mine. It even sprang when the LH muffler was removed.
Perhaps I need Slowflyer to show me how he did it. Got time tomorrow lunch time?
Not that I need it removed. I'm just interested to know why.
Slowflyer
Husqvarna
AA Class
Found another Terra that wouldn't let me remove the splitter pipe. Two of us tried, but no luck.
This one has been touching the engine casing just like mine. It even sprang when the LH muffler was removed.
Perhaps I need Slowflyer to show me how he did it. Got time tomorrow lunch time?
Not that I need it removed. I'm just interested to know why.
I am in Sale, Vic visiting the kids and grandkids. Rode the Rockster down - still getting over the hypothermia!
I wonder if it is because mine has ABS? I had to manoeuvre the pipe past the ABS mono block and associated plumbing.I also had to have the clamp on the collar because once the pipe was fitted on the header, there was insufficient room to move the clamp along the pipe. That took me about 10 minutes to figure out. There is a reason my tag has the word 'Slow' in it!
Engenia
Husqvarna
AA Class
Bugger!I am in Sale, Vic visiting the kids and grandkids. Rode the Rockster down - still getting over the hypothermia!
I wonder if it is because mine has ABS?
(It's no warmer in sunny Can'tberra. Snow down to 900m tonight. We're at 580m, so not even that to look forward to.)
I'm going to have to work it out for myself then.
Can't be ABS related. Bruce didn't have the issue.