schimmelaw
Husqvarna
AA Class
81' 430XC street-legal motard conversion in progress.
Tools required:
standard sized Craftsman 19mm socket, Craftsman "deep dish" 19mm socket, any large socket and a vise w/ jaw guards
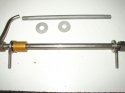
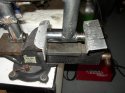
Photo 1:
How I did it. Follow along. Remove swingarm. Duh. Remove the four rubber o-rings. Don't get in a hurry and forget these and tear one up. Ask me how I know. Remove the two inner bushings. Line up the swingarm and sockets as pictured. (Large socket - hollow side over swingarm as back up and bearing catch. Standard sized 19mm as first press.) Center the standard 19mm socket on the bearing and slowly tighten up the vise. The standard 19mm socket will push the outer bearing into the inner bearing and will almost push the second bearing out before it bottoms out. Back off on the vise and replace the standard socket with the 19mm deep dish and finish pushing the bearings out into the large socket.
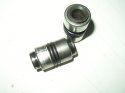
(Reassembly is just the opposite. No large socket or the deep dish is needed. Just use the vise to press the bearing (rubber lip facing out!) into the swingarm. Then use the standard 19mm socket to set the bearing at the proper depth for the o-ring. Wa-la done.)
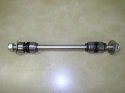
Photo 2:
Throw all your parts into some Berryman's CHEM-DIP parts cleaner. Let everything soak a couple of times. Final clean with some brake cleaner. Regrease. Reassemble. Ready for reinstall post powder.
Tools required:
standard sized Craftsman 19mm socket, Craftsman "deep dish" 19mm socket, any large socket and a vise w/ jaw guards
Photo 1:
How I did it. Follow along. Remove swingarm. Duh. Remove the four rubber o-rings. Don't get in a hurry and forget these and tear one up. Ask me how I know. Remove the two inner bushings. Line up the swingarm and sockets as pictured. (Large socket - hollow side over swingarm as back up and bearing catch. Standard sized 19mm as first press.) Center the standard 19mm socket on the bearing and slowly tighten up the vise. The standard 19mm socket will push the outer bearing into the inner bearing and will almost push the second bearing out before it bottoms out. Back off on the vise and replace the standard socket with the 19mm deep dish and finish pushing the bearings out into the large socket.
(Reassembly is just the opposite. No large socket or the deep dish is needed. Just use the vise to press the bearing (rubber lip facing out!) into the swingarm. Then use the standard 19mm socket to set the bearing at the proper depth for the o-ring. Wa-la done.)
Photo 2:
Throw all your parts into some Berryman's CHEM-DIP parts cleaner. Let everything soak a couple of times. Final clean with some brake cleaner. Regrease. Reassemble. Ready for reinstall post powder.

 but it still sucked.