Maybe i found reason why someone is happy with 110-110-115 settings with pu plug,and i needed to go as low as 87-90-95.And others somewhere in between.
Thumpertalk has conversation about i beat too,and if this is true,it explains a lot.
seymore
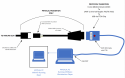
I'll repost this info here since this is about iBeat.
Also the ECU still adjust for altitude without the O2 sensor by using the atmosphere pressure sensor.
There seems to be a bit of confusion about the power up kit and iBeat adjustments. Here is what I have learned and tested...
1. The EFI tuning with iBeat only provides for 2 real adjustments.
a) You can calibrate the TPS idle position value so the ECU accurately recognizes idle position.
You can adjust the FeedBack parameter #1 (FB1) while the O2 sensor is installed with the bike warm and running. This parameter seems to add (FB1>100%)or subtract (FB1<100%) fuel from the nominal open-loop map.
2. The open-loop or (race) map appears to be used when the O2 sensor is not up to operating temp, or when you change throttle position rapidly and the system can't adjust fast enough, or if you have installed the PowerUp connector. Under these conditions the ECU uses FB1 to offset the amount of fuel.
3. With the Stock O2 sensor installed and at operating temp, the ECU closes the feedback loop from the O2 sensor and tries adjusts the fuel to maintain a Air Fuel Ratio (AFR) of 14.5:1 regardless of the FB1 setting. Perfect combustion would be 14.7:1 with gasoline, giving the lowest exhaust CO emissions and best MPG, but not the most power. A AFR between 12.5 to 13.4 will give the most power.
4. The Power-Up kit tuning bulletin says to adjust the FB1 to 100% before removing the O2 sensor. This appears to be a nominal value. Since the ECU no longer has feedback from the O2 sensor, it has to assume that a known amount of fuel is sprayed for a given injector pulse time. The problem is that this can vary from bike to bike depending on injector and fuel pump performance. So FB1 at 100% maybe great on one bike, but another bike may need to be set at 105% or 97%. Unfortunately most dirt bike dealers have not had a need to invest in dynanometer or exhaust gas analyzers to find the best FB1 setting and street bike shops with the dyno's don't have the iBeat tool or the interest.
5. I found that putting the Power-Up kit on my 450 without calibrating TPS or changing the factory setting of FB1 from 103% caused my bike to run very rich at 11.2:1. This caused the MPG to drop to 26 while riding hard in the dirt and left a thick layer of carbon in the exhaust system and the plug was getting black. You may need to have the dealer adjust the FB1 up or down by 3% at a time then ride it and look at the plug. Just like jetting. It's a pain to reconnect the O2 sensor each time. BTW, don't leave the O2 sensor installed without being connect for any long periods. It can get coated and damaged if not electrical heated.
6. All of this is part of the price and frustration of being a first adopter of EFI from Husky even though they had it on 610ie last year, they didn't have the performance kit and removal of the O2 sensor to deal with. The problem is also compounded by the lack of info from Husky to the dealers and EFI being new to many dealers and owners. I would suggest that if your having problems and the dealer is unsure what to do, have them contact Ferracci for help.
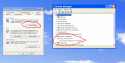
So if basemap is in controll with pu plug too,there cant be one setting that works for all. In mine corrected value was
between 85-90% in closed loop mode.(this value is shown in top of those fb 1,2,3 ) Ecu has not learned anything yet,all map settings were 100% but i think this time i give it some time to learn so maybe map is better following what that engine wants with pu plug too. There is corrected map also,but it cant be adjusted,only reset if needed.
I suspect that this bike
had pu plug installed quite soon after it has been bought new. Or ecu forgets its learned map if its long without battery,but i dont think it should behave like that. Maybe fuel pressure is bit higher than it should,
or injector is worn and flowing more. or something else.
I have not found any info what those fb2&3 does. with pu plug 2 and 3 should chance mid and full throttle settings,
but nobody says nothing with lambda. Exept dont touch those settings.
Thumpertalk has conversation about i beat too,and if this is true,it explains a lot.
seymore
Posted April 16, 2008I'll repost this info here since this is about iBeat.
Also the ECU still adjust for altitude without the O2 sensor by using the atmosphere pressure sensor.
There seems to be a bit of confusion about the power up kit and iBeat adjustments. Here is what I have learned and tested...
1. The EFI tuning with iBeat only provides for 2 real adjustments.
a) You can calibrate the TPS idle position value so the ECU accurately recognizes idle position.
You can adjust the FeedBack parameter #1 (FB1) while the O2 sensor is installed with the bike warm and running. This parameter seems to add (FB1>100%)or subtract (FB1<100%) fuel from the nominal open-loop map.
2. The open-loop or (race) map appears to be used when the O2 sensor is not up to operating temp, or when you change throttle position rapidly and the system can't adjust fast enough, or if you have installed the PowerUp connector. Under these conditions the ECU uses FB1 to offset the amount of fuel.
3. With the Stock O2 sensor installed and at operating temp, the ECU closes the feedback loop from the O2 sensor and tries adjusts the fuel to maintain a Air Fuel Ratio (AFR) of 14.5:1 regardless of the FB1 setting. Perfect combustion would be 14.7:1 with gasoline, giving the lowest exhaust CO emissions and best MPG, but not the most power. A AFR between 12.5 to 13.4 will give the most power.
4. The Power-Up kit tuning bulletin says to adjust the FB1 to 100% before removing the O2 sensor. This appears to be a nominal value. Since the ECU no longer has feedback from the O2 sensor, it has to assume that a known amount of fuel is sprayed for a given injector pulse time. The problem is that this can vary from bike to bike depending on injector and fuel pump performance. So FB1 at 100% maybe great on one bike, but another bike may need to be set at 105% or 97%. Unfortunately most dirt bike dealers have not had a need to invest in dynanometer or exhaust gas analyzers to find the best FB1 setting and street bike shops with the dyno's don't have the iBeat tool or the interest.
5. I found that putting the Power-Up kit on my 450 without calibrating TPS or changing the factory setting of FB1 from 103% caused my bike to run very rich at 11.2:1. This caused the MPG to drop to 26 while riding hard in the dirt and left a thick layer of carbon in the exhaust system and the plug was getting black. You may need to have the dealer adjust the FB1 up or down by 3% at a time then ride it and look at the plug. Just like jetting. It's a pain to reconnect the O2 sensor each time. BTW, don't leave the O2 sensor installed without being connect for any long periods. It can get coated and damaged if not electrical heated.
6. All of this is part of the price and frustration of being a first adopter of EFI from Husky even though they had it on 610ie last year, they didn't have the performance kit and removal of the O2 sensor to deal with. The problem is also compounded by the lack of info from Husky to the dealers and EFI being new to many dealers and owners. I would suggest that if your having problems and the dealer is unsure what to do, have them contact Ferracci for help.
So if basemap is in controll with pu plug too,there cant be one setting that works for all. In mine corrected value was
between 85-90% in closed loop mode.(this value is shown in top of those fb 1,2,3 ) Ecu has not learned anything yet,all map settings were 100% but i think this time i give it some time to learn so maybe map is better following what that engine wants with pu plug too. There is corrected map also,but it cant be adjusted,only reset if needed.
I suspect that this bike
had pu plug installed quite soon after it has been bought new. Or ecu forgets its learned map if its long without battery,but i dont think it should behave like that. Maybe fuel pressure is bit higher than it should,
or injector is worn and flowing more. or something else.
I have not found any info what those fb2&3 does. with pu plug 2 and 3 should chance mid and full throttle settings,
but nobody says nothing with lambda. Exept dont touch those settings.
")