• Hi everyone,

    As you all know, Coffee (Dean) passed away a couple of years ago. I am Dean's ex-wife's husband and happen to have spent my career in tech. Over the years, I occasionally helped Dean with various tech issues.

    When he passed, I worked with his kids to gather the necessary credentials to keep this site running. Since then (and for however long they worked with Coffee), Woodschick and Dirtdame have been maintaining the site and covering the costs. Without their hard work and financial support, CafeHusky would have been lost.

    Over the past couple of weeks, I’ve been working to migrate the site to a free cloud compute instance so that Woodschick and Dirtdame no longer have to fund it. At the same time, I’ve updated the site to a current version of XenForo (the discussion software it runs on). The previous version was outdated and no longer supported.

    Unfortunately, the new software version doesn’t support importing the old site’s styles, so for now, you’ll see the XenForo default style. This may change over time.

    Coffee didn’t document the work he did on the site, so I’ve been digging through the old setup to understand how everything was running. There may still be things I’ve missed. One known issue is that email functionality is not yet working on the new site, but I hope to resolve this over time.

    Thanks for your patience and support!

Tinker Tips

dartyppyt

Husqvarna
Pro Class
Do we have room up by common topics to have a section called tinker tips?

These are tips people have done to save money, get you out of a pinch, prevent breakdowns and very informative.

Example: you order the longer Seal Savers, cut them in half, you now have 2 pairs @ half the price!

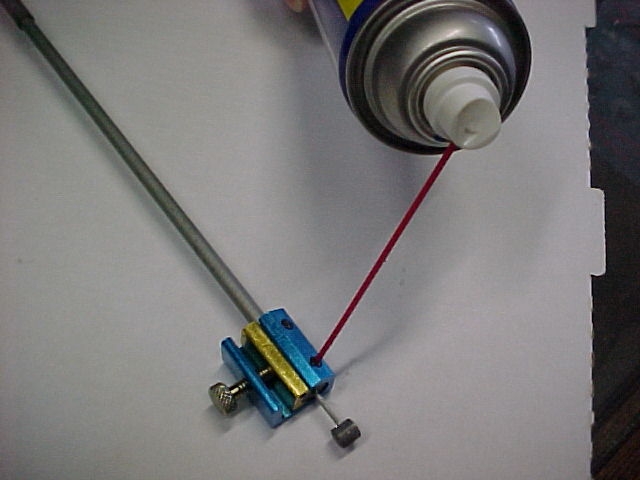
Example: You cut a corner off a sandwich bag, snip the corner for the size of your cable housing, duct tape around it tight, now you have a cable lube funnel. I run WD40 thru first and work cable till it flushes out the old grey stuff/dirt out the cable until it comes out clear. Then I put in my cable lube, till it runs out the bottom? I know a lot of you guys know this but just an example!

Would be nice with pictures for reference, as well.

Coffee, possible?

What do you other members think?

Thanx

Darin (ps: that is not my real pic)
 
cable1.jpgCable2.jpg

Cheap Cable Flush and Lube solution:

1. Go get a Zip Loc bag.

2. Cut a large corner off the bottom of bag, so it will hold several ounces of liquid.

3. From the cut off corner, now cut the bottom corner off the corner you just cut, about the width of your cable house. You are attempting to build a plastic funnel.

4. Undo your cable from up top and also bottom. Generally, you can leave it right on the bike. On clutch cables with a little grommet on the bottom, pop it off so that the fluid can run out.

5. Slide the Zip Loc funnel over your cable housing. Use a strip of duct tape and tape the plastic to the cable housing real tight.

6. Fill the plastic funnel up with WD40. Work the cable in and out, until the WD40 comes out of the bottom clear. You will need to fill the funnel while doing this several times. Especially, if your cable is real dirty inside.

7. Once clear, fill the funnel up with your preferred cable lube. Keep working the cable till your lube comes out the bottom. Wait till it stops dripping and re install your cable.

Makes a big difference in especially hard pulling clutch cables. Turns it into a 1 finger clutch! I do this the night before every race and every couple months on the throttle cables. On your throttle cable, wait for about an hour before re installing your cable so the lube completely drips out of the bottom, or else it will go into your carb.

Undo your tape and throw the funnel in the trash!
 
or you could get one of these for a few bucks :D

clube3.JPG
 
Heavy Zip lock bags are great to keep in your tool bags, they make the best fuel transfer option, with a very small volume to store them. Fill with gas from one bike, snip the corner and dump to the low fuel machine. Is this what we are posting? Or is it just shop tricks.
 
Heavy Zip lock bags are great to keep in your tool bags, they make the best fuel transfer option, with a very small volume to store them. Fill with gas from one bike, snip the corner and dump to the low fuel machine. Is this what we are posting? Or is it just shop tricks.

Perfect both trail, race or shop ideas, But give us an example and PIC! I just learned something new! Then go back and edit your post.
 
Heavy Zip lock bags are great to keep in your tool bags, they make the best fuel transfer option, with a very small volume to store them. Fill with gas from one bike, snip the corner and dump to the low fuel machine. Is this what we are posting? Or is it just shop tricks.
They're also good to keep your cell phone from getting wet when you get caught in the rain.
 
I have one of those cable oilers, doesn't work as advertised. End up with most of the lube everywhere else except in the cable..........
 
A few off the top of my head-
Don't have any pics handy rt now;

If you have a RAM mount on your bike, use it to clamp the front brake master nice and high for back bleeding. (I posted some pics in a thread about this about a year or 2 ago.)

Pack the space between the dust seal and the bearing in your wheel hubs completely full of grease, or a mix of grease & anti-seize. This will keep water & muck away from your bearings and extend their life by 3-4 times+. Spritz a bit of WD40 on the seal/axle after every wash or wet ride to displace any water that gets into the grease.

Use a product called 'spoke set' on your spoke nipples once a year or every 2 years to keep them from seizing up.

Use a piece of duct tape to store a couple spare fuses under your seat or on top of the rear fender (under the seat).
 
I have one of those cable oilers, doesn't work as advertised. End up with most of the lube everywhere else except in the cable..........
I have a hydraulic clutch. It has been so leaky since I got my bike that I wish I had cable lubing issues to deal with instead. :)
 
Nice thread idea.

If it fits the thread, I used a black piece of weatherstripping to fill the gap between my lower rad shrouds and 3.0 gal IMS fuel tank to not onlylook a lot better but keep the plastic from rubbing a hole in the tank. I'll come back later and edit with a pic.

photo55.jpg
 
I have one of those cable oilers, doesn't work as advertised. End up with most of the lube everywhere else except in the cable..........

I had one too, used it one time before i threw it in the garbage. I just use a syringe to lube my cables now and it works great. or you could try to use some shrink tubing it does the job if you don't have a needle.
 
Here is a quick way to fix a spinning insert in your tank.

1. I usually drill the head off of the spinning bolt (Sometimes you have to pinch the bolt/screw head with needle nose vise grips, in order to drill).

2. I use a razor blade to carefully cut out, around the top, square edge of the brass insert.

3. Pry the insert out with small screw driver.

4. Note: the depth of hole, so you can mark the depth to drill for new insert below.

5. Clean hole out and blow dry, using carb/parts cleaner.

6. Fill hole with JB Weld and let sit over night. Make sure there are no air pockets in JB weld.

7. Here is an amercan thread insert I found at a home improvement store.

8. It has 3 small holes already in the insert.

9. I selected some short, flat head, stainless screws to anchor new insert, about 1/4 inch in length.

10. Size a drill bit up the same size as the recessed part of insert, to eventually push in.

11. Use a peice of masking tape to mark your depth of the drill bit from step #4 so you don't drill into tank.

12. Drill center of JB weld out for new insert.

13. Install your new insert using the small screws.

14. I usually find a stainless steel screw/bolt for new insert and use antiseize lube on them.

Good luck and this works great! Cheap fix!

insertfix2.jpg


insertfix1.jpg
 
Their are several different ways to align forks. You can purchase tools that are around $50 with shipping or you can try the bounce method, several times to get different readings. I have always used a piece of 1/4 round steel, that I bent to use as an alignment tool. I noticed this little tool that works great for a big, whopping $12. It's accuracy is almost unbeatable. I too have one of those $50 tools. But here is a cost less, couple alternatives.

This takes a little time to set up, but once set up, it is a matter of feeding the tool thru your rotor/forks. It is faster than the bounce, brake, compress way. So, the next time you change your fork oil and remove your springs, what better timing do you have? Takes an extra 15-20 mins.

Now here is how to use it.

Fork1.jpg
 
With your spring caps removed, oil dumped and springs removed. Go ahead and re install your forks, just like you were installing them to ride (Caution: Be careful not allowing your forks to drop fast to cause busshing and seal damage). Next, you want to align them on one of your favorite the top 3 lines, in your triple clamps. Then align your axle so it slides in and out and turns freely (On a newer bike you almost have to wedge a screwdriver in the slot to help with turning the axle easier).
You perform this, so you have no axle binding on the forks. If your axle does not move freely, adjust your forks up and down in the triple clamps until your axle is set properly. Next torque your forks. I go 17 ft lbs top and 12 ft lbs bottom, so they don't bind. Then go ahead and torque your axle nut and tighten your axle pinch bolts on the rotor side to proper torque. Leave the left ones very loose so the fork can float on the axle (Remember, you might have to wedge a screwdiver in the slot on a newer bike so the fork on the non rotor side can float and align). Notice how easy the forks move up and down with hardly any stiction. Try pushing in on the non rotor fork while moving your fork up and down, forcing it out of alignment. Notice the stiction it places on the fork?

Fork2.jpg
 
Using some zip ties, compress your forks until fully compressed and tighten the zip ties up. This will hold the forks up in the tubes for pefect compressed alignment. Do not let these drop while performing this step. Dropping can damage your bushings or seals. Or don't let them drop removing the zip ties when your done.

Fork3.jpg
 
Next, using your tool, find the center of your forks, either on top triple clamp or lower one. It should be in dead center of your clamp slot when properly torqued. The slot is generally 2-4 mm wide. You want to be on dead center from slot to slot. The points on the tool are tapered and this helps in centering. Also make sure your thumb screw adjust ment arms are square on your ruler.

Fork4.jpg
 
Next record your measurement on a steel ruler that measures milimeters. On my WR 250 from center to center, I am at 186 mm. Write this down for later use.

fork6.jpg
 
So lets see how we compare against the center casting marks in the axle pinch clamps. Looks almost perfect.

Fork7.jpg
 
Before you do this next step. Back up to where your bike had the wheel on before you took it apart. Take one end off your new tool and feed it thru your brake rotor and spokes. You will need to determine on your fork axle pinch clamps the easiest place to leave a punch mark (Both sides). In this illustration, I am now ready to punch my center measuring point, on my rotor side, fork axle, pinch clamp.

Fork5.jpg
 
Now, I am ready to mark my left, fork axle pinch clamp. First with a pencil and then to final punch it. Remember, the point to point on the tool is 186 mm for my 08 WR 250 with the 45 Marzocchi's. On my 09 WR125 with the 50mm TC marzocchi's, it is 199 MM.

Fork8.jpg
 
Back
Top