• Hi everyone,

    As you all know, Coffee (Dean) passed away a couple of years ago. I am Dean's ex-wife's husband and happen to have spent my career in tech. Over the years, I occasionally helped Dean with various tech issues.

    When he passed, I worked with his kids to gather the necessary credentials to keep this site running. Since then (and for however long they worked with Coffee), Woodschick and Dirtdame have been maintaining the site and covering the costs. Without their hard work and financial support, CafeHusky would have been lost.

    Over the past couple of weeks, I’ve been working to migrate the site to a free cloud compute instance so that Woodschick and Dirtdame no longer have to fund it. At the same time, I’ve updated the site to a current version of XenForo (the discussion software it runs on). The previous version was outdated and no longer supported.

    Unfortunately, the new software version doesn’t support importing the old site’s styles, so for now, you’ll see the XenForo default style. This may change over time.

    Coffee didn’t document the work he did on the site, so I’ve been digging through the old setup to understand how everything was running. There may still be things I’ve missed. One known issue is that email functionality is not yet working on the new site, but I hope to resolve this over time.

    Thanks for your patience and support!

Tinker Tips

Last but not least, I take a permanent marker and write on my left lower fork,axle pinch clamp. The permanent fork reading from point to point or punch to punch mark.

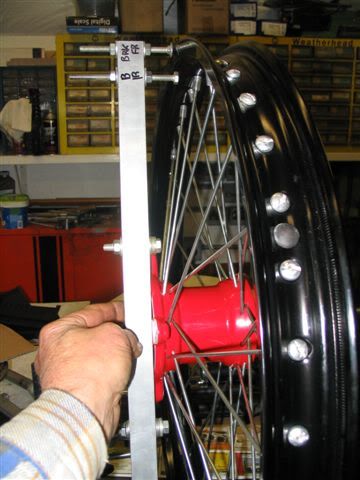
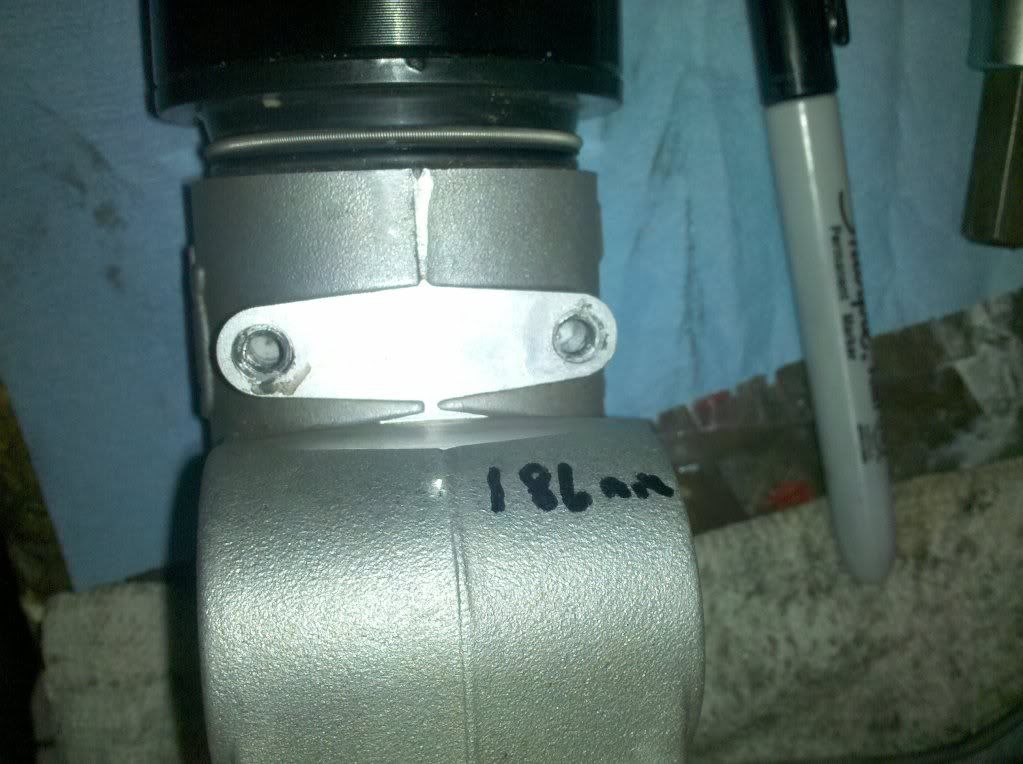
Go ahead and reassemble everything. From now on when you remove your front wheel. All you have to do is feed your tool thru your rotor, set it from point to point at 186 mm and you have perfect fork alignment with no binding.

Note: On the newer Braking rotors you can feed the tool in without removing an end. On the older style rotors, you have to use a little finesse by taking one end off your tool and feeding it thru the spokes/rotors. I took a picture of my old tool but it is not on my camera. I will post it in the next few days that works easier on the old rotors.

So, you can bounce, compress, do what ever you prefer. But I learned along time ago that it didn't work for accuracy/less stiction. Try doing it this way once, then try the bounce, brake and compress method and see how far you are off.

Out of curiosity, my son's 08 WR 125, with the bounce, brake and compress method. It was 2mm off. It sure made a difference in the stiction free up only being off 2 mm. Being off like that has to take it's toll on the bushings and seals.

Fork10.jpg
 
Water pump seal pressing ... long bolt & nut, flat washer same size as seal, socket large enough to fit over seal hole and bearing housing ...

Reverse this configuration to press seal in from the outside ..

100_2211.JPG100_2212.JPG
 
When fitting a new drive chain, pull 2 fingers off some nitrile/latex gloves and pull them over the two ends of the chain. Then when you get the chain fed through the dirty chain guide etc, and ready for the master link, pull the gloves off and the chain is still out of the box clean with no possible debris in the master link.
 
Pulling a battery out of the battery box when it´s stuck is easy if you remove the battery contact bolts and thread two zipties through the holes. Close the ties and use the loops as handles.
 
When fitting a new drive chain, pull 2 fingers off some nitrile/latex gloves and pull them over the two ends of the chain. Then when you get the chain fed through the dirty chain guide etc, and ready for the master link, pull the gloves off and the chain is still out of the box clean with no possible debris in the master link.

Sounds a little kinky with the latex gloves and all but ok.... :)
 
Easy, inexpensive gauges can be made for measuring and setting wheel offset for building wheels.
Offsetgaugedelete001.jpg

Two pieces of 1/8" X 24" flat bar held together in the center with two 8mm or 5/16 bolts. Bolts near the ends of the gauge are placed at the appropriate distance to contact the rim at the desired offset. The larger bolts in the center make the adjustment bolts easy to slide in and out.
Offsetgaugedelete008.jpg

In this picture there is a gauge bolt set for a back wheel offset and one for a front wheel. I usually write on the the gauge with a sharpie: brake side, sprocket side etc.
 
Im diggin that home-made jig.... My only question is how does it tie to the axle while spinning the wheel? Does the axle go thru the center of it?
 
It doesn't need to turn with the wheel, because it isn't used to get the wheel straight, just to get the correct offset. It is held up to the wheel in a couple of places occaisionally as the spokes are tightened. If for instance, there is a gap between the gauge outer bolts and the rim, all the spokes on that side are tightened til the gap goes away. If the gap is large, the spokes on the other side may need to be slackened.
 
Good idea, keep them coming! This is what this thread is for. Any and all tricks that are homemade that makes our life easier.
 
When doing any work on the steering head/triples & the handle bars have to be removed; it's a lot easier if you can suspend them up & out of the way. A tie down can do this handily:

P10000522.jpg
 
Back
Top