• Husqvarna Motorcycles Made In Sweden - About 1988 and older

  • Hi everyone,

    As you all know, Coffee (Dean) passed away a couple of years ago. I am Dean's ex-wife's husband and happen to have spent my career in tech. Over the years, I occasionally helped Dean with various tech issues.

    When he passed, I worked with his kids to gather the necessary credentials to keep this site running. Since then (and for however long they worked with Coffee), Woodschick and Dirtdame have been maintaining the site and covering the costs. Without their hard work and financial support, CafeHusky would have been lost.

    Over the past couple of weeks, I’ve been working to migrate the site to a free cloud compute instance so that Woodschick and Dirtdame no longer have to fund it. At the same time, I’ve updated the site to a current version of XenForo (the discussion software it runs on). The previous version was outdated and no longer supported.

    Unfortunately, the new software version doesn’t support importing the old site’s styles, so for now, you’ll see the XenForo default style. This may change over time.

    Coffee didn’t document the work he did on the site, so I’ve been digging through the old setup to understand how everything was running. There may still be things I’ve missed. One known issue is that email functionality is not yet working on the new site, but I hope to resolve this over time.

    Thanks for your patience and support!

1972 450CR

Yeah the 420/430 piston would have issues that would keep them from working in your 450.

I don't remember from previous posts but is the existing sleeve water damaged or can it be bored?
 
I can bore it no problem. The piston is toast. It's first over piston that the ring had busted on, big gouges in the piston, sleeve looks okay but I am sure will need to be bored second over.

I'll be patient and keep up a search or I'll bite the bullet and send the deniro to get the sleeve and piston I found.
 
Mike
Since your going to ride your 450 resto project, and if you like performance, you may want to consider doing some porting work. The 450 motor from this era was consider by some to be under powered for its displacement class. I think Husky realized this because they soon published an engine modification bulletin.

Opening up the transfer ports relieves a lot of restriction. This became a stock feature on the post 74 magnesium motors.

Stock cylinder.
DSCN7735 Resized.JPG

DSCN7744 Resized.JPG

Enlarged transfer ports.
DSCN7734 Resized.JPG
DSCN7745 Resized.JPG
 
Mike, since this is your first early 70's Husky build here are some things to double check when assembling your motor. These are items I've found to be unique to these engines. Others may have additional suggestions as well.

Once torqued into place make sure the clutch hub spins free of the clutch basket. There have been some incidences reported of the hub binding against the basket. If you run into a problem we can help you correct it but as long as the small thrust wash goes back between the hub and basket things should be okay. Even if the hub spins free without the thrust washer its recommended that you install one to eliminate wear to the end of the splines that the hub slides over as this could lead to bigger problems over time.

Your shifter shaft may or may not have had a washer installed on the far left side between the circlip and left center case. The parts list and the service manual both indicate a washer in this location but some guys have ended up with a seized shifter shaft when a washer was installed, including myself. If this happens then just leave the washer out. I've found that one millimeter of lateral play is acceptable.

Before the crank is installed I suggest installing the shifter shaft, the primary shaft, and the clutch basket and hub before buttoning up the cases with the gasket and checking the two items mentioned above for clearance before doing a complete assembly. Its easier to pull the cases apart without the crank.

On the final assembly double check the shifter stepfeeder as shown in the service manual. Without the proper setup you won't have all the gears.

Its a good idea to lap the head to the barrel with valve grinding compound. I've found that the head to barrel seal is pretty forgiving in that leaks are rare but its worth doing the lapping while its apart.

Main bearings have been a topic of discussion in these forums on more than one occasion. If you have any doubts about what to use or how much to pay for new mains be sure to ask. I paid as much as $200 for a set and as little as $80. I understand that when it comes to quality bearing like SKF there's knock offs out there that prematurely come apart.

These bikes vibrate like crazy so use locktite where indicated in the service manual and torque the engine bolts and swing arm bolt to factory specs. The check them after your first ride.

With your CBX build experience I'm sure that your Husky will be an excellent bike when completed.
 
Very good tips.

I am looking forward to putting your advice to use.

I think I found a new second over piston....YEAH!

About $290 but still better than $600 for the piston and sleeve.

Have the front hub at Woody's getting laced to a Morad rim. The cost of repairing the original Akront rim was just to much.

The crank is at Ken O'Connor racing for rebuild and the Motoplat is with Vance Smith.

Soon I will send the forks to Race Tech for rebuild and the tank to vintage Husky for painting.

Some progress this week.

USPS made money off me!
 
What oil seals are you guys using on the wheels?
I took out STEFA BC 25 x 42 x 7. Looks like a double lip seal.

What are the alternative replacement seals?

I was able to source some metric cheesehead screws for the case covers. The original screws were pretty beat up.

Thanks

Mike
 
Thanks for the lead on seals.

The screws won't be original; they will look similar only stainless steel. I'll give them a coat of anti-seize so they won't react with the aluminum.

This bike has become a succubus!

I would rather do it right than half-assesd though. I figure the 450 will appreciate faster than my savings is at 1/4%.
 
MarkVMod0 said "This bike has become a succubus! I would rather do it right than half-assesd though. I figure the 450 will appreciate faster than my savings is at 1/4%. "

I think I read somewhere in this thread you were going to ride your 450. If so theres a huge enjoyment factor that comes riding a well built vintage bike.

When I rebuild a bike on a budget and its for riding I focus on making it mechanically sound. I figure that all the other things can be unbolted and restored one at a time when the time comes to having a factory original in the collection.

I had to look up the term succubus. That's a hoot when applied to a guys dirt bike. :lol:
 
What vintage motorcycle isn't a succubus? My other passion; the CBX is the queen succubus!

Anyway, I managed to get the tank off for dent removal. When I get it back I'll braze the seam that was leaking fuel. It's not a stressed area, just the bike was ridden without the tank being supported properly and the front of the tank hammered against the frame backbone.

Tomorrow I'll get the fork stop plate TIG welded and then I can paint the frame.

I was going to reuse the original swing arm bushings until I checked the play; I'll be replacing the bushings, maybe the bolt too.

Should have the crank back from Ken next week.

I have read a lot about bearing replacement and the problem with knock off Chinese bearings. What bearing suppliers are you trusting? I am replacing ALL the bearings and seals. Do it right the first time!

I have a 2nd over piston kit coming from Keystone Motorsports in Wis. Steve Roof was of immense help in finding a needle in a haystack. I'll be sending the cylinder, head and piston the Ken for work. I managed to pull up the porting mods from the Husky tech papers and I'll use the photos crashaholic posted. Ken assured me it would be no problem for him the do.

No pictures today but I will get some posted next week. Trying to fit a bike restoration in with work can be a tough thing
 
For authentic SKF I go to Motion Industries here on the west coast. Be prepared to pay $200 for the mains. Vintage Husky sells bearings for your entire motor for less than $200. For comparison the mains alone are $80. I think they're Czech bearings. I saw a poster here a while ago who had been running Czech mains in his bike for about a year without a problem. Some guys will tell you that saving $120 on a set of mains isn't worth the risk. I can certainly understand their point of view but some of us need gas money to go riding.

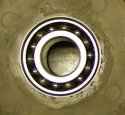
The super duper SKF's are #3205 E C3 Double Row Ball. The Czech's are around $80 from John at Vintage Husky, I don't have a number on those. Both of these bearings have 14 balls per row with a steel retainer. I've purchased and returned 3205's that had only 9 per row.

SKF Main Bearing
DSCN8687.JPG

Main Bearing from Vintage Husky
DSCN9620 d.JPG
 
I got mine from Motion Industries as well & I'm east coast. I also sent back bearings with less balls as well. Common issue....
 
Looks like I'll have to find another source to massage the dents out of the tank. The guy couldn't get them out.

You guys have any suggestions for getting dents out of these chrome tanks?
 
Crap! I forgot about Blake.

He does some great work. Another CBX owner used him for painting and he was really happy with the results.

Thanks for the reminder.

Mike
 
Yeah CBX. I saw it referenced on his website. Well good, I hope he can make your tank smooth again. Don't forget to let me know how things work out with him. I've got a 69 tank with a real nasty dent the size of a banana right in the chrome area.
 
Back
Top