• Husqvarna Motorcycles Made In Sweden - About 1988 and older

  • Hi everyone,

    As you all know, Coffee (Dean) passed away a couple of years ago. I am Dean's ex-wife's husband and happen to have spent my career in tech. Over the years, I occasionally helped Dean with various tech issues.

    When he passed, I worked with his kids to gather the necessary credentials to keep this site running. Since then (and for however long they worked with Coffee), Woodschick and Dirtdame have been maintaining the site and covering the costs. Without their hard work and financial support, CafeHusky would have been lost.

    Over the past couple of weeks, I’ve been working to migrate the site to a free cloud compute instance so that Woodschick and Dirtdame no longer have to fund it. At the same time, I’ve updated the site to a current version of XenForo (the discussion software it runs on). The previous version was outdated and no longer supported.

    Unfortunately, the new software version doesn’t support importing the old site’s styles, so for now, you’ll see the XenForo default style. This may change over time.

    Coffee didn’t document the work he did on the site, so I’ve been digging through the old setup to understand how everything was running. There may still be things I’ve missed. One known issue is that email functionality is not yet working on the new site, but I hope to resolve this over time.

    Thanks for your patience and support!

1973 400 CR

Yup, TLC and money. A little progress tonight. Man, as hard as I tried, I just scratched the $#@& out of that frame. Even had towels and tape everywhere. Oh well, it's a racer, right? RIGHT? Here are a few quick ones before I covered her up for bed.

IMG_2016.jpg

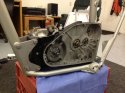
I mentioned before that the cases' engine mount pads were all buggerd up. I filed them flat again, and in that process
moved the entire engine 3mm to the left side. I'll do the same when building the rear wheel and it looks like that will
allow the chain to clear those fat Ohlins springs. In this shot you can just barely see the 3mm spacers inside the right
rear engine mount. It's SNUG in that cradle now, with nice metal to metal mounting points, important for good ignition
function and low vibration.

IMG_2017.jpg

Engine plates were blasted with fine glass media then scrubbed with oil. They have several blems that don't come through in the photos, but they still look good. I used stainless bolts for the engine mounts, but I'm not happy with them. They seem a bit stretchy, and the plating is galling and the threads got sticky in just a few on/off cycles as I got the engine placed. Will have to look into this.

IMG_2018.jpg
 
did you powder coat the frame.i hope you do it or you going to scratch the frame in no time.:confused:

This time I used paint and, although its beautiful, it's already showing that its not gonna be nearly as durable as the powdered ones I've built. Went with paint this time cuz I wanted as close a match as possible to that awesome Husky silver. Thought about trying the powder mentioned in another thread here but the frame was going to Vintage Husky for his mod so I just had him paint it while it was there. He did a good job I think it's just a repaint thing.View attachment 30377 image.jpg
 
A little progress on the engine.

IMG_2028.jpg

And the hubs are back from the blaster and all painted up. Let's do some wheels...
 

Attachments

  • IMG_2018.jpg
    IMG_2018.jpg
    76.5 KB · Views: 9
Did the front first. Almost forgot that the inner and outer brake side spokes have a slightly different head angle.

IMG_2023.jpg

The first spoke.

IMG_2022.jpg

Took only 15 minutes to loose lace the front because it's a very standard pattern.

IMG_2024.jpg

Rear took about 45 minutes cuz I had to check and re-check that I was doing the "husky odd" pattern correctly.

IMG_2029.jpg

That was the easy part. Now I have to center and true. Yuck.
 
years ago I had a front rim self destruct with a heap of spokes coming loose and the wheel touching the forks on both sides. I snugged everything back up and rode flat out down this road and then tightened the loose ones and in 15 mins she was straight again and was fun to do.
 
Are they new spokes or replated? I've been tossing around the idea of replating my spokes myself...I have more time than money.
 
Yes, new. Mine were SO bad I just gave up. Spent way too long trying to get them to loosen up and finally went nuts with the die-grinder and chopped those suckers up! Sparks were flying and it gave a nice sense of revenge!

IMG_1945.jpg

Note to anyone doing a resto: Take more pics of the icky stuff before you take it apart. I hardly have any shots of just how bad the wheels were.
 
Luckily I have 2 duplicate wheels for pattern verification when I lace up the DLS hub to the new rim with the Buchanan spoke set I got for it. Once again need to find the time...
 
Save one of those old wheels and mount it on the wall. You can spin it and have your own wheel of fortune. Prob now you feel like you spent a fortune! Yet all your time in it. Very nice work and keep going!
 
Yes, new. Mine were SO bad I just gave up. Spent way too long trying to get them to loosen up and finally went nuts with the die-grinder and chopped those suckers up! Sparks were flying and it gave a nice sense of revenge!

View attachment 30530

Note to anyone doing a resto: Take more pics of the icky stuff before you take it apart. I hardly have any shots of just how bad the wheels were.
you have to do that on the first place and no wasting time trying to pull out those suckers.
 
Luckily I have 2 duplicate wheels for pattern verification when I lace up the DLS hub to the new rim with the Buchanan spoke set I got for it. Once again need to find the time...

I do have a duplicate, and that was the plan. But then I found that the MK/ML manual has very detailed re-lacing instructions and I just followed those. When was the last time you saw a bike manual that showed you how to disassemble and re-assemble the wheels!?!?
 
Nice build......73 400cr, awesome bike. When it comes to looks I prefer paint over PC. Paint leaves the character of the frame intact that's noticeable from the factory. My experience with PC is that it covers to much of the welds and other small imperfections, not to mention the Serial number. If I were to build a rider that was going to get a lot of time on it then PC would be my first choice.

Can't wait to see more......
 
Back
Top