• Husqvarna Motorcycles Made In Sweden - About 1988 and older

  • Hi everyone,

    As you all know, Coffee (Dean) passed away a couple of years ago. I am Dean's ex-wife's husband and happen to have spent my career in tech. Over the years, I occasionally helped Dean with various tech issues.

    When he passed, I worked with his kids to gather the necessary credentials to keep this site running. Since then (and for however long they worked with Coffee), Woodschick and Dirtdame have been maintaining the site and covering the costs. Without their hard work and financial support, CafeHusky would have been lost.

    Over the past couple of weeks, I’ve been working to migrate the site to a free cloud compute instance so that Woodschick and Dirtdame no longer have to fund it. At the same time, I’ve updated the site to a current version of XenForo (the discussion software it runs on). The previous version was outdated and no longer supported.

    Unfortunately, the new software version doesn’t support importing the old site’s styles, so for now, you’ll see the XenForo default style. This may change over time.

    Coffee didn’t document the work he did on the site, so I’ve been digging through the old setup to understand how everything was running. There may still be things I’ve missed. One known issue is that email functionality is not yet working on the new site, but I hope to resolve this over time.

    Thanks for your patience and support!

1987 430 barn find. Need some help.

the shaft that goes through the center of the clutch assembly has a washer with a groove cut out, this rides on the inside of the basket case cover. There is a whole on the cover is there some type of pin or screw that aligns them.
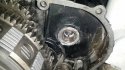
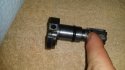
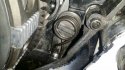
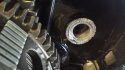
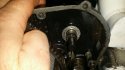
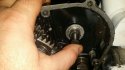
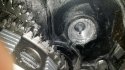
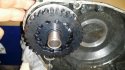
I don't know the carb diameter off hand, the clutch hole and groove are for adjusting your clutch. There's a set screw at the center of that piece you took a picture of, and you stick a nail, small screwdriver, etc through that hole, use it to hold the crown in place and use an alen wrench to turn that set screw to adjust your clutch play.

When you do set your clutch play, don't adjust it too tight. You lose play as the clutch wears, and if you set it with little-to-no play, you might burn through faster than you think.
 
Thank you very much guys!!! Ok 2premo I figured it out, it pops of the cover with out screwing with the springs. I poped it in the case it has 1/4 in play up/down and sideways. It does fit tight in the case though, Is that enough to make it work. are there any other options vs splinting the case to replace half of it. I do have a machinist friend I could talk to. machine them both and add a needle pin bearing?? Its not good, hope it can be fixed, I'M not wanting to split this dam case.
 

Attachments

  • kick shaft.jpg
    kick shaft.jpg
    81.2 KB · Views: 44
  • kicker shaft down.jpg
    kicker shaft down.jpg
    84.7 KB · Views: 44
  • kicker shaft up.jpg
    kicker shaft up.jpg
    91.9 KB · Views: 43
do you have the needle bearing between the idler gear and the shaft? if you have a shim between the bearing and case it may be ok. the needle bearing needs replaced occasionally..
 
yes I did replace them. the shaft does not spin in there though right? It got this bad because there was nothing left of the bearings that were in there. I need a few opinions on it how it is now, and if it will work as is. . It does fit tight into the case side. I can machine down the case, put a hardened seat and machine the shaft to fit in the seat, this way it is all tight. It would be a lot of work and I would still have to split the case but its the only way I can think of to fix it and make it strong. Any other simpler ideas are welcome.
 
The shaft does not spin in there. I would think that you could drill out the case to make the hole round, press in a sleeve and leave the shaft stock (or maybe replace your shaft with one that isn't chewed up, and leave that one stock). That approach is a common repair when the holes in the clutch cover go out of round on older model clutch covers. Later model clutch covers came from the factory with steel sleeves.
 
Ok that sounds like something I was thinking about, It just has to much play. Enough to make me worry anyway. Little by little, I was hoping to have it going this coming up weekend. Hmm Hmm, o well, nice little project.
 
I got the shaft cleaned up as good as I could without taking to much off. I had the gear hardened, I would rather go through pawls faster than have the gear wear out like it did. I cleaned up the inner case and machined a steel pilot bearing to fit as a retainer sleeve to fix the problem. Need to take another 4-5 mills more off though, its to tight still. I found a lot of small cracks in the case someone has epoxied up. Some under the water pump. So i will be hunting for a new case if anyone knows anyone who may have one? I will call halls on Tuesday, maybe they can get an updated aftermarket.
 

Attachments

  • 20170114_221521.jpeg
    20170114_221521.jpeg
    162.7 KB · Views: 49
  • retainer.jpg
    retainer.jpg
    116.3 KB · Views: 48
  • 20170114_214925 (1).jpeg
    20170114_214925 (1).jpeg
    87.7 KB · Views: 47
Looking good. I do think I mis-spoke on the shaft though, it does spin when you are kicking, but stays stationary when the bike is running, so you will want to have a little clearance between your pilot bearing and the shaft.

Also, the gear faces the other way :)

When you refer to case, are you talking about the clutch cover or crankcase itself? I'm not 100% clear based on context. You can get clutch covers from HVA Factory. Crankcase you may have to watch ebay for.
 
HVA Factory is the only source for current production replacement clutch covers. NOS is non existent unless one pops out of the woodwork.
 
thanks guys. Yes Eric i fiddled around with it and figured out it would spin on kick, I clearance it to hover in there tight but spin as needed. I will start checking out the covers.
 
The carb is a 38mm the 36mm has a thicker wall.

Drill and ream the hole and epoxy or press in a oil lite bronze bushing. But I would use a harden steel washer as a thrust washer between and case and gear. Go by the teeth line up when you shim it.
 
I'm fortunate enough to have a nos replacement that the factory sent my old man since the originals corroded. It's mint never been installed. Don't know which of my bikes it'll end up on yet
 
I noticed some familiar damage to the case half near the needle bearing at the starter gear. Most of the kicker gears for that set up which is a bit different than say an 1983 in the teeth have less than desirable surface inside that kicker gear. This is most likely why the needle bearing fails. I did a thread years ago about how to install the shell of a shell needle bearing that is longer and trim off the ends restoring that surface to same as original. I never installed my work. I also did get a replacement gear, new one and that does not have the lightening holes, they probably are nla by now. The shaft in the picture generally is fused together in my experience the part in the hole in the composite picture generally wants to stay stuck to something else. Perhaps it only comes apart to make it easier to produce. I probably tried to improve the case a bit with some epoxy so the shim sat flush.

Those gears in the pictures in this thread look very good on the teeth. Like in post 43 some shimming may be called for on those starter gears. It has been a while the intermediate gear I think had a champher on one corner of the teeth on most of them which I do not see in these pictures, maybe it is an 1988. I do not think the hole in the case being a bit sloppy is going to be an issue, the cure if it bothers you is install a bronze sleeve.
 

Attachments

  • kick gear.jpg
    kick gear.jpg
    131.4 KB · Views: 25
Thanks Frank, thats what I ended up doing. I inserted a steel sleeve after machining it to fit. I left it a tad longer so the bearing could ride against it and not the messed up inner case, picture 1, doesnt look like it but its about 1/8 inch longer. I may try and fit a thin Steele washer between the gear and inner case were the bearing will ride? I am still waiting on a few parts so i can fit it all and play with it. Here are a few pics of it so far. I am having a problem with my kickstarter shaft seals. I went to parts store and sized some out. the outer one, were my finger points in pic 3 keeps walking out on me when the shaft spins. Im ordering some off husky parts to see if it will help. I was told to just run 1 by a friend. Not sure if thats right though. It had two on tear down as shown in pic 2.
 

Attachments

  • 20170201_214142.jpeg
    20170201_214142.jpeg
    144.3 KB · Views: 24
  • 20170131_164304.jpeg
    20170131_164304.jpeg
    136.3 KB · Views: 24
  • 20170201_214241.jpeg
    20170201_214241.jpeg
    109.8 KB · Views: 23
cant remember how this shifter spring went in. Anyone help? Do I have it messed up? Cant seem to find a clear pic online.
 

Attachments

  • 20170201_214208.jpeg
    20170201_214208.jpeg
    128.4 KB · Views: 35
cant remember how this shifter spring went in. Anyone help? Do I have it messed up? Cant seem to find a clear pic online.

That looks correct. If it doesn't sit flush on the shaft, you can try to flip it around, it may improve how it sits.
 
When I was assembling the 155mm howitzers for the US ARMY every threaded hole I inserted a heli coil. We used a lacquer paint in the threaded hole before we installed the helicoil to glue it in. Just a little will do. If the government trusts helicoil coils and the aircraft industry does too then I have faith in them.


I have every metric and inch helicoil repair set. I also have 7mm screws too. I drilled and tapped a stripped out exhaust bolt and tapped it 7mm. Either way I can do the repair. I also have snap on thread restorers too.

I been buying up extra parts when there affordable. Lower case and tranny assemblies, cylinders, cranks, etc. if my son is going to run them into the future he may need parts here and there too.
 
Back
Top