• 4 Stroke Husqvarna Motorcycles Made In Italy - About 1989 to 2014
    TE = 4st Enduro & TC = 4st Cross

  • Hi everyone,

    As you all know, Coffee (Dean) passed away a couple of years ago. I am Dean's ex-wife's husband and happen to have spent my career in tech. Over the years, I occasionally helped Dean with various tech issues.

    When he passed, I worked with his kids to gather the necessary credentials to keep this site running. Since then (and for however long they worked with Coffee), Woodschick and Dirtdame have been maintaining the site and covering the costs. Without their hard work and financial support, CafeHusky would have been lost.

    Over the past couple of weeks, I’ve been working to migrate the site to a free cloud compute instance so that Woodschick and Dirtdame no longer have to fund it. At the same time, I’ve updated the site to a current version of XenForo (the discussion software it runs on). The previous version was outdated and no longer supported.

    Unfortunately, the new software version doesn’t support importing the old site’s styles, so for now, you’ll see the XenForo default style. This may change over time.

    Coffee didn’t document the work he did on the site, so I’ve been digging through the old setup to understand how everything was running. There may still be things I’ve missed. One known issue is that email functionality is not yet working on the new site, but I hope to resolve this over time.

    Thanks for your patience and support!

2010 TE250 Power Up and Protection (and my Introduction)

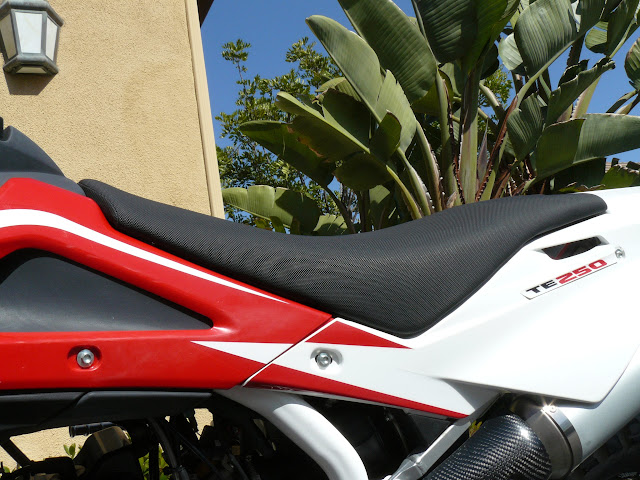
After this I put the Husqvarna lower seat on the bike, and then removed the spacers from under the handlebar. The lower seat is good... its not miles lower but it is significant. I was thinking about cutting it down a bit further, but I do want some real cushioning left. So I think I'll try it like this first.
Then I mounted my Garmin eTrex GPS. The garmin handlebar mount didn't fit the fat bar, so I used a half round file to make it a bit bigger and it clamped on.
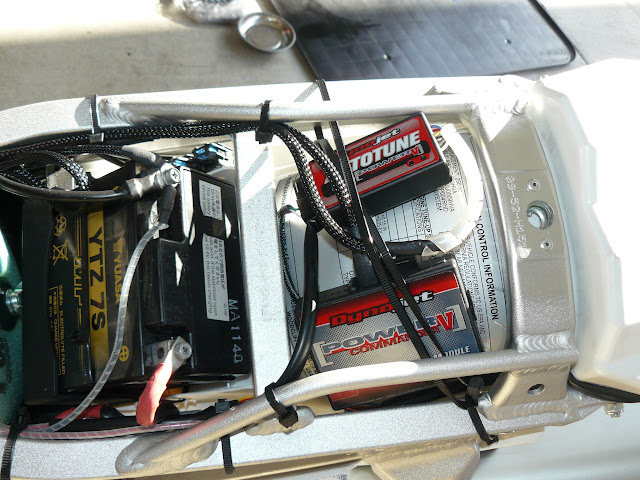
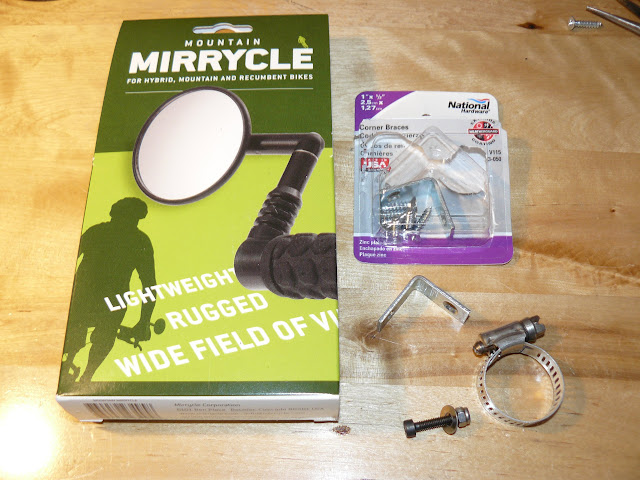
Next up is some small mirrors. And my power commander V and Autotune are on order from semcodesigns.com. And I want some better tires and I'll do the smaller sprocket then...
 
Beautiful ride!
One thing with your throttle side and the cycra mounting. I would trim the grip a little shorter and also slide the throttle tube assembly inward (toward the bar mounts) to give more clearance to prevent the throttle from binding if you fall down on the right side.

+1 on this advice. I used Acerbis guards, mounted just like these and I got cute with the grip trim. First hard dump to the right, and the guard jammed the throttle in a pretty high rev. I had to bash the guards away from the throttle with a rock (on trail at the time). Not fun.

Be aggressive on the trimming of the grip.
 
Think about getting Baja Design mirrors. They screw into the stock mounts. Pretty good image and tuck away nicely. I have broken off both the the stock mirrors. I'm going to get the same handguards you did. l like your tail light mounting.
 
Nice detailed thread and congratulations on the bike ...

If not mentioned here already, that battery needs to be zip tied or strapped down in some additional manner or it will jump out of that box and end up on top of the air filter if you start logging air time ...
 
The mirror project is on hold while I wait for some parts. But today I put the big sprocket on. Wow it is a lot larger! So much for highway travel.
And then the fun part, I put in the PCV and Autotune! What a mess of cables.
P1030164.JPG


And some more...
P1030163.JPG


I also zip tied the battery down, as was suggested. But I couldn't see how it would move with the seat in place.

Tomorrow I'm off to the desert and we will see how it all works. I'm particularly curious about the autotune! Seemed OK on my ride around the neighborhood, and its finding massive corrections (more than 20% too rich in some spots!). More reporting after the desert trip!
Carl
 
Sweet work ... the seat is suppose to hold the battery in place but it will come out at east on the earlier models ... Your box does look a little taller at the bottom than my 08 TXC250 ... mine has cost me ~3 air filters to date ... I also ran the bike a couple of months without a battery after the last time it popped out of the box as I was tired of screwing with it ...

The guys who write the software for this EFI stuff are really good but I'm not surprised about that ... I just wonder how you would test their code other than just ride the bike ....
 
Carl, Looking forward to hearing your ride report. I have a 2011 TE 250 with a full Leo system tuned on
I-beat the best the dealer could do. Not happy with the way it runs, so I too bought the PCV and Autotune. I will have to run the stock header with Autotune until I can get a few maps/readings figured out ??? Should
be here Thursday...
 
So last week I went to the desert to test my new bike! And... well, it was a bust, but not the bike. My buddy and I were on the second ride of the day when he became an astronaut at high speed over some whoops and broke his collarbone badly when he landed. (Video here) After making sure he was stable I got the rangers and we hauled him out. It took a couple days to get him through the hospital and then back home (400 mi away).
But on the husky side I had just enough time on the bike to shake it down and to have a list of things to adjust.
I did crash a bunch... here's some evidence:
upload1.jpg


Interestingly and happily, my tiny turn signals that I had carefully mounted completely avoided damage on these multiple fall overs. So those were a complete success. See early in this thread if you want to see those blinkers.

On the unfortunate side, the crash that rashed the hand shield above bent the top bar clamp and the washers that hold the rubber mounting bushings!
upload2.jpg


upload3.jpg


I was really surprised this stuff bent before the handle bars. A bit of surfing this forum showed me this does happen and that the culprit is the rubber bushings. They allow the bars to twist and warp the top clamp. So I ordered a new top clamp from Motoxotica and some cool solid aluminum bar mount bushings from BRP.
The replacement bar clamp is not quite as nice a piece as the original... rounded edges, not nicely anodized and more of the flashing showing on the mold seams. But otherwise fine. And most impressive that Motoxotica had it in stock, allow with new washers for the bushings. New clamp on the bottom:
upload4.jpg


Here is a pic of the cool billet bushings next to the old rubber ones.
upload5.jpg


Sadly, you can barely see the bushings when they are installed:
upload6.jpg


Note the bar spacers have been removed.
I also found I was struggling with my 28” inseam and the height of the TE250. There was one place in particular where I fell on a hillclimb and getting back down was a real issue. You see, even with just the tip of my left toe on the ground my right foot can’t reach the right footpeg, let alone the brake lever on the other side of the bike. (You guys who cut and lower so both feet can reach the ground crack me up... I can only dream of that.) On the level I just gas it while hanging off and then pull myself up. But on a sandy downhill holding the front brake and not having my weight immediately on the pegs was an issue. So it was time to cut the seat. Actually, I knew I was going to do this, but ran out of time before the desert trip. Nicely, the TE250 has spacers under the bars, so when you remove that your seat to bar relationship is still good after cutting the seat. Also, with short legs the seat to pegs relationship is fine too. I already had the lowered seat from Husqvarna, but frankly it was only about a cm lower, not the 3.5 they claimed. I cut about 1 to 1.5 cm more off the seat Luckily, I’ve done this before so it wasn’t too scary. I marked a center line down the middle of the seat (front to back). And the I measured off the sides of that line and made lots of marks to aid my cutting. Its important to make lots of marks, farther down the seat than you might need as sanding and cutting will obviously obliterate the top marks. I started with a big bread knife!
upload7.jpg


But actually, I found the best tool is a Sureform flat file. If I were going to do it again, I would only use the file. You can see the back of the seat is smoother where I cleaned it up with the Sureform. The front was too thin already to smooth it any more than this. But these small marks mostly disappear under the seat cover,
upload8.jpg


upload9.jpg


I put a layer of plastic wrap on top of the cut area of the seat in case the cover isn’t perfectly water proof. Here it is on the bike, not bad!

upload10.jpg


Pic of the excellent Sureform flat file:
upload11.jpg


In the desert for my first rides I has made the preload really, really low to lower the seat height. This was a bad idea as the ride was horrible over the bumps.
I have also ordered a 1” lowering Kouba link and will report back on that after its installed and I reset the sag properly.

Oh, and I decided to add a BRP chain guide. I was nervous the stock one might bend and leave me stranded in the desert: And I couldn't resist ordering it when I bought the bar spacers.

upload12.jpg


Another thing I needed was low profile mirrors. I actually tried to buy some dualstar mirrors but couldn’t reach them. But quickly realized I could build my own from a bicycle mirror, a corner brace, a bolt and a hoseclamp:

upload13.jpg


I used some heat shrink to tidy it up.

upload14.jpg


Here they are on the bike:

upload15.jpg

These work surprisingly well if you don't mind looking under your arms and you aren't too wide!

And a closeup of the mirror:

upload16.jpg


Finally I also found the Power Commander and Autotune was making some major jetting adjustments. Some of the cells were close to -40! My dealer has proven useless, and I was very curious so I bought the iBeat stuff from Semco Designs (Scott is an excellent guy!). Here is what I found today:

upload17.jpg


So that explains why it is so rich on the smaller throttle openings!
 
There is nothing wrong with the nice stock folding Husky mirrors, imo. I am getting a pair for my TE 630. Why exactly did you ditch them?
 
XKEnduroMan, As a dirt novice, I fall alot... and the mirrors looked like they could break the clutch and brake perches. I removed them for this desert trip, but plan on heading into places where the street legal bike is required on my next trip.
 
Uh oh. I just installed the BRP bushings a couple nights ago and didn't see the need to keep the original washers since everything is now metal on metal. Now am running it through my little brain if that was a mistake or not. Lower bar mounts are aluminum, new bushings are aluminum, steel nut against aluminum bushing on the bottom......hmmmm.

The BRP chain guide is a quite simply what the bikes should come with from the factory! They are tough and so easy to swap over.

Glad your friend made it out alright. Good to see you "blooded" the Husky properly, too
cheers.gif
 
When you trim that seat, U are actually making a wider place to sit as the top is the narrowest ..Does it feel any better when riding?

I've beat the chain guide to death on 2 bikes and never had an issue with it ...
 
have used the aluminum bushings on my 2009 te450 and did not like them yes more vibration and when i droped the bike i bent the bars so i went back to the rubber husky ones because if you drop your bike the bars move in the bushings and dont bend bars to fix just loosen bolts straighten and all good..............better to bend in the bushings than to bend bars as bars cost more to replace

and as ray-ray said i think the husky chain guids are good and i have never had any problems
 
Back
Top