• 4 Stroke Husqvarna Motorcycles Made In Italy - About 1989 to 2014
    TE = 4st Enduro & TC = 4st Cross

  • Hi everyone,

    As you all know, Coffee (Dean) passed away a couple of years ago. I am Dean's ex-wife's husband and happen to have spent my career in tech. Over the years, I occasionally helped Dean with various tech issues.

    When he passed, I worked with his kids to gather the necessary credentials to keep this site running. Since then (and for however long they worked with Coffee), Woodschick and Dirtdame have been maintaining the site and covering the costs. Without their hard work and financial support, CafeHusky would have been lost.

    Over the past couple of weeks, I’ve been working to migrate the site to a free cloud compute instance so that Woodschick and Dirtdame no longer have to fund it. At the same time, I’ve updated the site to a current version of XenForo (the discussion software it runs on). The previous version was outdated and no longer supported.

    Unfortunately, the new software version doesn’t support importing the old site’s styles, so for now, you’ll see the XenForo default style. This may change over time.

    Coffee didn’t document the work he did on the site, so I’ve been digging through the old setup to understand how everything was running. There may still be things I’ve missed. One known issue is that email functionality is not yet working on the new site, but I hope to resolve this over time.

    Thanks for your patience and support!

2010 TE250 Power Up and Protection (and my Introduction)

Ioneater, I was not sure about the washers either, but it looked like the lower part of the clamp wit fetter to the triple clamp with the washer in place. And as you said it separates the bushing from the nut on the bottoms. I think it's better to keep the washers.

ray_ray, I am hoping for some improvement in comfort with the flatter seat, but the thing is hard as a board and is now thinner. Luckily I'm standing alot in the desert anyway.

The chain guide did seem OK to me, but a couple people suggested the change so I went for it. I don't think the BRP one will be worse. ;-) And getting stuck in the middle of the desert really sucks.

husky_bom, In my experience, the top clamp bent in a fairly minor fall as you can see above. Its a cheap part, but has to be replaced to fix the alignment. And bars are fairly hard to bend... I haven't had that happen ever yet in many falls with aluminum bars on various bikes. I guess everybody has there own experience. I will see how the vibration is, but it might be less on my new xlite 250 engine that it is on your big 450. ;-) The other 250s I have ridden (Yamaha) never had any rubber bushings anyway, so I'm hoping its not too tingly.

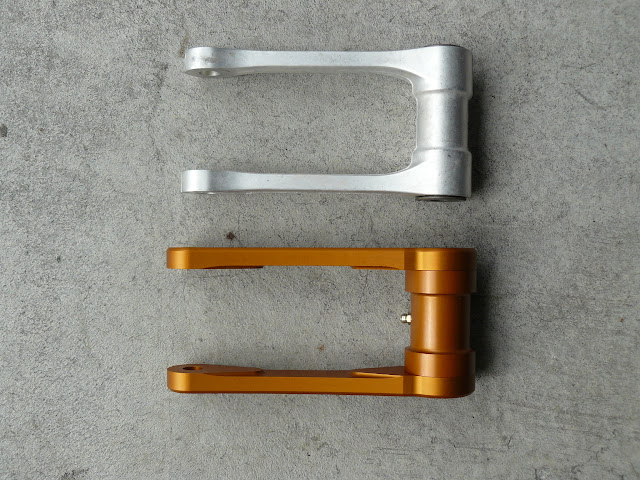
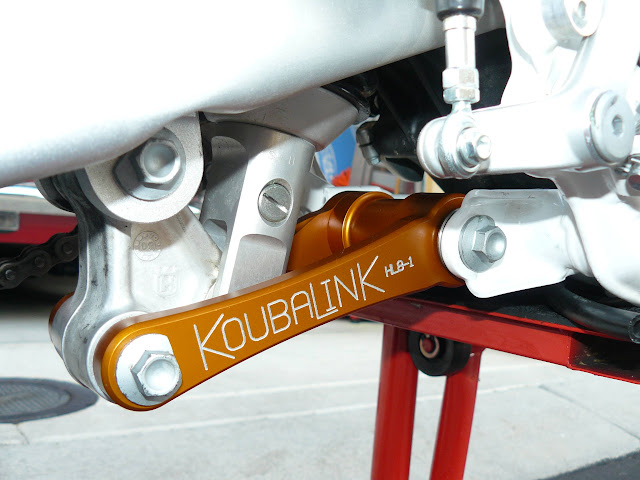
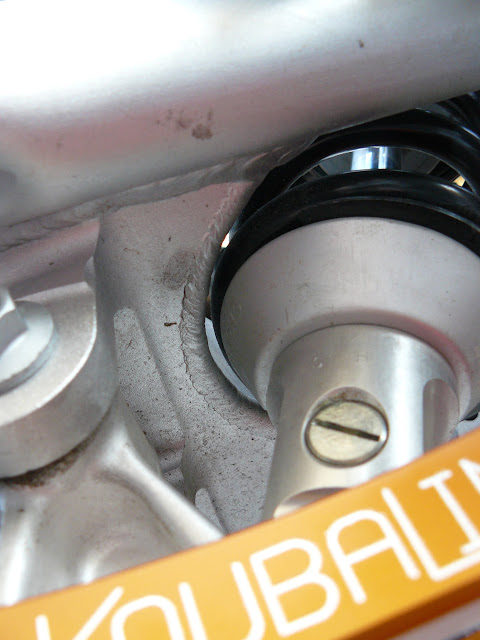
Got the Kouba link in the mail today, will fit in tomorrow!
 
I may put the washers back on under the nuts at least. Didn't even consider them at the time for some reason.

Ray, here's why I've gone to the BRP guides. TM also sells one of nearly the exact same design that many riders use as well. This is the housing (sitting upside down on my toolbox) that would normally have the stock plastic insert material installed. Last pic shows what the bent guide started doing to my aluminum sprocket. The 100% polymer versions still get beat up but they don't stay bent after a hit. This is from normal riding here. Dropping the rear wheel into a rock garden and/or rootball or landing parallel to a log does this easily.

IMG_0287.JPG IMG_0290.JPG IMG_0294.JPG
 
Well this is the last bit on the prepping of my TE250. I just put a Kouba link on. As I said earlier, I have a 28" inseam and would like to be able to get one toe on the ground and be able to reach the peg on the other side. (Two toes on the ground is only a dream ;-))
I bought a Kouba HL8-1. If you order one of these from someone besides Kouba, make sure they read the part number off the link itself. Kouba uses the same packaging for several links and you need to link at the link itself. The HL8-1 is supposed to drop the rear about an inch. My measurement once it was on the bike came to about 2 cm. Thats fine with me at is well matches what I can lower the front. The front forks slide up a bit, but not a whole inch.
Here are some shots of the original and the new link.
P1030247.JPG

P1030248.JPG


The link went on fine.

Here are two tips:
- Do NOT over tighten the grease fitting. It's very easy to strip. (Don't ask me how I know this ;-). The original grease fitting threads do not extend all the way to the "nut" part of the fitting and thus the fitting might not bottom the nut part against the body of the link. Do not tighten the fitting too far.

- I found one of the the rubber bearing seals popped out when I filled the link with grease from the gun. This was without the nuts on the mounting bolts. I ended up pulling the link back off and popping the seal back in. You might fill the link with grease before mounting it, and then checking the rubber seals.

This is a shot of the rear mounting bearing with the original grease. Looks like Husqvarna greased these fine at the factory. Obviously I cleaned the sand up before reassembly!
P1030240.JPG


Here's the link installed:
P1030250.JPG


This shot shows the clearance to the swingarm, fully extended. Its pretty close. Kouba says the other link that lowers the bike more might hit the swingarm, and I believe it.
P1030254.JPG


I also took all the preload out, had my wife sit on the bike and really bounced the rear end. The shock bumper does hit before the tire hits the fender. I couldn't bottom the bike hard, but it looks like the fender is probably clear That's good. Some link installs the tire will hit the fender and that could cause the rear wheel to lock, a bad thing.

So thats it for my TE prep. I suspect I'll post my PCV5, Autotune and iBeat tuning developments (which are next on my list) in the EFI section.
C
 
wow does that rear and look nice the way you did your own mod. Where in So cal are you? Want to come over and do mine? lol . I'll buy the beer ! On the reality side .. I do need to ditch the stock set up in the rear on my 2011 Te 250. Any suggestions that I can buy and install. I do want to change the rear turn signals but probably leave the front alone as they are better protected. Did you do the JD jetting EFI?
 
Next up was the new P3 pipe shields. These are nice pieces. Not perfectly beautiful like CF you might buy for a Bimota, but really solid and well constructed, IMO.
Here are the old guards and the replacements.
TE%20power%20up%2023.JPG


These are mode with a couple layers and you can see the heat reflective underside.

And the pretty top.

Mounting was no problem, just followed the included directions. For appearances, I would prefer if the pipe guard mounted a bit higher on the pipe. You can see how the top of the pipl=e is visible But maybe it's angled a bit toward the ground to protect better from rocks and whatnot.
TE%20power%20up%2026.JPG


Derestricted and guards installed!

Do you have a part number for that guard?
That thing is nice.
 
Excellent thread man I really used it unplugging my bike. I was just wondering if you know how big the brass plug is on your exhaust pipe. I just bought a 2012 te250 and it didn't come with the powerup kit and all I need is the brass plug but I wondering if you know the size of it before I buy one off eBay.
 
Vintageveloce, any chance you might be able to measure the before and after "eye-to-eye" length of your old and new link?
 
Back
Top