-
Hi everyone,
As you all know, Coffee (Dean) passed away a couple of years ago. I am Dean's ex-wife's husband and happen to have spent my career in tech. Over the years, I occasionally helped Dean with various tech issues.
When he passed, I worked with his kids to gather the necessary credentials to keep this site running. Since then (and for however long they worked with Coffee), Woodschick and Dirtdame have been maintaining the site and covering the costs. Without their hard work and financial support, CafeHusky would have been lost.
Over the past couple of weeks, I’ve been working to migrate the site to a free cloud compute instance so that Woodschick and Dirtdame no longer have to fund it. At the same time, I’ve updated the site to a current version of XenForo (the discussion software it runs on). The previous version was outdated and no longer supported.
Unfortunately, the new software version doesn’t support importing the old site’s styles, so for now, you’ll see the XenForo default style. This may change over time.
Coffee didn’t document the work he did on the site, so I’ve been digging through the old setup to understand how everything was running. There may still be things I’ve missed. One known issue is that email functionality is not yet working on the new site, but I hope to resolve this over time.
Thanks for your patience and support!
- Husqvarna Motorcycles
- Husqvarna Motorcycles - Sweden
- Vintage/Left Kickers
- Vintage Restoration Projects
You should upgrade or use an alternative browser.
74 400 Cross Engine Assembly Help?
- Thread starter bul_racer
- Start date
bul_racer
Husqvarna
A Class
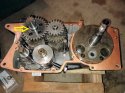
From this view the space between the left side of the crank and the case is definitely to big so there is either something keeping the crank stub from sliding into the bearing or the seal is getting held up at seal journal. Wonder whats keeping the right side from sliding on?

Crashaholic
Husqvarna
Pro Class
Crash, I'm not sure what you mean by 'Seal getting held up at the seal journal.' I installed the seal flush with the inside of the case.
I was referring to the hub on the crankshaft that the seal rides on. Its has a larger OD than the stub shaft where the bearing rides. Seeing that its bigger I thought the seal could be stopping the crank from sliding on all the way if the seal was a millimeter smaller. Just a guess at this point.

Crashaholic
Husqvarna
Pro Class
Uh... No. I can see that might cause a problem if I had the seal installed but Since I don't yet have the seal inside the flange I'm thinking it won't make a difference. You think I should remove it first?
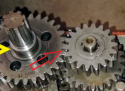
The collar in the photo will prevent the cases from going together. It slides on the shaft after the cases are together. Also you may want to install the seal before assembling the cases in order to save from having to remove the seal retainer and then reinstall it after assembly. Its best to install the seal without the shaft present.
Attachments
bul_racer
Husqvarna
A Class
I was referring to the hub on the crankshaft that the seal rides on. Its has a larger OD than the stub shaft where the bearing rides. Seeing that its bigger I thought the seal could be stopping the crank from sliding on all the way if the seal was a millimeter smaller. Just a guess at this point.
Gosh, I hope not. Guess I'll find out when I pull the crank back out to check it. If the seal doesn't appear mashed I'll assume that's not happening.
bul_racer
Husqvarna
A Class
The collar in the photo will prevent the cases from going together. It slides on the shaft after the cases are together. Also you may want to install the seal before assembling the cases in order to save from having to remove the seal retainer and then reinstall it after assembly. Its best to install the seal without the shaft present.
OK, I don't have a problem taking the collar off until after the cases are together. Whatever I can do to make this work...
Crashaholic
Husqvarna
Pro Class
motomwo
Husqvarna
Pro Class
Hey Marty,
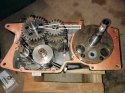
I think you must mean the right side case since my pictures have the crank & trans in the left side.
Yes, good eye! I did have a small chip in the right side case. Guess I can try to polish it and maybe clean up the receiving hole.
Yep, that is what I meant to say. Right side. Sorry.
Marty
bul_racer
Husqvarna
A Class
Also, referring to the pic in my post #25, the gear on top of the clutch shaft is suppose to be level with the gear on top of the countershaft. Is there something underneath it thats keeping it from sitting level with the countershaft gear?
Not sure why it looks to be setting above but I just checked it and this is OK.
bul_racer
Husqvarna
A Class
Yep, that is what I meant to say. Right side. Sorry.
Marty
No worries! I appreciate your contribution.
DeathFromAbove
My Cat Says AREAR!
bul_racer
Husqvarna
A Class
Yeah, that aint right.
OK, Removed it.
bul_racer
Husqvarna
A Class
Gosh, I hope not. Guess I'll find out when I pull the crank back out to check it. If the seal doesn't appear mashed I'll assume that's not happening.
Pulled crank from left case & examined the seal there. Do not see any damage. Manual shows the edge as flush with inside of the case so assuming the seal is not causing any interference to prevent crank from going into position.
DeathFromAbove
My Cat Says AREAR!
Also, referring to the pic in my post #25, the gear on top of the clutch shaft is suppose to be level with the gear on top of the countershaft. Is there something underneath it thats keeping it from sitting level with the countershaft gear?
You got good eyes crash!!

Is l the left seal pointing out board?

DeathFromAbove
My Cat Says AREAR!
bul_racer
Husqvarna
A Class
You got good eyes crash!!
Is l the left seal pointing out board?
Smooth side facing inward as per manual.
bul_racer
Husqvarna
A Class
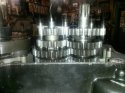
thrThe gear and spline should be flat.
They are flat. Can't take a picture of it now bc I taped up the transmission so the crank could be removed without having gears falling all over the place. Question: How'd you get those gears so sparkling clean? I cleaned mine pretty good but your stuff looks new.
DeathFromAbove
My Cat Says AREAR!
bul_racer
Husqvarna
A Class

Was concerned that all this torquing might affect crank truing so I removed it and put it on my home made truing jig to check. All was OK though.

I put the crank back into the left case, then the right. When I got it all cranked down pretty good I noticed that it still was not drawing the cases together enough to remove the gap, esp. in the front. Decided to check the manual for the length of the 2 Allen screws that come from the left side & found that I'd been using 50mm screws where it calls for 40mm. Switched those out and, behold! Problem eliminated!
However, I am still concerned about the space between the crank wheels and cases. This time instead of too much space I am concerned that it might be too little. I think it was Crash that said it should be 2mm, which amounts to about .0079 inch. I'm getting only about .0020 on the ignition side and about .0045 on the clutch side. My first thought was to put the case puller back on and crank it carefully until it moves to the desired spec but then I realized that wouldn't work because it would just split the cases. The crank does spin freely and I do not hear any rubbing on the cases.
What do you think? Do I have a problem here? If so, suggestions please for correcting it...
