• Hi everyone,

    As you all know, Coffee (Dean) passed away a couple of years ago. I am Dean's ex-wife's husband and happen to have spent my career in tech. Over the years, I occasionally helped Dean with various tech issues.

    When he passed, I worked with his kids to gather the necessary credentials to keep this site running. Since then (and for however long they worked with Coffee), Woodschick and Dirtdame have been maintaining the site and covering the costs. Without their hard work and financial support, CafeHusky would have been lost.

    Over the past couple of weeks, I’ve been working to migrate the site to a free cloud compute instance so that Woodschick and Dirtdame no longer have to fund it. At the same time, I’ve updated the site to a current version of XenForo (the discussion software it runs on). The previous version was outdated and no longer supported.

    Unfortunately, the new software version doesn’t support importing the old site’s styles, so for now, you’ll see the XenForo default style. This may change over time.

    Coffee didn’t document the work he did on the site, so I’ve been digging through the old setup to understand how everything was running. There may still be things I’ve missed. One known issue is that email functionality is not yet working on the new site, but I hope to resolve this over time.

    Thanks for your patience and support!

Changing/Upgrading H4 Headlight Bulb

I haven't seen it written up to change a headlight and guessing the procedure tells us to turn the handlebars and weasel things out, but I just couldn't get the protective boot off with my fingers...let alone put it back on. So, here's MY process for changing/upgrading the stock H4 headlight bulb.

In my case I upgraded to a Philips X-treme Power +80% bulb. Note that these bulbs are the same wattage as stock (55/60W), but purportedly produce more usable lumens. Now, I wouldn't necessarily agree it's 80% of the stock bulb, but do think it's a noticeable improvement with no increase in juice. I'm not a fan of over driving the stock wiring harness with higher wattage bulbs.

original-philips-x-treme-power-3500k-80-light-h4-bulb-free-ship-chyee1986-1008-06-chyee1986@3.jpg

First I had to start with Torx bits I had bought years ago and have scarcely used until now.

MWK09378b.JPG

This fastener is a T25 and used a 1/4" socket driver with a 1/4" socket.

MWK09379b.JPG

First off was remove the black cover with the 4 fasteners (they look like they're stainless steel) and set them aside.

MWK09374b.JPG

Next take off the remainder of the white plastic. The bottom two connection points are easily jiggled free from grommets.

MWK09375b.JPG

With the last piece off you can really see the underlying structure, wiring layout, and nooks and crannies you might want to do future farkling projects.

MWK09373b.JPG

The reflector is held in place by three total fasteners. Two side bolts and one top bolt. The top fastener adjusts the vertical position of the headlight beam and I made a mental note of about how many threads were exposed.

MWK09369b.JPG

Release this screw by going to the other side of the instrument panel with a long extension (below) and turn until the threads pop out from the white part (above).

MWK09380b.JPG

Now focus on the two fasteners on the sides. I also note relative position and tried to put back in the same spot. If you don't get these right you may find your light pattern is right or left of where it should be when you ride the motorcycle later. Regardless all three are adjustable after you put it all back together later if you need to.

MWK09372b.JPG

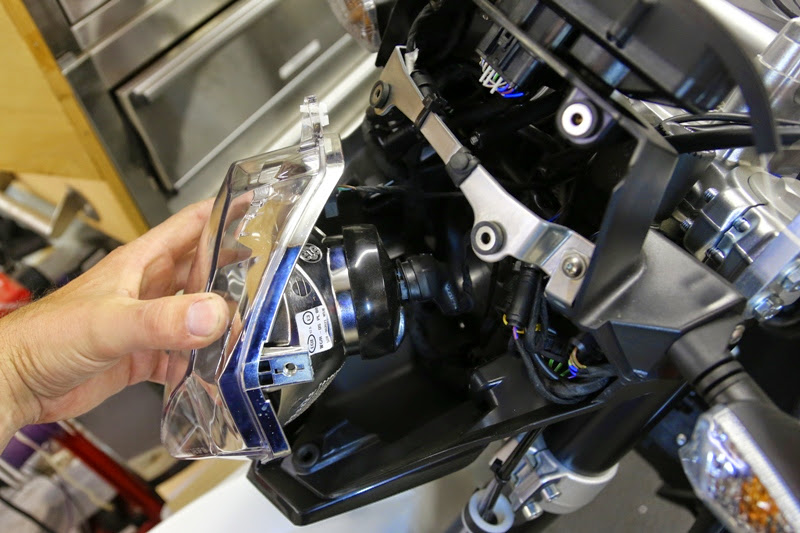
With the three fasteners removed you can remove the headlight assembly.

MWK09365b.JPG

Wiggle off the headlight connector. It's a three-prong type.

MWK09366b.JPG

Next, wiggle off the watertight cover. (This is the part I couldn't seem to do by turning the handlebars....or that it would have taken so long or frustrating for me than doing these steps).

MWK09367b.JPG

There are two wire bails you need to release and then the bulb will come free. Swap bulbs and remember not to touch the glass part and get oil from your finger on it. Reverse the process for installing things back.

MWK09368b.JPG

I didn't do a before or after shot, but can say there are more lumens on my garage wall than the stock bulb.

MWK09385b.JPG

And a final shot of the bulb's nicely "whiter" light than stock.

MWK09384b.JPG

Enjoy. :)
Are you sure those are the right bulbs that you used in your bike, the first picture you posted? 9006 and not the H4 equivilant? It looks like 9006 are a angled plug and not a straight one.
 
Just an FYI follow up that I'll likely be documenting in a new thread. I ran across an unused HID kit in my garage (yes, that's weird to say....I had totally forgotten about it as I was going to play some next generation HID games with my FJR and never did). Suffice it to say I've installed a 50 watt low-beam only HID with the ancillary ballast igniter in the nose of our TR650 with a moderate amount of work and the light output is strong as well as retains the correct cut-off.

My project isn't done yet as I haven't finished my testing, wire routing, final ballast/igniter placement, weather proofing, and integration with my LED auxiliary lights yet. But, I'll have pictures and details when I do i. Two teaser pictures until then....suffice it to say the Terra fender shims very nicely with 3 washers to allow a *bit* of extra room. :)

terrahid1.jpg


terrahid2.jpg
 
I also went the way of the HID. I took a little different route though. I tried some things but couldn't get around the fact that the stock reflector is just small (and a weird shape). I went with the cheapest trailtech 8" race light I could find and converted. IMG_1374.JPGIMG_1375.JPG Like Ignaciob, I also found space in the front fender for the HID igniter and ballast. 2 months of riding all conditions and everything still works. The light pattern isn't perfect; the reflector is made for an h1 bulb, but it is totally passable and a bunch more light than stock. I am using the HID kit that moves the bulb back and forth in the housing to create a high/low.

I took some pictures of the light patterns for reference. All photos were shot from the same distance with the same shutter speed and f-stop at the same distance-- shed is about 50' away and fence is 62'. First photo is stock headlight on low beam. Second is HID low.stock low beam.JPGhid h4 low beam.JPG
 
Just an FYI follow up that I'll likely be documenting in a new thread. I ran across an unused HID kit in my garage (yes, that's weird to say....I had totally forgotten about it as I was going to play some next generation HID games with my FJR and never did). Suffice it to say I've installed a 50 watt low-beam only HID with the ancillary ballast igniter in the nose of our TR650 with a moderate amount of work and the light output is strong as well as retains the correct cut-off.


You didn't have any problems? I tucked the ballast and the igniter in behind the headlight. At first the gauge cluster speed and temp letter slowly faded out, then the EWS error came up and the bike wouldn't run. Where did you put your ballast?
 
You didn't have any problems? I tucked the ballast and the igniter in behind the headlight. At first the gauge cluster speed and temp letter slowly faded out, then the EWS error came up and the bike wouldn't run. Where did you put your ballast?
Nope. No problems.

Look at the second picture and you can see the current ballast placement. ;)
 
Nope. No problems.

Look at the second picture and you can see the current ballast placement. ;)
My ballast was up higher under the cluster, I just extended the wires between the ballast and igniter. Hopefully I won't have the problem after I mount the ballast by the battery. I also removed all the low beam only shields off the bulb, I feel bad for anyone who drives slow on a one lane road in front of me later. But it's gonna be perfect in the woods.
 
I haven't seen it written up to change a headlight and guessing the procedure tells us to turn the handlebars and weasel things out, but I just couldn't get the protective boot off with my fingers...let alone put it back on. So, here's MY process for changing/upgrading the stock H4 headlight bulb.

In my case I upgraded to a Philips X-treme Power +80% bulb. Note that these bulbs are the same wattage as stock (55/60W), but purportedly produce more usable lumens. Now, I wouldn't necessarily agree it's 80% of the stock bulb, but do think it's a noticeable improvement with no increase in juice. I'm not a fan of over driving the stock wiring harness with higher wattage bulbs.

original-philips-x-treme-power-3500k-80-light-h4-bulb-free-ship-chyee1986-1008-06-chyee1986@3.jpg

First I had to start with Torx bits I had bought years ago and have scarcely used until now.

MWK09378b.JPG

This fastener is a T25 and used a 1/4" socket driver with a 1/4" socket.

MWK09379b.JPG

First off was remove the black cover with the 4 fasteners (they look like they're stainless steel) and set them aside.

MWK09374b.JPG

Next take off the remainder of the white plastic. The bottom two connection points are easily jiggled free from grommets.

MWK09375b.JPG

With the last piece off you can really see the underlying structure, wiring layout, and nooks and crannies you might want to do future farkling projects.

MWK09373b.JPG

The reflector is held in place by three total fasteners. Two side bolts and one top bolt. The top fastener adjusts the vertical position of the headlight beam and I made a mental note of about how many threads were exposed.

MWK09369b.JPG

Release this screw by going to the other side of the instrument panel with a long extension (below) and turn until the threads pop out from the white part (above).

MWK09380b.JPG

Now focus on the two fasteners on the sides. I also note relative position and tried to put back in the same spot. If you don't get these right you may find your light pattern is right or left of where it should be when you ride the motorcycle later. Regardless all three are adjustable after you put it all back together later if you need to.

MWK09372b.JPG

With the three fasteners removed you can remove the headlight assembly.

MWK09365b.JPG

Wiggle off the headlight connector. It's a three-prong type.

MWK09366b.JPG

Next, wiggle off the watertight cover. (This is the part I couldn't seem to do by turning the handlebars....or that it would have taken so long or frustrating for me than doing these steps).

MWK09367b.JPG

There are two wire bails you need to release and then the bulb will come free. Swap bulbs and remember not to touch the glass part and get oil from your finger on it. Reverse the process for installing things back.

MWK09368b.JPG

I didn't do a before or after shot, but can say there are more lumens on my garage wall than the stock bulb.

MWK09385b.JPG

And a final shot of the bulb's nicely "whiter" light than stock.

MWK09384b.JPG

Enjoy. :)
Thanks for the helpful photos - I just ordered a bulb and will be making this change in a week... On another note, the windshield it looks like you have looks like a great size and design. Can you tell me about it, how well it works? and where you found it? Thanks
 
Back
Top