• 4 Stroke Husqvarna Motorcycles Made In Italy - About 1989 to 2014
    TE = 4st Enduro & TC = 4st Cross

  • Hi everyone,

    As you all know, Coffee (Dean) passed away a couple of years ago. I am Dean's ex-wife's husband and happen to have spent my career in tech. Over the years, I occasionally helped Dean with various tech issues.

    When he passed, I worked with his kids to gather the necessary credentials to keep this site running. Since then (and for however long they worked with Coffee), Woodschick and Dirtdame have been maintaining the site and covering the costs. Without their hard work and financial support, CafeHusky would have been lost.

    Over the past couple of weeks, I’ve been working to migrate the site to a free cloud compute instance so that Woodschick and Dirtdame no longer have to fund it. At the same time, I’ve updated the site to a current version of XenForo (the discussion software it runs on). The previous version was outdated and no longer supported.

    Unfortunately, the new software version doesn’t support importing the old site’s styles, so for now, you’ll see the XenForo default style. This may change over time.

    Coffee didn’t document the work he did on the site, so I’ve been digging through the old setup to understand how everything was running. There may still be things I’ve missed. One known issue is that email functionality is not yet working on the new site, but I hope to resolve this over time.

    Thanks for your patience and support!

Let's play a game of "what's this?"

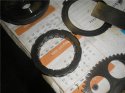
I found the last large chunk of debris once I pulled the cover.

It looks like it has to do with this assembly found on page O.35 of the manual:
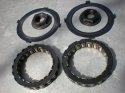
Remove the primary drive pinion (C) nut (27 mm wrench). Assemble: spacer
(30), washer (29), needle bearing (28), free wheel gear (27), ring (5) and free
wheel (4).


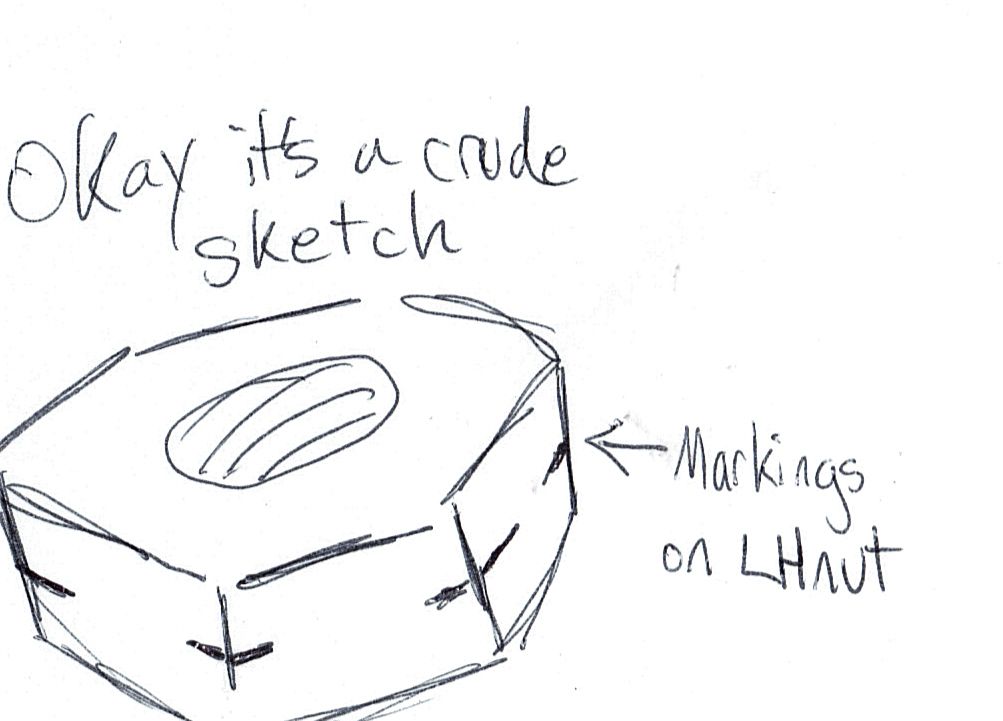
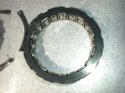
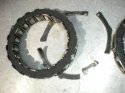
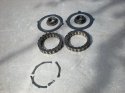
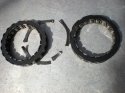
I've attached a picture Bill sent me that shows the above component (#4--free wheel)


I don't know what the metal ring does (upper right end of picture) but it is currently loose/ floppy at this time. Bill says that that ring should be tight, so I guess I'm on the right track.

He says that this issue is fairly common on 510's because of all of the compression. He recommends that the auto decomp. lever be pulled when starting, especially when cold (if I got that right).


UPDATE:

Now I'm stuck at getting the nut off so I can expose the above assembly.

I've tried 3 different half inch impact wrenches, one of which my machinist buddy said was rated at 400 ft/ lbs. He said that if it didn't get it off, nothing would. It didn't get it off.

I've tried a hand held torch to heat up the nut, and still nothing doing.
Please tell me someone has an idea as to how to get this nut off.

My last idea is to try a breaker bar and a sledge hammer, but don't know if that will do anything different than the impact wrenches.
 

Attachments

  • Primarydrive.jpg
    Primarydrive.jpg
    44.2 KB · Views: 81
Did you see my previous post about the primary drive nut being a left-hand thread (i.e. you turn it clockwise to loosen it)?

Apologies if you're doing that already. :)

Edit: whoops, I could've sworn I posted about that. Anyways, it's a left-hand thread. When you get the primary gear off take some pictures of the freewheel, as the new one needs to be fitted in the same direction - it is possible to fit 'em back to front. The (missing) circlip will indicate the direction of fitting. Be careful when you remove the freewheel as there's a bunch of rollers in it that will want to fall into your engine if their retaining garter spring is broken.

Apologies for referencing my phantom missing post...
 
Hi x39,

I checked the threads and they do not appear to be reversed. I can only see about a thread and a half and could be wrong.

I called Bill and he said that it looked like the nut needed to be turned counter clockwise to loosen it as well.

I'll call in to him tomorrow for a re- check unless someone chimes in and confirms what you have already said.

PS: I did try both ways to see if the nut would break free. If you are correct, which I don't doubt, then maybe I have tightened it that much more.

Thanks.


EDIT: I just went and re- checked thinking of course there's no way we both looked at it wrong. We were in fact wrong and you were correct. They are reversed threads.

Next question. What trick did you use to get the nut loose?
 
An air impact wrench can be used on all the internal fasteners successfully. Many times left hand fasteners will have a marking like a partial line half way through them. All my Kawasaki's have crank nuts with this type of marking on them. If your fastener has this type of marking you can be sure that it is left handed.

4-13-201072045PM.jpg
 
Thanks for the drawing and for the heads up. I just went and checked, no markings that I can see on this nut. You may have saved me some problems when I work on my KX down the road though.

I'll give it a go with a 3/4" impact gun tomorrow and see what gives. Do any of you think that a breaker bar struck with a sledge would be a better option? Luckily, I've got a buddy with a machine shop, and my dad's got an excavation company, so I've got access to plenty of big tools.
 
An old mechanics trick- Heat the nut with a torch(carefully) or a heat gun. When you get it good-n-hot, remove the heat and apply candle wax to the thread-to nut area. It will make a waxy mess. Let it cool for a few minutes while applying the wax. The cooling and contracting affect will suck in the wax and should make removing it easier.

Can't guarantee it will work, but Ive been amazed at what it has done for me.
 
Brandon Whitmore;89928 said:
Next question. What trick did you use to get the nut loose?

I made a gear jammer years ago out of some 1" x 1/2" aluminium bar. It fits between the clutch and primary gears and jams them together. Lucky I never threw it away! I knew the nut was going to be tight so I leaned on it with a single hex socket on a long breaker bar (I have no air wrench unfortunately). Motion Pro make a similar gear jamming tool - but I've not tried one.

You're nearly there now! Best check your primary drive nut to see if it's held up to the punishment. Check also the surfaces that the freewheel engages on (both in the primary drive gear and on the gear behind it). Light marking /high spots can be smoothed out with fine wet and dry. Remember the orientation when fitting the new freewheel - the crank spins clockwise when viewed from the clutch side, so that's when the unit needs to slip. Give it a good glug of engine oil on assembly too.

My ('04) manual states the torque for the primary drive nut is 108 lb/ft and the clutch hub nut is 55 lb/ft - best double check these though, in case they've changed.

Probably best to use a new tab washer for the clutch hub nut. Bend up the very end of the tab on the washer a little before fitting the nut, otherwise it's hard to get a punch under it, but don't bend it too far back, otherwise the nut will be hard to torque down. Motion Pro make a clutch bub holding tool. Don't be tempted to hold the hub by wedging a screwdriver against the clutch basket - the ears can break off cast aluminium baskets pretty easily. Oh, and as someone mentioned there's an o-ring fits under the engine cover gasket (at the front somewhere - can't quite remember) and another o-ring between the oil pump and cover (if your bottom end is the same as mine).

Hope all goes well!
 
Thanks for the detailed response. I didn't even know there was such as thing as a gear jammer, but it makes sense. I'll give the 3/4 gun a try, and if that doesn't pan out, I'll be off in search of a gear jammer.
 
Brandon Whitmore;89945 said:
Thanks for the drawing and for the heads up. I just went and checked, no markings that I can see on this nut. You may have saved me some problems when I work on my KX down the road though.

I'll give it a go with a 3/4" impact gun tomorrow and see what gives. Do any of you think that a breaker bar struck with a sledge would be a better option? Luckily, I've got a buddy with a machine shop, and my dad's got an excavation company, so I've got access to plenty of big tools.


If the nut has loctite on it, that makes it really hard for a impact to take off because it seems like it absorbs the impact. I was replacing wheel bearings on my truck that had a three bolts with loctite and they were supposed to be torqued to like 220 or somewhere close. But a 700ft.lb. impact wouldnt budge them. Even after I used a big breaker bar to back it off half a turn it still wouldnt take it off.

Also if the nut isnt held stationary it does the same thing and makes a impact almost useless on a tight fastener.
The gear jammer option that 7.62 mentioned is a good idea.
 
We tried a breaker bar this morning, but when turning righty loosey, the gears don't turn, so I am not sure where a gear jammer would go to detach the nut. We were thinking that maybe an oil filter strap wrench would work to secure things in place if the heat didn't, but thankfully we didn't have to go that route. What ended up working for me was an acetylene torch. Once the nut started to turn a slight reddish orange, the nut popped right off :thumbsup:

I'm heading down to the Husky shop this morning to see what parts he's got in stock. Later on when I get some time, I'll take some pictures of the issue, etc.

Thanks again to all of you for your time and assistance.
 
So was it left hand thread or not?

Good luck on your solution / getting your bike back on the road. :thumbsup:

Great stuff guys / excellent forum help for a husky brother :cheers:
 
Brandon Whitmore;90062 said:
We tried a breaker bar this morning, but when turning righty loosey, the gears don't turn, so I am not sure where a gear jammer would go to detach the nut.

Sorry I didn't make it clear, I should have said to temporarily refit the clutch basket. The jammer fits between the primary drive gear and the gear at the base of the basket.

Brandon Whitmore;90062 said:
Thanks again to all of you for your time and assistance.

The old girl will be up and about in no time, I'm sure. :thumbsup:
 
So was it left hand thread or not?

Righty loosey it was. Thanks 7point62.

Sorry I didn't make it clear, I should have said to temporarily refit the clutch basket.

No worries-- the heat made it simple.

The old girl will be up and about in no time, I'm sure.

Sort of.

Next question:

I have re- installed everything, but have not re- filled with oil yet. I went ahead to feel what my clutch felt like, and it feels like nothing. There's no resistance whatsoever.

When the clutch is re- installed, is there something I have to do to make the clutch work again? Man, I hope this isn't a dumb question.
 
Here's the pictures of the problem as promised.
The picture on the left shows the new one with the retention clip in place.
The picture on the right shows the damaged one with the clip that broke. Nothing else was wrong-- just the clip snapped and popped out.
 

Attachments

  • 1.jpg
    1.jpg
    82.5 KB · Views: 69
  • 2.jpg
    2.jpg
    83.7 KB · Views: 69
Here's some more pictures.

The left half of each picture is the damaged materials, while the right half of each is the new stuff.

The big clip with the nut sitting inside it's ring was damaged on the outer "fins", caused by the retaining clip breaking and hitting it. Also, I slightly stripped the nut so I replaced it, and the retention clip can not be purchased separately-- ya gotta purchase the entire assembly.
 

Attachments

  • 4.jpg
    4.jpg
    94 KB · Views: 43
  • 5.jpg
    5.jpg
    90.8 KB · Views: 36
  • 6.jpg
    6.jpg
    93.3 KB · Views: 37
Remember the orientation when fitting the new freewheel - the crank spins clockwise when viewed from the clutch side, so that's when the unit needs to slip. Give it a good glug of engine oil on assembly too.

The free wheel was easy to remember-- thanks to you I looked at it first. The side that has a directional arrow stamped into it faces outward, while the retainer clip (my failed side) faces inward.
 
My clutch lost all fluid in the process as well. Just back bleed it through the slave cylinder to replace the fluid. I went to the local feed store, picked up a small syringe and hooked a piece of carb vent line to it.
 
My clutch lost all fluid in the process as well. Just back bleed it through the slave cylinder to replace the fluid. I went to the local feed store, picked up a small syringe and hooked a piece of carb vent line to it.

Thanks Ken. I've never bled a clutch before, but will soon know how......

How does the fluid get lost when nothing was opened up on the line?
 
I just took off my right side cove do to a stripped oil weep plug. Low and behold I found that exact same snap ring in the bottom of my case.
Do I have to buy the freewheel as an assembly and what did it run you?
Thanx
 
Back
Top