• Husqvarna Motorcycles Made In Sweden - About 1988 and older

  • Hi everyone,

    As you all know, Coffee (Dean) passed away a couple of years ago. I am Dean's ex-wife's husband and happen to have spent my career in tech. Over the years, I occasionally helped Dean with various tech issues.

    When he passed, I worked with his kids to gather the necessary credentials to keep this site running. Since then (and for however long they worked with Coffee), Woodschick and Dirtdame have been maintaining the site and covering the costs. Without their hard work and financial support, CafeHusky would have been lost.

    Over the past couple of weeks, I’ve been working to migrate the site to a free cloud compute instance so that Woodschick and Dirtdame no longer have to fund it. At the same time, I’ve updated the site to a current version of XenForo (the discussion software it runs on). The previous version was outdated and no longer supported.

    Unfortunately, the new software version doesn’t support importing the old site’s styles, so for now, you’ll see the XenForo default style. This may change over time.

    Coffee didn’t document the work he did on the site, so I’ve been digging through the old setup to understand how everything was running. There may still be things I’ve missed. One known issue is that email functionality is not yet working on the new site, but I hope to resolve this over time.

    Thanks for your patience and support!

Need advice on performance 83 250 XC

No! Do not run the bike until you do the leak down test. If it has a serious air leak, you risk the motor running to lean (sucking in air) and it could quickly sieze, ruining your new piston and fresh bore job. Not to mention wasting a future bore size.

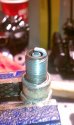
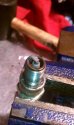
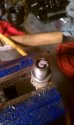
Yes the adapter has a through hole to pump air into the motor and is the same diameter as a 38mm Mikuni. I just slip it in and clamp it with the carb clamp.

I have a nice 250 pipe and silencer for you (just needs a paint job). Send me an email to coolhuh73@cs.com and I'll send you some pics. We can work out a deal you can't refuse.

Not to sure if JB Weld will stand up to the heat, especially in that section of the pipe. Exhaust is considerably hotter in lead section.
 
Another thought. We talked about the gas tank venting properly to supply fuel to the carb, but never discussed the float level.

A low float level will cause a lean condition and a high level can cause it to run rich.

The float level can be set using a standard triangular "Stanley" knife blade, as it's the proper height.

Remove the float bowl gasket and lay the blade against one side of the float arm.

Bend the tang between the floats until the base of the arm is at the height of the knife blade. Then if the arms are not level with the blade, bend the arms up or down on each side, until they are level with the blade.
 
I did something similar when going through the carb. I followed the advice on this YouTube video. The pertinent part is at timecode 5:55 and after. My float arms measured 22/32nds, or 0.66in, so I didn't adjust the tang. But that IS at the bottom of the acceptable range.

Interestingly, the knife blade is 24/32nds or .75in. That's just a wee bit (0.01th) "higher" than spec I saw, but not significant I guess; that's a PRO Tip, @Ron, and much easier than what I did. I suspect I may have to adjust mine a bit if she does run lean after I've addressed the other issues.

See attached for the spec I used.
 

Attachments

  • HuskyCarbFloatLevel.JPG
    HuskyCarbFloatLevel.JPG
    72.2 KB · Views: 16
I did something similar when going through the carb. I followed the advice on this YouTube video. The pertinent part is at timecode 5:55 and after. My float arms measured 22/32nds, or 0.66in, so I didn't adjust the tang. But that IS at the bottom of the acceptable range.

Interestingly, the knife blade is 24/32nds or .75in. That's just a wee bit (0.01th) "higher" than spec I saw, but not significant I guess. I suspect I may have to adjust mine a bit if she does run lean after I've addressed the other issues.

See attached for the spec I used.

The blade just makes it quick and easy.
 
So is there no head gasket on these engines? I see this picture in the assembly manual:

HuskyLapHead.JPG

and I wonder if that is what everyone does. Does the grinding paste stay, or does one take the head back off and wipe it clean?
 
So is there no head gasket on these engines? I see this picture in the assembly manual:

View attachment 22777

and I wonder if that is what everyone does. Does the grinding paste stay, or does one take the head back off and wipe it clean?
Yes, make sure clean off the grinding paste otherwise you risk all sorts of damage to your engine.
 
Thanks @adam6402. I felt silly asking that, but it seems strange to not have a head gasket; figured it was better to ask.
 
Heat transfer is better without a gasket. A gasket presents another pair of surface the heat must cross.
Use valve lapping paste to lap the head to the barrel and then have your wife wash them in the kitchen sink with hot soapy water.
Blow it completely dry and immediately spray it with WD40, until your ready to install it.
When your ready to install, wash it again and dry it completely, but this time wipe the liner with a clean cloth and alcohol, then coat the liner, piston, wrist pin and bearing with your favorite premix oil and install. I always pour a bit on the bottom rod bearing too. If it's a complete rebuild I use a good bit more.
 
The pipe was full of squirrel :), acorn caps, moss, etc. The airbox too. I blew the pipe out with compressed air and loosened the internals with some shaking and banging. I have no silencer on it now, so it is straight pipe from cylinder to ears :)

I -did- have two rust spots that I had to patch. I used my Dremmel to grind the spots to good metal, then stripped away rust on the outside. I used some screen wire and JB Weld to patch. I'll smooth out the patches with the Dremmel once I start the cosmetics part. See attached.

The Bike is never going to run right with out any Silencer. It might run OK but by not having it You are changing the Jetting etc. This is not all your problem but it is contributing to it.
 
Got it, thanks lads.

Speaking of silencers, what packing do you guys use? The image in the parts fiche/pdf looks like a cartridge and is called "absorber." Philip / Husqvarna-parts has what looks like a blanket of fiberglass-like material. Do y'all just roll it up like a sleeping bag and stuff it in?
 
Heat transfer is better without a gasket. A gasket presents another pair of surface the heat must cross.
Use valve lapping paste to lap the head to the barrel and then have your wife wash them in the kitchen sink with hot soapy water.
Blow it completely dry and immediately spray it with WD40, until your ready to install it.
When your ready to install, wash it again and dry it completely, but this time wipe the liner with a clean cloth and alcohol, then coat the liner, piston, wrist pin and bearing with your favorite premix oil and install. I always pour a bit on the bottom rod bearing too. If it's a complete rebuild I use a good bit more.

What grit do you guys use for your lapping paste? Is the Permatex in a tube advisable, or stick with Clover?
 
These bikes like a descent muffler to assist in port scavenging, you would risk a lean out at the exhaust if you run it without the muffler at peak revs too much and it could affect low end power a fair bit not having it installed. between that and the gas cap, you probably dodged a melted spark plug bullet there;)

I use steel wool wrapped around the core reasonably Tightly, works well.

Note: This model had some issues with cylinder head studs with the nut tightening on the stud before pulling the head down to correct tension. check there is ample thread below the head nut surface or add a couple of flat washers to make sure you can get correct even tension on all studs. Ol mate seized 3 pistons before we discovered this and others on the site have experienced the same issue...
 
Report #2: little progress. I finally got the ol' girl back out today. I followed that good practice of only changing one thing at a time.
  • First I got the gas cap plug clear: no improvement.
  • I ran without the K&N filter: a minuscule improvement.
  • I loosened the gas cap all the way while accelerating: no improvement.
  • K&N back on, I adjusted the air screw to 1 1/2 turns out from full seat: no improvement.
  • Adjusted air screw by 1/4 turns both ways for 1 1/2 turns: slight improvement at 1 turn out from full seat.
Then I ran out of daylight.
I have replaced the K&N with a UNI and cage per original. I've replaced the fuel and vent lines with new ones, and installed a new in-line fuel filter. My silencer hasn't arrived yet, so I can't test with that yet. If the lack of a silencer is part of the problem, I just have to wait a bit more.
To reiterate the symptoms:
  • Running 92 octane pump fuel with Pro-Honda oil at 32:1. (I found some VP C12 fuel locally, and I'll prolly switch to Silkolene after this 1/2 tank is gone)
  • Running Bel-ray Gearsaver 75wt in the case (Prolly switching to tractor fluid next)
  • Starts and idles fine. One note: it will hit on the first kick when the "starter system" is engaged, but has yet to start. I have to disengage the "starter system" lever, and kick about six times, varying from no throttle to 1/4 throttle. Once she warms up a bit, she starts on first kick.
  • She bogs at low RPM. From a sitting start, as well as low RPM while moving.
  • She bogs at higher RPM.
  • She occasionally catches her powerband and runs strong for a little, then bogs again.
Tomorrow I intend to reset to 1 1/2 turns on the air screw, and try it out with the UNI filter. I have not checked the timing yet (not sure how that will go, never done it before, but I'll use @Ron's advice on 2.55mm BTDC. How does one determine that, BTW?)
I am not optimistic at this point that the UNI filter will fix things. Perhaps it is indeed the absence of a silencer, but I recall running without one back in the day as well. But that WAS 26 years ago...
Stand by for my next report.
 
G. do you have an R-2 needle jet to try? When you say it bogs. Is it 4 stroking (blubbering rich kinda ba bum ba bum ba bum) or is it hunting giving a baawhaaaa sound when you open the throttle? 4 stroking is to rich, hunting is to lean. My guess is it's 4 stroking, because an R-4 needle jet sounds to big.

Try an R-2 with the needle clip one down from the top. That will be leaner than what you have now. If it "catches her powerband and runs strong for a little, then bogs again", your main jet may be wrong.

A good idea is to mark your throttle with a piece of masking tape so you can see when your at 1/4, 1/2, 3/4 and full. That way, when you hold the throttle steady you can isolate where the jettting is off.

Starting with the pilot jet (make sure the motor is warm). If your getting an improvement closing the air screw down to one turn open, your pretty close and could probably call that good. If it's any less than one turn open, I would try a 40 pilot and see if that cleans up the idle.

Does it run off the choke right away when it's cold? If it does, that's another indication the pilot is to big.

Have someone hold the throttle steady at a slightly high rpm (to hard to do by yourself while trying to adjust the air screw). Adjust the air screw both in and out to find here it starts to go lean and starts to go rich. The middle between these to points will be the best position. In other words if it starts to get rich at one turn out and then get lean at two turns out, 1-1/2 turns out will be your best setting.

You can fine tune in this range by cracking the throttle wide open and see how it responds, but that should wait until you have sorted out the rest of the jetting.

After your satisfied with the pilot jet, move the clip on the needle to the top position and run the bike with the main jet left out. The bike should run reasonble well up to around 1/2 to 3/4 throttle, but stumble severly as you go from 3/4 to wide open. If it continues to rev thru 3/4 to wide open, the R-2 is to small and you'll have to go back to the R-4.

If the restriction in the needle jet (R-2) lets it rev out past 3/4 throttle, it won't matter how large the main jet is, because your not getting adequate flow through the needle jet to the main jet.

Now you can start seaching out the main jet. Put the clip on the needle back to the middle position for now and it's always a good idea to start with a main jet that's to large (rich) and work your way down (lean).

When you have found a main jet that revs out completely, your approaching the danger zone and it might be best to go back to the last larger size to prevent siezing when wide open. Careful plug readings will have to be down to run any leaner.

With the pilot and the main jet settled you can go about cleaning up the mid range and throttle response (where most of us ride most of the time). Raising the clip on the needle toward the top lowers the needle and leans the mixture. Lowering the clip from the top down raises the needle and richens the mixture.

As you run the bike holding the throttle steady it should run smoothly and 4 stroke slightly as you back the throttle off slightly. If it sound flat when you backoff raise the needle (lower the clip). If it blubbers to much when you backoff, lower the needle (raise the clip).

Finally, if your getting a slight stumble off idle you need to determine whether it went flat lean or blubbered rich. The cutaway on the slide is controlling the off idle to 1/8 throttle. More cutaway will lean the mixture and less will richen it.

Timing:

To set the timing you will need a dial indicator that can be placed through the spark plug hole. Use the dial indiactor to find top dead center and then rotate the crankshaft counter-clockwise to find 2.55mm before top dead center.

It's best to rotate the crank counter-clockwise past the timing and then turn it clockwise to the setting. This will take up any slack in the crank assembly.

You will need to remove your flywheel so you can loosen the screws holding the stator plate to the cases. When the screws are loose, put the flywheel back on (doesn't have to be tightened).

With the flywheel in place you'll need a 2mm pin that fits through a hole in the flywheel and locates into a hole in the stator. Align the two with the piston at 2.55mm BTDC and your set.

Take out the pin, remove the flywheel and tighten the stator screws. Put the flywheel back on and torque it. Double check the timing and your done.
 
I want a "Ron Garage Technician" tee-shirt once I do all those things, my friend! Thank you for the time it took to write that up.

To your questions:

I don't have any extra jets at the moment. I best gets some ordered!

I think it is 4-stroking. But, the plug is not sooty or wet. I'll go snap a picture of the plug and edit into this post.
 

Attachments

  • HuskyPlug-WithFlash.jpg
    HuskyPlug-WithFlash.jpg
    70.9 KB · Views: 14
  • HuskyPlag2-WithFlash.jpg
    HuskyPlag2-WithFlash.jpg
    70.6 KB · Views: 15
  • HuskyPlug-NoFlash.jpg
    HuskyPlug-NoFlash.jpg
    59.4 KB · Views: 15
  • HuskyPlug2-NoFlash.jpg
    HuskyPlug2-NoFlash.jpg
    66.5 KB · Views: 14
Back
Top